Jeep XJ. Manual - part 328


  Index      Jeep     Jeep XJ - service repair manual 2001 year


Search            


Content   ..  326  327  328  329   ..


Jeep XJ. Manual - part 328


CAUTION: When servicing exhaust system compo-
nents, disconnect the oxygen sensor connector.
Allowing the exhaust system to hang by the oxygen
sensor harness will damage the wiring and/or sen-
sor.

REMOVAL

(1) Raise and support the vehicle.
(2) Remove the clamps from the catalytic converter

and muffler connection (Fig. 14).

(3) Disconnect and remove the oxygen sensor from

the catalytic converter.

(4) Heat the catalytic converter and muffler con-

nection with an oxyacetylene torch until the metal
becomes cherry red.

(5) While the metal is still cherry red, twist the

muffler assembly back and forth to separate it from
the catalytic converter.

(6) Disconnect the exhaust pipe from the catalytic

converter (Fig. 14). If needed, heat up the pipes to
separate.

INSTALLATION

(1) Connect the catalytic converter to the exhaust

pipe and the muffler/tailpipe assy. (Fig. 14). Use a
new clamp and tighten the nuts to 61 N·m (45 ft.
lbs.) torque.

(2) Install the muffler onto the catalytic converter

until the alignment tab is inserted into the align-
ment slot.

(3) Install a new clamp at the muffler and cata-

lytic converter connection (Fig. 14). Tighten the
clamp nut to 61 N·m (45 ft. lbs.) torque.

(4) Coat the oxygen sensor with anti-seize com-

pound. Install the sensor and tighten the nut to 27
N·m (20 ft. lbs.) torque.

(5) Lower the vehicle.
(6) Start the engine and inspect for exhaust leaks

and exhaust system contact with the body panels.
Adjust the alignment, if needed.

CATALYTIC CONVERTER—LATE BUILD

WARNING: IF TORCHES ARE USED WHEN WORK-
ING ON THE EXHAUST SYSTEM, DO NOT ALLOW
THE FLAME NEAR THE FUEL LINES.

CAUTION: When servicing exhaust system compo-
nents, disconnect the oxygen sensor connector.
Allowing the exhaust system to hang by the oxygen
sensor harness will damage the wiring and/or sen-
sor.

REMOVAL

(1) Raise and support the vehicle.
(2) Disconnect and remove the oxygen sensor from

the catalytic converter.

(3) Saturate the bolts and nuts with Mopar

t Rust

Penetrant. Allow 5 minutes for penetration.

(4) Remove the nuts and bolts then disconnect the

catalytic converter flange from the muffler flange.

(5) Remove the nuts from the catalytic converter to

exhaust pipe flange and remove catalytic converter
and gasket from vehicle (Fig. 15).

INSTALLATION

(1) Position a new gasket then position catalytic

converter onto exhaust pipe (Fig. 15), install three
mounting nuts. DO NOT tighten nuts at this time.

(2) Position muffler flange onto catalytic converter

flange and install nuts and bolts. Tighten Nuts to
28.5 N·m (21 ft. lbs.).

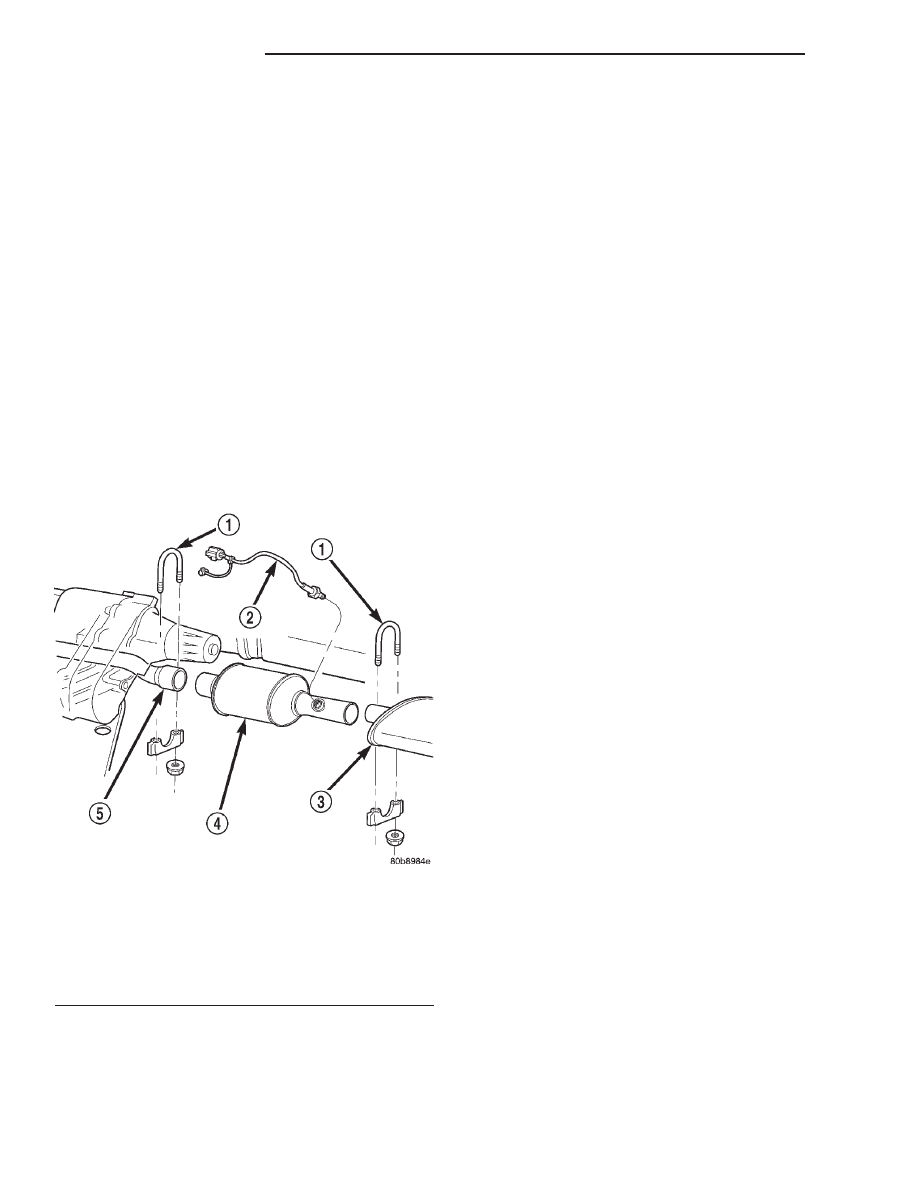
Fig. 14 Catalytic Converter to Muffler and Exhaust

Pipe Connection—Early Build

1 – EXHAUST CLAMP ASSEMBLY
2 – OXYGEN SENSOR
3 – MUFFLER
4 – CATALYTIC CONVERTER
5 – EXHAUST PIPE

11 - 8

EXHAUST SYSTEM

XJ

REMOVAL AND INSTALLATION (Continued)

2000 XJ Service Manual
Publication No. 81-370-0046
TSB 26-03-00

March, 2000

(3) Tighten catalytic converter to exhaust pipe

flange mounting nuts to 28.5 N·m (21 ft. lbs.).

(4) Install oxygen sensor into catalytic converter.

Connect oxygen sensor.

(5) Lower vehicle.
(6) Start engine check for leaks.

MUFFLER AND TAILPIPE—EARLY BUILD

All original equipment exhaust systems are manu-

factured with the exhaust tailpipe welded to the muf-
fler.

Service

replacement

mufflers

and

exhaust

tailpipes are either clamped together or welded
together.

WARNING: IF TORCHES ARE USED WHEN WORK-
ING ON THE EXHAUST SYSTEM, DO NOT ALLOW
THE FLAME NEAR THE FUEL LINE.

CAUTION: When servicing exhaust system compo-
nents, disconnect the oxygen sensor connector.
Allowing the exhaust system to hang by the oxygen
sensor harness will damage the wiring and/or sen-
sor.

REMOVAL

(1) Raise and support the vehicle.
(2) Disconnect front tailpipe hanger from the insu-

lator (Fig. 16).

(3) Remove the front exhaust clamp from the cat-

alytic converter and muffler connection (Fig. 17).

(4) Heat the catalytic converter-to-muffler connec-

tion with an oxyacetylene torch until the metal
becomes cherry red.

(5) While the metal is still cherry red, remove the

exhaust muffler/tailpipe assembly from the catalytic
converter.

(6) Slide the muffler/tailpipe assy. rearward and

out of the rear exhaust tailpipe mounting bracket
(Fig. 17).

(7) Remove the muffler from the exhaust tailpipe:
• To remove an original equipment exhaust muf-

fler/tailpipe combination, cut the exhaust tailpipe
close to the muffler. Collapse the part remaining in
the muffler and remove.

• To remove a service exhaust tailpipe/muffler

combination, apply heat until the metal becomes
cherry red. Remove the exhaust tailpipe/muffler
clamp and twist the exhaust tailpipe out of the muf-
fler.

Fig. 15 Catalytic Converter—Late Build

1 – NUT
2 – CATALYTIC CONVERTER TO MUFFLER FLANGE JOINT
3 – CATALYTIC CONVERTER
4 – GASKET
5 – EXHAUST PIPE FLANGE JOINT

Fig. 16 Front Exhaust Tailpipe Hanger

1 – MUFFLER
2 – INSULATOR
3 – TAILPIPE
4 – FRONT TAILPIPE HANGER

XJ

EXHAUST SYSTEM

11 - 9

REMOVAL AND INSTALLATION (Continued)

2000 XJ Service Manual
Publication No. 81-370-0046
TSB 26-03-00

March, 2000

INSTALLATION

(1) Install the muffler onto the catalytic converter.

Install the clamp and tighten the nut finger tight.

(2) Install the exhaust tailpipe into the rear of the

muffler.

(3) Install the exhaust tailpipe/muffler assembly

on the rear exhaust tailpipe mounting bracket. Make
sure that the exhaust tailpipe has sufficient clear-
ance from the floor pan.

(4) Install front tailpipe hanger into the insulator

(Fig. 16).

(5) Align the muffler and tighten the nuts on the

muffler-to-catalytic converter clamp to 61 N·m (45 ft.
lbs.) torque (Fig. 17).

(6) Align the tailpipe and install a new clamp at

the muffler to tailpipe connection.

(7) Tighten the muffler to tailpipe clamp to 61 N·m

(45 ft. lbs.)

(8) Lower the vehicle.
(9) Start the engine and inspect for exhaust leaks

and exhaust system contact with the body panels.
Adjust the alignment, if needed.

MUFFLER AND TAILPIPE—LATE BUILD

All original equipment exhaust systems are manu-

factured with the exhaust tailpipe welded to the muf-
fler.

Service

replacement

mufflers

and

exhaust

tailpipes are either clamped together or welded
together.

WARNING: IF TORCHES ARE USED WHEN WORK-
ING ON THE EXHAUST SYSTEM, DO NOT ALLOW
THE FLAME NEAR THE FUEL LINE.

CAUTION: When servicing exhaust system compo-
nents, disconnect the oxygen sensor connector.
Allowing the exhaust system to hang by the oxygen
sensor harness will damage the wiring and/or sen-
sor.

Fig. 17 Muffler/Tailpipe Removal and Installation—Early Build

1 – TAIL PIPE HANGER CLAMP
2 – MUFFLER AND TAIL PIPE HANGER
3 – CLAMP

4 – CATALYTIC CONVERTER
5 – MUFFLER AND TAIL PIPE ASSEMBLY
6 – TAIL PIPE

11 - 10

EXHAUST SYSTEM

XJ

REMOVAL AND INSTALLATION (Continued)

2000 XJ Service Manual
Publication No. 81-370-0046
TSB 26-03-00

March, 2000

REMOVAL

(1) Raise and support the vehicle.
(2) Disconnect front tailpipe hanger from the insu-

lator (Fig. 18).

(3) Remove the mounting nuts from the muffler to

catalytic converter flange (Fig. 18).

(4) Remove the clamp retaining the tailpipe to the

rear tailpipe hanger (Fig. 18).

(5) Remove the muffler and tailpipe assembly from

the vehicle.

INSTALLATION

(1) Position muffler and tailpipe assembly into

vehicle.

(2) Install clamp retaining tailpipe to the rear

tailpipe hanger (Fig. 18). DO NOT

(2) tighten clamp at this time.
(3) Install mounting nuts onto the muffler to cata-

lytic converter flange studs (Fig. 18). DO NOT
tighten nuts at this time.

Fig. 18 Muffler/Tailpipe Removal and Installation—Late Build

1 – EXHAUST PIPE FLANGE JOINT
2 – REAR TAILPIPE HANGER
3 – FRONT TAILPIPE HANGER
4 – MUFFLER

5 – FLANGE JOINT
6 – CATALYTIC CONVERTER
7 – NUT

XJ

EXHAUST SYSTEM

11 - 11

REMOVAL AND INSTALLATION (Continued)

2000 XJ Service Manual
Publication No. 81-370-0046
TSB 26-03-00

March, 2000


Content   ..  326  327  328  329   ..