Jeep Wrangler TJ. Manual - part 544


  Index      Jeep     Jeep Wrangler TJ - service repair manual 2005 year


Search            


Content   ..  542  543  544  545   ..


Jeep Wrangler TJ. Manual - part 544


FULL DOOR

TABLE OF CONTENTS

page

page

DOOR

REMOVAL

. . . . . . . . . . . . . . . . . . . . . . . . . . . . . 18

INSTALLATION

. . . . . . . . . . . . . . . . . . . . . . . . . 18

ADJUSTMENTS

ADJUSTMENT

. . . . . . . . . . . . . . . . . . . . . . . . 18

DOOR GLASS

REMOVAL

. . . . . . . . . . . . . . . . . . . . . . . . . . . . . 19

INSTALLATION

. . . . . . . . . . . . . . . . . . . . . . . . . 19

WINDOW REGULATOR

REMOVAL

. . . . . . . . . . . . . . . . . . . . . . . . . . . . . 19

INSTALLATION

. . . . . . . . . . . . . . . . . . . . . . . . . 20

EXTERIOR HANDLE

REMOVAL

. . . . . . . . . . . . . . . . . . . . . . . . . . . . . 20

INSTALLATION

. . . . . . . . . . . . . . . . . . . . . . . . . 20

GLASS RUN CHANNEL

REMOVAL

. . . . . . . . . . . . . . . . . . . . . . . . . . . . . 21

INSTALLATION

. . . . . . . . . . . . . . . . . . . . . . . . . 21

HINGE

REMOVAL

. . . . . . . . . . . . . . . . . . . . . . . . . . . . . 21

INSTALLATION

. . . . . . . . . . . . . . . . . . . . . . . . . 21

INSIDE HANDLE ACTUATOR

REMOVAL

. . . . . . . . . . . . . . . . . . . . . . . . . . . . . 22

INSTALLATION

. . . . . . . . . . . . . . . . . . . . . . . . . 22

LATCH

REMOVAL

. . . . . . . . . . . . . . . . . . . . . . . . . . . . . 22

INSTALLATION

. . . . . . . . . . . . . . . . . . . . . . . . . 22

LATCH STRIKER

REMOVAL

. . . . . . . . . . . . . . . . . . . . . . . . . . . . . 23

INSTALLATION

. . . . . . . . . . . . . . . . . . . . . . . . . 23

LOCK CYLINDER

REMOVAL

. . . . . . . . . . . . . . . . . . . . . . . . . . . . . 23

INSTALLATION

. . . . . . . . . . . . . . . . . . . . . . . . . 23

TRIM PANEL

REMOVAL

. . . . . . . . . . . . . . . . . . . . . . . . . . . . . 23

INSTALLATION

. . . . . . . . . . . . . . . . . . . . . . . . . 23

DOOR

REMOVAL

(1) Open the door.
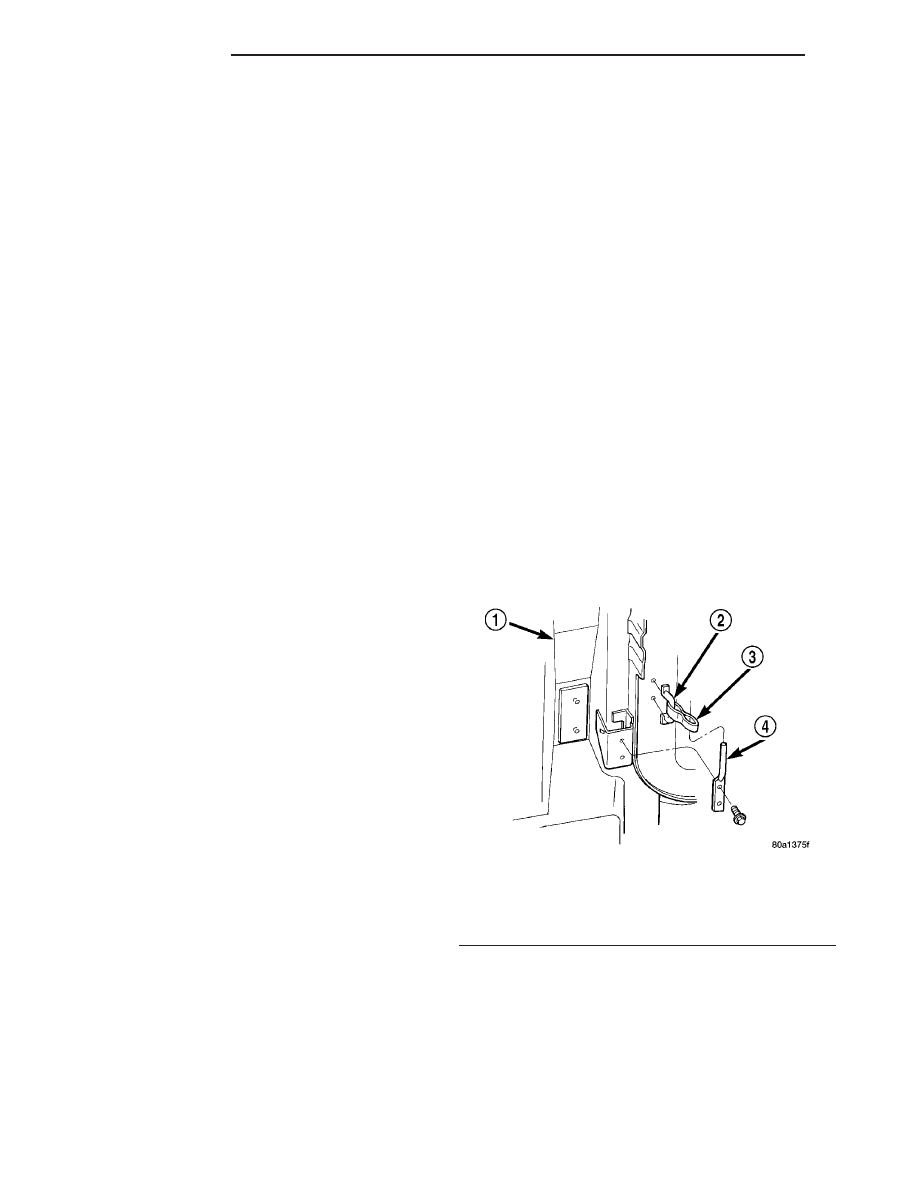
(2) Disconnect the door restraint strap from the

pin (Fig. 1).

(3) Remove the nuts at the door hinge pivots and

lift the door from the body.

INSTALLATION

(1) Position the door in the hinge and install the

nuts.

(2) Connect the door restraint strap at the pin.

ADJUSTMENTS

ADJUSTMENT

The doors are adjusted at the hinge attaching loca-

tions on either the body or the door. Enlarged holes
are located in the body (lower hinge only) for fore, aft
and tilt adjustments. Enlarged holes are also located
in the door (upper and lower hinges) for up, down,
fore, aft and tilt adjustments.

Prior to door adjustment or alignment, the door

latch must be removed to allow the door to close
freely and be properly aligned.

The door latch striker should be adjusted in or out

to allow the door latch to be fully engaged. The door
should be flush with the adjacent body panels.

Fig. 1 RESTRAINT STRAP

1 - BODY
2 - FOOTMAN LOOP
3 - STRAP
4 - RESTRAINT PIN

23 - 18

FULL DOOR

TJ

DOOR GLASS

REMOVAL

(1) Remove the door trim panel and the waterdam.

(Refer to 23 - BODY/FULL DOOR/TRIM PANEL -
REMOVAL)

(2) Pull the door glass run channel from the door

sail.

(3) Roll glass fully downward.
(4) Using a trim stick C-4755 or equivalent,

remove the screws and remove the door sail panel
(Fig. 2) and (Fig. 3).

(5) Roll glass 1/4 upward to access regulator arm

guide.

(6) Remove the screws that attach the regulator

arm guide to the glass.

(7) Lift the glass upward while tilting inward and

remove from the door.

INSTALLATION

(1) Position the glass in the door ensuring the

glass is aligned in the glass run channel.

(2) Install the screws that attach the regulator

arm guide to the glass.

(3) Install the door sail panel.
(4) Install the run channel in the door sail.
(5) Install the waterdam and the door trim panel.

(Refer to 23 - BODY/FULL DOOR/TRIM PANEL -
INSTALLATION)

WINDOW REGULATOR

REMOVAL

(1) Remove door glass. (Refer to 23 - BODY/FULL

DOOR/DOOR GLASS - REMOVAL)

(2) Loosen the bolts in the slotted holes (Fig. 4).
(3) Remove the bolts attaching the regulator to the

door inner panel.

(4) Lift the regulator upward to free it from the

slotted holes in the door inner panel.

(5) Lower the regulator and remove it through the

access hole in the door inner panel (Fig. 5).

Fig. 2 DOOR SAIL SCREWS

1 - DOOR SAIL
2 - DOOR

Fig. 3 DOOR SAIL REMOVAL

1 - DOOR FRAME
2 - TRIM STICK
3 - DOOR SAIL

Fig. 4 WINDOW REGULATOR BOLTS

1 - LOOSEN BOLTS
2 - REMOVE BOLTS

TJ

FULL DOOR

23 - 19

INSTALLATION

(1) Position the regulator in the door.
(2) Align regulator bolts into slotted holes.
(3) Install bolts attaching regulator to the inner

door panel.

(4) Tighten the bolts in the slotted holes.
(5) Install door glass. (Refer to 23 - BODY/FULL

DOOR/DOOR GLASS - INSTALLATION)

EXTERIOR HANDLE

REMOVAL

(1) Remove the door trim panel. (Refer to 23 -

BODY/FULL DOOR/TRIM PANEL - REMOVAL)

(2) Position the window in the full upward posi-

tion.

(3) Remove the grab handle support bracket (Fig.

6).

(4) Peel back the waterdam from the door inner

panel to access the door latch.

(5) Disconnect from the latch, the inside lock knob

to latch rod and, the outside release handle to latch
rod.

(6) Disengage tail of retainer from handle keeper.
(7) Using a long flat blade, tap the handle keepers

upward and remove from the door handle (Fig. 7).

(8) Remove the latch release rod from the door

handle.

(9) Separate the handle and gasket from the door.

INSTALLATION

(1) Engage the latch release rod to the door han-

dle.

(2) Position the gasket and handle in the door.

(3) Slide the keepers into the door handle from the

top.

(4) Lower the window.
(5) Using a long flat blade, lightly tap the handle

keepers downward to secure the handle. The tail of
the retainer must be positioned on the 2nd or 3rd
step from the bottom on the handle keeper.

(6) Raise the window.

Fig. 5 REGULATOR REMOVAL

1 - DOOR
2 - REGULATOR ASSEMBLY

Fig. 6 GRAB HANDLE SUPPORT BRACKET

1 - FULL DOOR
2 - GRAB HANDLE BRACKET
3 - TRIM PANEL
4 - NUT

Fig. 7 OUTSIDE DOOR HANDLE REMOVAL

1 - TAIL
2 - OUTSIDE HANDLE
3 - RETAINER
4 - HANDLE KEEPER
5 - DOOR

23 - 20

FULL DOOR

TJ

WINDOW REGULATOR (Continued)

(7) Connect to the latch, the inside lock knob to

latch rod and, the outside release handle to latch rod.

(8) Reposition the waterdam
(9) Install the grab handle support bracket.
(10) Install the door trim panel. (Refer to 23 -

BODY/FULL DOOR/TRIM PANEL - INSTALLA-
TION)

GLASS RUN CHANNEL

REMOVAL

(1) Lower the window.
(2) Using a trim stick C-4755 or equivalent, care-

fully pry the glass run channel weatherstrip from the
window opening frame.

(3) Remove the door glass. (Refer to 23 - BODY/

FULL DOOR/DOOR GLASS - REMOVAL)

(4) Grasp the glass run channel weatherstrip in

the door (Fig. 8) and pull from the channel.

INSTALLATION

NOTE: Applying a small amount of lubricant to the
weatherstrip may ease the installation.

(1) Position the weatherstrip in the lower door

channels and press into place.

(2) Install the door glass. (Refer to 23 - BODY/

FULL DOOR/DOOR GLASS - INSTALLATION)

(3) Position the weatherstrip in the window open-

ing frame and press into place.

NOTE: Ensure that the glass is seated properly.
Improperly seated door glass will result in high
glass roll-up/roll-down effort.

HINGE

REMOVAL

(1) Remove the door. (Refer to 23 - BODY/FULL

DOOR/DOOR - REMOVAL)

(2) Using a grease pencil or equivalent, mark the

outline of the existing hinge on the body and the door
for installation alignment reference.

(3) Remove the nut from the upper hinge pin (Fig.

9).

NOTE: When removing the door or hinge DO NOT
discard the plastic shims or the hinge pin.

(4) Remove the hinge-to-body screws and the

hinge-to-door screws. Remove the hinge from the
door and body. Support the door as necessary. The
upper hinge is integrated with the windshield hinge.
When removing it, support the windshield frame
with an appropriate device prior to removal.

INSTALLATION

(1) Clean the replacement hinge with an appropri-

ate solvent and dry it with compressed air.

(2) Paint the hinge to match the vehicle body.
(3) Lubricate the hinge with spray lubricant.
(4) Position the hinge on the door, align carefully

with the wax pencil installation alignment reference
marks, and install the screws.

Fig. 8 FULL DOOR GLASS RUN CHANNEL

WEATHERSTRIP

1 - WINDOW GLASS
2 - REGULATOR
3 - GROMMET
4 - GLASS RUN CHANNEL WEATHERSTRIP
5 - DOOR

Fig. 9 FULL DOOR HINGE

1 - HINGE HALF
2 - HINGE HALF
3 - TAPPING PLATE
4 - HINGE HALF
5 - HINGE HALF

TJ

FULL DOOR

23 - 21

EXTERIOR HANDLE (Continued)


Content   ..  542  543  544  545   ..