Jeep Wrangler TJ. Manual - part 521


  Index      Jeep     Jeep Wrangler TJ - service repair manual 2005 year


Search            


Content   ..  519  520  521  522   ..


Jeep Wrangler TJ. Manual - part 521


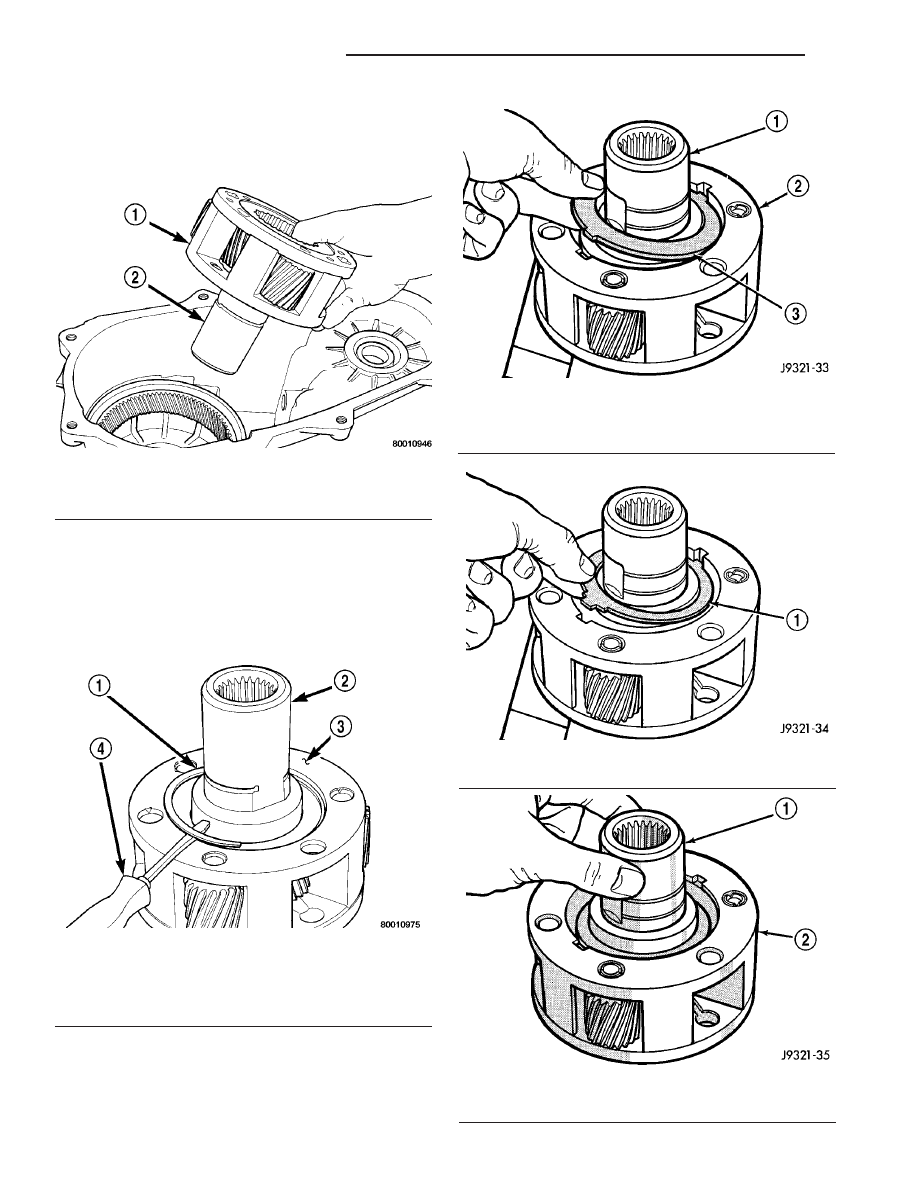
(5) Place front case in horizontal position. Then

remove input gear and low range gear as an assem-
bly (Fig. 28). Tap gear out of bearing with plastic
mallet if necessary.

INPUT AND LOW RANGE GEAR

(1) Remove snap-ring that retains input gear in

low range gear (Fig. 29).

(2) Remove retainer (Fig. 30).
(3) Remove front tabbed thrust washer (Fig. 31).
(4) Remove input gear (Fig. 32).

Fig. 29 Input Gear Snap-Ring Removal

1 - CARRIER LOCK RETAINING RING
2 - INPUT GEAR
3 - PLANETARY CARRIER
4 - SCREWDRIVER

Fig. 30 Input Gear Retainer Removal

1 - INPUT GEAR
2 - LOW RANGE GEAR
3 - RETAINER

Fig. 31 Front Tabbed Thrust Washer Removal

1 - FRONT TABBED THRUST WASHER

Fig. 32 Input Gear Removal

1 - INPUT GEAR
2 - LOW RANGE GEAR

Fig. 28 Input Gear And Planetary Carrier Removal

1 - PLANETARY ASSEMBLY
2 - INPUT GEAR

21 - 174

TRANSFER CASE - NV231

TJ

TRANSFER CASE - NV231 (Continued)

(5) Remove rear tabbed thrust washer from low

range gear (Fig. 33).

CLEANING

Clean the transfer case parts with a standard

parts cleaning solvent. Remove all traces of sealer
from the cases and retainers with a scraper and
3M™ all purpose cleaner. Use compressed air to
remove solvent residue from oil feed passages in the
case halves, retainers, gears, and shafts.

INSPECTION

MAINSHAFT/SPROCKET/HUB

Inspect the splines on the hub and shaft and the

teeth on the sprocket (Fig. 34). Minor nicks and
scratches can be smoothed with an oilstone. However,
replace any part that is damaged.

Check the contact surfaces in the sprocket bore

and on the mainshaft. Minor nicks and scratches can
be smoothed with 320-400 grit emery cloth but do not
try to salvage the shaft if nicks or wear is severe.

INPUT GEAR AND PLANETARY CARRIER

Check the teeth on the gear (Fig. 35). Minor nicks

can be dressed off with an oilstone but replace the
gear if any teeth are broken, cracked, or chipped. The
bearing surface on the gear can be smoothed with
300-400 grit emery cloth if necessary.

Examine the carrier body and pinion gears for

wear or damage. The carrier will have to be replaced
as an assembly if the body, pinion pins, or pinion
gears are damaged.

Check the lock ring and both thrust washers for

wear or cracks. Replace them if necessary. Also
replace the lock retaining ring if bent, distorted, or
broken.

Fig. 34 Mainshaft, Mode Hub, And Drive Sprocket

1 - MODE HUB

3 - MAINSHAFT

2 - DRIVE SPROCKET

4 - MODE HUB RETAINING RING

Fig. 33 Rear Tabbed Thrust Washer Removal

1 - LOW RANGE GEAR
2 - REAR TABBED THRUST WASHER

TJ

TRANSFER CASE - NV231

21 - 175

TRANSFER CASE - NV231 (Continued)

SHIFT FORKS/HUBS/SLEEVES

Check condition of the shift forks and mode fork

shift rail (Fig. 36). Minor nicks on the shift rail can
be smoothed with 320-400 grit emery cloth.

Inspect the shift fork wear pads (Fig. 37). The

mode fork pads are serviceable and can be replaced if

necessary. The range fork pads are not serviceable.
The fork must be replaced as an assembly if the pads
are worn or damaged.

Check both of the sleeves for wear or damage,

especially on the interior teeth. Replace the sleeves if
wear or damage is evident.

Fig. 35 Input Gear And Carrier Components

1 - PLANETARY CARRIER

4 - CARRIER LOCK RING

2 - REAR THRUST WASHER

5 - CARRIER LOCK RETAINING RING

3 - FRONT THRUST WASHER

6 - INPUT GEAR

Fig. 36 Shift Forks

1 - RANGE FORK
2 - MODE FORK AND RAIL
3 - MODE SPRING

Fig. 37 Shift Fork And Wear Pad Locations

1 - RANGE FORK
2 - MODE FORK
3 - WEAR PADS (SERVICEABLE)
4 - WEAR PADS (NON-SERVICEABLE)

21 - 176

TRANSFER CASE - NV231

TJ

TRANSFER CASE - NV231 (Continued)

REAR RETAINER/BEARING/ SEAL/SLINGER/BOOT

Inspect the retainer components (Fig. 38). Replace

the bearing if rough or noisy. Check the retainer for
cracks or wear in the bearing bore. Clean the
retainer sealing surfaces with a scraper and 3M™ all
purpose cleaner. This will ensure proper adhesion of
the sealer during reassembly.

An output shaft slinger is used on some vehicles,

while an output shaft damper is used on other vehi-
cles. The output shaft slinger and seal should be
replaced outright; do not reuse either part.

Replace any part if distorted, bent, or broken. Also

replace the boot if cut or torn. Replace the boot band
clamps, do not reuse them.

Fig. 38 Rear Retainer Without Output Shaft Damper

1 - REAR RETAINER

5 - BAND CLAMPS

2 - REAR BEARING I.D. MAINSHAFT RETAINING RING

6 - REAR SLINGER

3 - REAR SEAL

7 - REAR BEARING O.D. RETAINING RING

4 - BOOT

8 - REAR BEARING

TJ

TRANSFER CASE - NV231

21 - 177

TRANSFER CASE - NV231 (Continued)


Content   ..  519  520  521  522   ..