Jeep Wrangler TJ. Manual - part 499
 

  Index      Jeep     Jeep Wrangler TJ - service repair manual 2005 year


Search            


Content   ..  497  498  499  500   ..


Jeep Wrangler TJ. Manual - part 499


(12) Carefully work transmission forward and over

engine block dowels until converter hub is seated in
crankshaft.

(13) Install and tighten bolts that attach transmis-

sion converter housing to engine block.

CAUTION: Be sure the converter housing is fully
seated on the engine block dowels before tighten-
ing any bolts.

(14) Install

torque

converter

attaching

bolts.

Tighten bolts to 88 N·m (65 ft. lbs.).

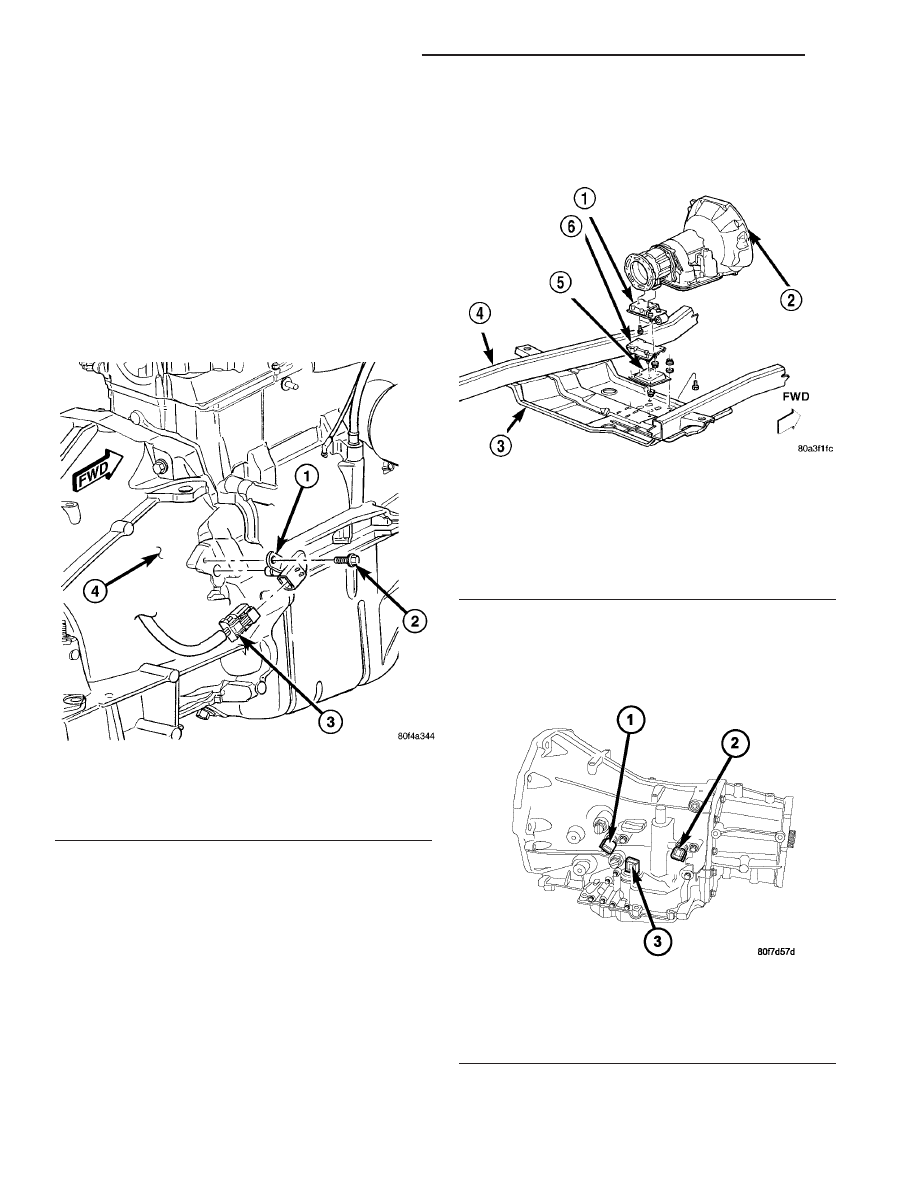
(15) On 4.0L engine equipped vehicles, install the

crankshaft position sensor (Fig. 140).

(16) Install transmission fill tube and seal. Install

new fill tube seal in transmission before installation.

(17) Connect transmission cooler lines to transmis-

sion.

(18) Install transfer case onto transmission. (Refer

to

21

-

TRANSMISSION/TRANSFER

CASE

-

INSTALLATION)

(19) Install skid plate (Fig. 141) and attach trans-

mission rear support to skid plate. (Refer to 13 -
FRAME & BUMPERS/FRAME/TRANSFER CASE
SKID PLATE - INSTALLATION)

(20) Remove engine support fixture.
(21) Remove transmission jack.
(22) Connect input and output speed sensor wires

(Fig. 142).

Fig. 140 Crankshaft Position Sensor

1 - CRANKSHAFT POSITION SENSOR
2 - MOUNTING BOLT
3 - ELECTRICAL CONNECTOR
4 - TRANSMISSION BELLHOUSING

Fig. 141 Transmission Mount - Automatic

Transmission

1 - TRANSMISSION SUPPORT BRACKET
2 - AUTOMATIC TRANSMISSION
3 - SKID PLATE
4 - FRAME
5 - TRANSMISSION MOUNT SUPPORT BRACKET
6 - CUSHION

Fig. 142 Input and Output Speed Sensors and

Transmission Range Sensor

1 - INPUT SPEED SENSOR
2 - OUTPUT SPEED SENSOR
3 - TRANSMISSION RANGE SENSOR

21 - 86

AUTOMATIC TRANSMISSION - 42RLE

TJ

AUTOMATIC TRANSMISSION - 42RLE (Continued)

(23) Connect wires to the transmission range sen-

sor (Fig. 142) and the solenoid/pressure switch
assembly (Fig. 143).

(24) Install converter housing access cover.
(25) Install exhaust pipes and support brackets, if

removed.

(26) Install starter motor (Refer to 8 - ELECTRI-

CAL/STARTING/STARTER MOTOR - INSTALLA-
TION) and cooler line bracket.

(27) Install new plastic retainer grommet on any

shift linkage rod or lever that was disconnected.
Grommets should not be reused. Use pry tool to
remove rod from grommet and cut away old grom-
met. Use pliers to snap new grommet into lever and
to snap rod into grommet at assembly.

(28) Connect gearshift cable.
(29) Connect transfer case shift linkage.
(30) Adjust gearshift linkage, if necessary.
(31) Align and connect propeller shaft(s). (Refer to

3 - DIFFERENTIAL & DRIVELINE/PROPELLER
SHAFT/PROPELLER SHAFT - INSTALLATION)

(32) Fill transfer case to bottom edge of fill plug

hole.

(33) Lower vehicle and connect battery negative

cable.

(34) Fill transmission to correct level with Mopar

t

ATF +4.

Fig. 143 Solenoid/Pressure Switch Assembly

1 - SOLENOID/PRESSURE SWITCH ASSEMBLY CONNECTOR

TJ

AUTOMATIC TRANSMISSION - 42RLE

21 - 87

AUTOMATIC TRANSMISSION - 42RLE (Continued)

SCHEMATICS AND DIAGRAMS - 42RLE TRANSMISSION

Park/Neutral

(Speed

Under

8

mph)

21 - 88

AUTOMATIC TRANSMISSION - 42RLE

TJ

AUTOMATIC TRANSMISSION - 42RLE (Continued)

Neutral

(Speed

Over

8

mph)

TJ

AUTOMATIC TRANSMISSION - 42RLE

21 - 89

AUTOMATIC TRANSMISSION - 42RLE (Continued)


Content   ..  497  498  499  500   ..