Jeep Wrangler TJ. Manual - part 227
 

  Index      Jeep     Jeep Wrangler TJ - service repair manual 2005 year


Search            


Content   ..  225  226  227  228   ..


Jeep Wrangler TJ. Manual - part 227


level. Where axle bearing damage is slight, the noise
is usually not noticeable at speeds above 30 mph.

LOW SPEED KNOCK

Low speed knock is generally caused by a worn

U-joint or by worn side–gear thrust washers. A worn
pinion shaft bore will also cause low speed knock.

VIBRATION

Vibration at the rear of the vehicle is usually

caused by a:

• Damaged drive shaft.

• Missing drive shaft balance weight(s).

• Worn or out-of-balance wheels.

• Loose wheel lug nuts.

• Worn U-joint(s).

• Loose/broken springs.

• Damaged axle shaft bearing(s).

• Loose pinion gear nut.

• Excessive pinion yoke run out.

• Bent axle shaft(s).
Check for loose or damaged front-end components

or engine/transmission mounts. These components
can contribute to what appears to be a rearend vibra-

tion. Do not overlook engine accessories, brackets
and drive belts.

NOTE: All driveline components should be exam-
ined before starting any repair.

DRIVELINE SNAP

A snap or clunk noise when the vehicle is shifted

into gear (or the clutch engaged), can be caused by:

• High engine idle speed.

• Transmission shift operation.

• Loose engine/transmission/transfer case mounts.

• Worn U-joints.

• Loose spring mounts.

• Loose pinion gear nut and yoke.

• Excessive ring gear backlash.

• Excessive side gear to case clearance.
The source of a snap or a clunk noise can be deter-

mined with the assistance of a helper. Raise the vehi-
cle on a hoist with the wheels free to rotate. Instruct
the helper to shift the transmission into gear. Listen
for the noise, a mechanics stethoscope is helpful in
isolating the source of a noise.

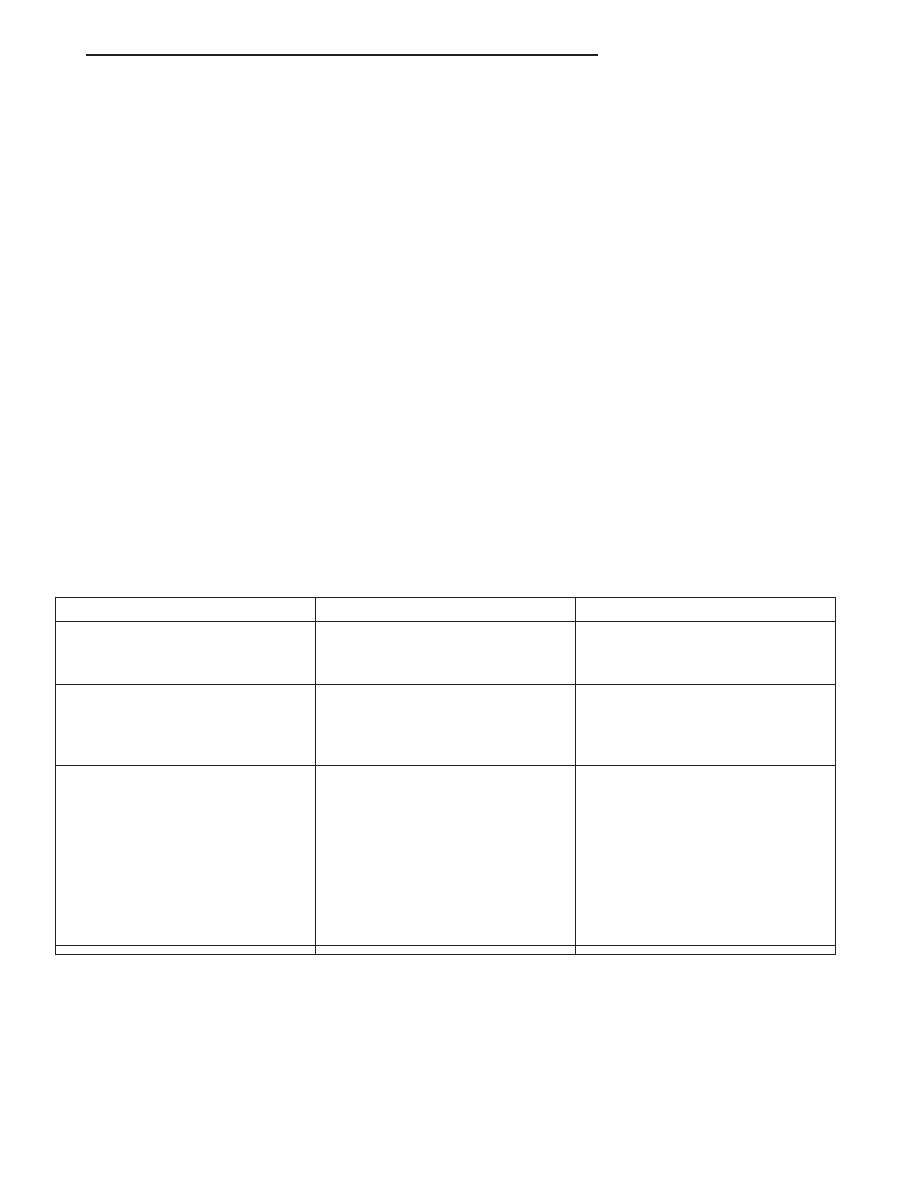
DIAGNOSTIC CHART

Condition

Possible Causes

Correction

Wheel Noise

1. Wheel loose.

1. Tighten loose nuts.

2. Faulty, brinelled wheel bearing.

2. Replace bearing.

Axle Shaft Noise

1. Misaligned axle tube.

1. Inspect axle tube alignment.
Correct as necessary.

2. Bent or sprung axle shaft.

2. Inspect and correct as necessary.

Axle Shaft Broke

1. Misaligned axle tube.

1. Replace the broken shaft after
correcting tube mis-alignment.

2 Vehicle overloaded.

2. Replace broken shaft and avoid
excessive weight on vehicle.

3. Erratic clutch operation.

3. Replace broken shaft and avoid
or correct erratic clutch operation.

4. Grabbing clutch.

4. Replace broken shaft and inspect
and repair clutch as necessary.

TJ

REAR AXLE - 194RBI

3 - 85

REAR AXLE - 194RBI (Continued)

Condition

Possible Causes

Correction

Differential Cracked

1. Improper adjustment of the
differential bearings.

1. Replace case and inspect gears
and bearings for further damage.
Set differential bearing pre-load
properly.

2. Excessive ring gear backlash.

2. Replace case and inspect gears
and bearings for further damage.
Set ring gear backlash properly.

3. Vehicle overloaded.

3. Replace case and inspect gears
and bearings for further damage.
Avoid excessive vehicle weight.

4. Erratic clutch operation.

4. Replace case and inspect gears
and bearings for further damage.
Avoid erratic use of clutch.

Differential Gears Scored

1. Insufficient lubrication.

1. Replace scored gears. Fill
differential with the correct fluid type
and quantity.

2. Improper grade of lubricant.

2. Replace scored gears. Fill
differential with the correct fluid type
and quantity.

3. Excessive spinning of one
wheel/tire.

3. Replace scored gears. Inspect all
gears, pinion bores, and shaft for
damage. Service as necessary.

Loss Of Lubricant

1. Lubricant level too high.

1. Drain lubricant to the correct
level.

2. Worn axle shaft seals.

2. Replace seals.

3. Cracked differential housing.

3. Repair as necessary.

4. Worn pinion seal.

4. Replace seal.

5. Worn/scored yoke.

5. Replace yoke and seal.

6. Axle cover not properly sealed.

6. Remove, clean, and re-seal
cover.

Axle Overheating

1. Lubricant level low.

1. Fill differential to correct level.

2. Improper grade of lubricant.

2. Fill differential with the correct
fluid type and quantity.

3. Bearing pre-loads too high.

3. Re-adjust bearing pre-loads.

4. Insufficient ring gear backlash.

4. Re-adjust ring gear backlash.

3 - 86

REAR AXLE - 194RBI

TJ

REAR AXLE - 194RBI (Continued)

Condition

Possible Causes

Correction

Gear Teeth Broke

1. Overloading.

1. Replace gears. Examine other
gears and bearings for possible
damage.

2. Erratic clutch operation.

2. Replace gears and examine the
remaining parts for damage. Avoid
erratic clutch operation.

3. Ice-spotted pavement.

3. Replace gears and examine
remaining parts for damage.

4. Improper adjustments.

4. Replace gears and examine
remaining parts for damage. Ensure
ring gear backlash is correct.

Axle Noise

1. Insufficient lubricant.

1. Fill differential with the correct
fluid type and quantity.

2. Improper ring gear and pinion
adjustment.

2. Check ring gear and pinion
contact pattern. Adjust backlash or
pinion depth.

3. Unmatched ring gear and pinion.

3. Replace gears with a matched
ring gear and pinion.

4. Worn teeth on ring gear and/or
pinion.

4. Replace ring gear and pinion.

5. Loose pinion bearings.

5. Adjust pinion bearing pre-load.

6. Loose differential bearings.

6. Adjust differential bearing
pre-load.

7. Mis-aligned or sprung ring gear.

7. Measure ring gear run-out.
Replace components as necessary.

8. Loose differential bearing cap
bolts.

8. Inspect differential components
and replace as necessary. Ensure
that the bearing caps are torqued
tot he proper specification.

9. Housing not machined properly.

9. Replace housing.

TJ

REAR AXLE - 194RBI

3 - 87

REAR AXLE - 194RBI (Continued)

REMOVAL

(1) With vehicle in neutral, position vehicle on

hoist.

(2) Position a lift device under the axle and secure

axle to device.

(3) Remove brake components.
(4) Disconnect the vent hose from the axle shaft

tube.

(5) Remove propeller shaft.
(6) Disconnect stabilizer bar links (Fig. 1).

(7) Remove shock absorbers from axle bracket (Fig.

2).

(8) Remove track bar from axle bracket (Fig. 3).

(9) Remove upper and lower control arms from

axle brackets.

(10) Lower axle and remove springs.

INSTALLATION

CAUTION: The weight of the vehicle must be sup-
ported by the springs before suspension arms and
track bar fasteners can be tightened. Failure to
heed caution may result in damage.

(1) Raise axle and align the spring centering bolts

with mating holes in the axle spring perch.

(2) Install upper and lower control arms in the

axle brackets (Fig. 4) and loosely install the mount-
ing bolts.

Fig. 1 STABILIZER BAR

1 - LINK
2 - RETAINER
3 - STABILIZER BAR
4 - AXLE MOUNT

Fig. 2 SHOCK ABSORBER

1 - AXLE BRACKET
2 - SHOCK

Fig. 3 REAR TRACK BAR

1 - TRACK BAR
2 - FRAME BRACKET
3 - REAR AXLE

Fig. 4 UPPER AND LOWER SUSPENSION ARMS

1 - UPPER SUSPENSION ARM
2 - REAR AXLE
3 - LOWER SUSPENSION ARM

3 - 88

REAR AXLE - 194RBI

TJ

REAR AXLE - 194RBI (Continued)


Content   ..  225  226  227  228   ..