Jeep Liberty KJ. Manual - part 919


  Index      Jeep     Jeep Liberty KJ - service repair manual 2006 year


Search            


Content   ..  917  918  919  920   ..


Jeep Liberty KJ. Manual - part 919


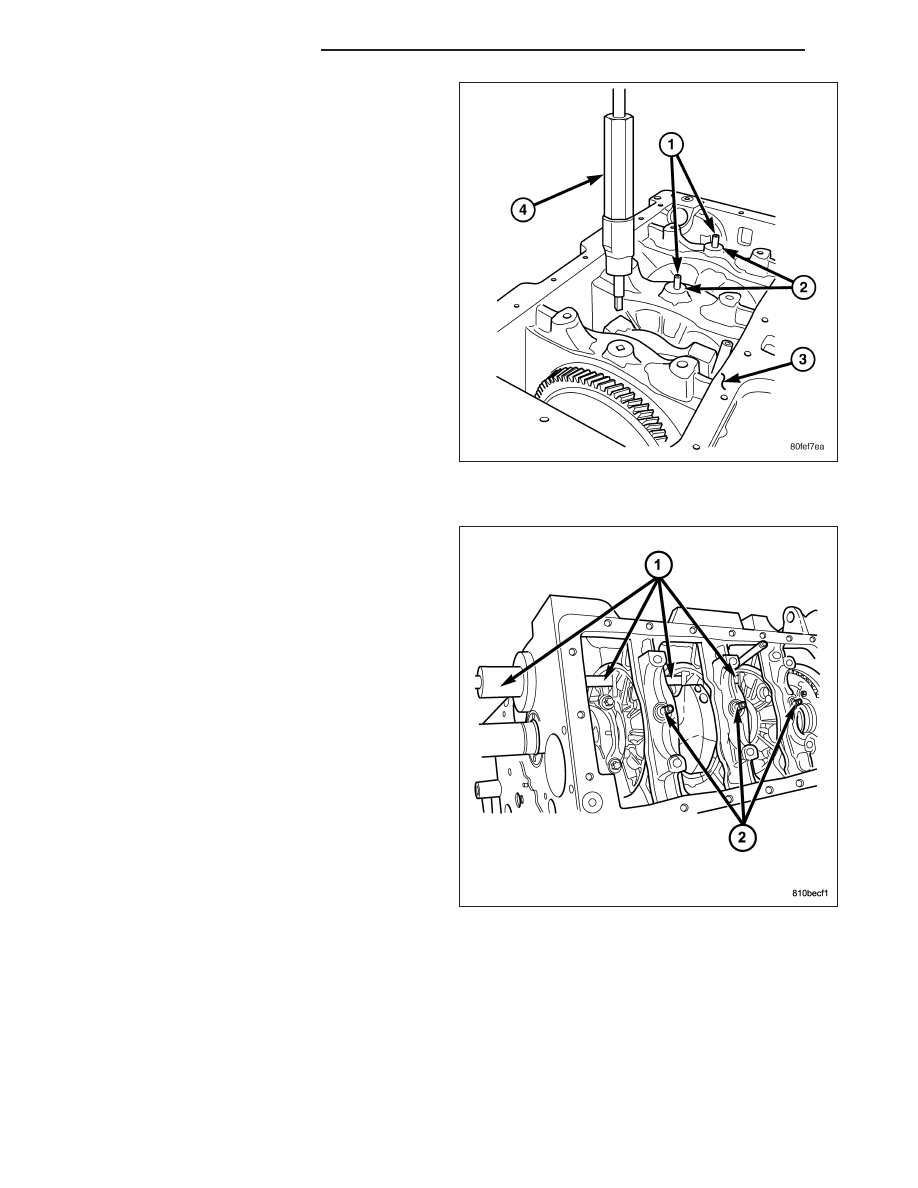
24. Using special tool VM.1054 (4), remove crank-

shaft support retainers (1) and o-rings (2), discard
o-rings (2)..

25. Paint mark or scribe the relation between the

crankshaft sensor tone ring and the crankshaft
and remove the tone ring.

26. While holding crankshaft guide VM 1069, carefully

guide crankshaft out of the rear of engine block
(3).

INSTALLATION

CAUTION: IT IS CRITICAL THAT BOTH HALVES OF
THE

CRANKSHAFT

SUPPORT

ARE

ALIGNED

PROPERLY WITH THE ENGINE TO SUPPORT
ENGINE OIL MANAGEMENT.

1. Install crankshaft in engine block.

NOTE: There are two identical holes in the crank-
shaft support. Care must be taken to insert the
special tool into the correct one..

2. Insert crankshaft support alignment dowel into the

vacuum pump access hole, through the proper
crankshaft support holes then slide the tool guide
flush against the engine block and retain with a
vacuum pump retaining bolt.

3. Install crankshaft support retainers.

9 - 1634

ENGINE - 2.8L DIESEL

KJ

4. Remove special tool VM.1069 from crankshaft.

5.

Remove special tool VM. 9095 from engine block.

6. Install crankshaft sprocket.

7. Install front engine cover (Refer to 9 - ENGINE/EN-

GINE BLOCK/ENGINE COVER - INSTALLATION).

8. Install rear main bearing support in engine block

(1). Be sure to align oil hole in rear main bear-
ing support with the lubrication port in the
block.

9. Install adapter plate and retaining bolts. Torque

bolts to 27.5N·m.

10. Install flex plate.

11. Install piston and connecting rod assemblies

(Refer to 9 - ENGINE/ENGINE BLOCK/PISTON &
CONNECTING ROD - INSTALLATION).

12. Install oil jets (Refer to 9 - ENGINE/LUBRICA-

TION/OIL JET - INSTALLATION).

13. Install balance shaft assembly (Refer to 9 -

ENGINE/VALVE

TIMING/BALANCE

SHAFT

-

INSTALLATION).

14. Install oil pump pickup tube (Refer to 9 - ENGINE/LUBRICATION/OIL PUMP - INSTALLATION).

15. Install oil pan (Refer to 9 - ENGINE/LUBRICATION/OIL PAN - INSTALLATION).

16. Install cylinder head (Refer to 9 - ENGINE/CYLINDER HEAD - INSTALLATION).

17. Install cylinder head cover/intake manifold (Refer to 9 - ENGINE/CYLINDER HEAD/CYLINDER HEAD COV-

ER(S) - INSTALLATION).

18. Install timing belt inner cover (Refer to 9 - ENGINE/VALVE TIMING/TIMING BELT / CHAIN COVER(S) -

INSTALLATION).

19. Install timing belt (Refer to 9 - ENGINE/VALVE TIMING/TIMING BELT/CHAIN AND SPROCKETS - INSTALLA-

TION).

20. Install timing belt outer cover (Refer to 9 - ENGINE/VALVE TIMING/TIMING BELT / CHAIN COVER(S) -

INSTALLATION).

21. Install engine in vehicle.

22. Fill engine oil with proper oil to correct level.

KJ

ENGINE - 2.8L DIESEL

9 - 1635

BEARINGS-CRANKSHAFT MAIN

REMOVAL

NOTE: The crankshaft support halves can be iden-
tified by aligning the witness marks scribed on the
face, located between the halves. These witness
marks must face towards the front of the engine
when installing the crankshaft and support assem-
bly.

The engine must be removed from vehicle and com-
pletely disassembled to replace the front main bear-
ing.

CRANKSHAFT MAIN BEARINGS

1. With crankshaft assembly removed from engine.

2. Identify the crankshaft support witness marks.

3. Remove crankshaft supports from crankshaft and

remove bearing halves from supports.

9 - 1636

ENGINE - 2.8L DIESEL

KJ

CRANKSHAFT FRONT MAIN BEARING

1. Using special tool VM.1073 push front main bear-

ing out of front of engine block.

INSTALLATION

CRANKSHAFT MAIN BEARINGS

NOTE: Identify the correct crankshaft by noting the groove on the front of the 2.8L crankshaft.

1. Install bearing halves in crankshaft supports.

2. Lubricate crankshaft and main bearings with clean engine oil.

3. Install crankshaft supports on crankshaft. Torque bolts to 44.1N·m.

KJ

ENGINE - 2.8L DIESEL

9 - 1637


Content   ..  917  918  919  920   ..