Jeep Liberty KJ. Manual - part 1436


  Index      Jeep     Jeep Liberty KJ - service repair manual 2006 year


Search            


Content   ..  1434  1435  1436  1437   ..


Jeep Liberty KJ. Manual - part 1436
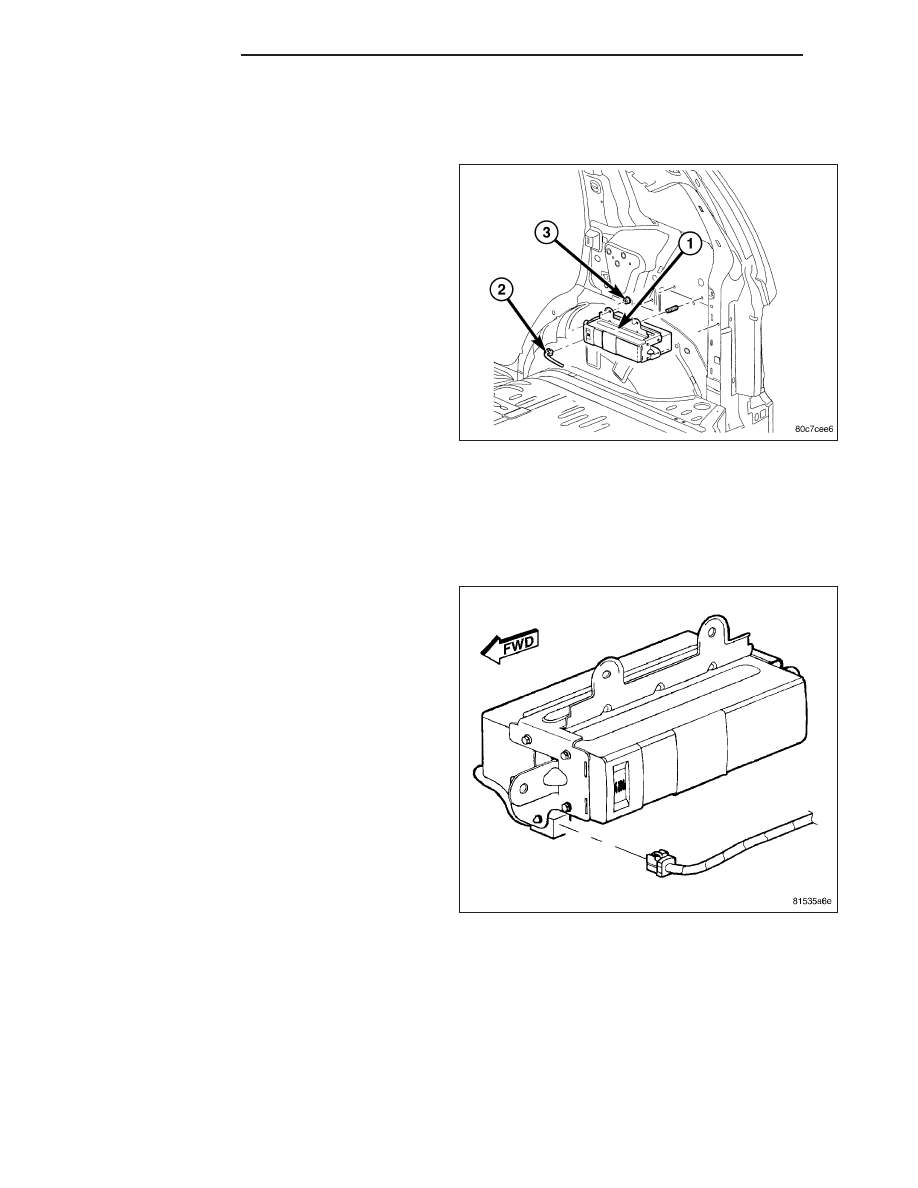


CD CHANGER

DESCRIPTION

The CD changer (if equipped) is mounted in the cargo
area of the passenger compartment on the right rear
quarter panel.

OPERATION

The CD changer will only operate when the ignition switch is in the On or Accessory positions, and the radio is
turned on. The six-CD magazine may be ejected with the ignition in the Off position.

REMOVAL

1. Disconnect and isolate the battery negative cable.

2. Remove the right rear quarter trim panel. (Refer to

23 - BODY/INTERIOR/QUARTER TRIM PANEL -
REMOVAL).

3. Disconnect the electrical wire harness connector.

8A - 48

AUDIO/VIDEO

KJ

4. Remove the mounting fasteners.

5. Remove the CD Changer (1) from the vehicle.

INSTALLATION

1. Install the CD Changer to the vehicle.

2. Install and tighten the mounting fasteners.

3. Connect the wire harness connector.

4. Install the right rear quarter trim panel (Refer to 23

-

BODY/INTERIOR/QUARTER

TRIM

PANEL

-

INSTALLATION).

5. Connect the battery negative cable.

KJ

AUDIO/VIDEO

8A - 49

INSTRUMENT PANEL ANTENNA CABLE

REMOVAL

DOMESTIC

WARNING: Disable the airbag system before attempting any steering wheel, steering column, seat belt ten-
sioner, side airbag, or instrument panel component diagnosis or service. Disconnect and isolate the battery
negative (ground) cable, then wait two minutes for the airbag system capacitor to discharge before per-
forming further diagnosis or service. This is the only sure way to disable the airbag system. Failure to take
the proper precautions could result in accidental airbag deployment and possible personal injury.

1. Disconnect and isolate the battery negative cable.

2. Remove the instrument panel (Refer to 23 - BODY/

INSTRUMENT

PANEL/INSTRUMENT

PANEL

ASSEMBLY - REMOVAL).

CAUTION: Pulling the antenna cable straight out
of the radio without pulling on the locking antenna
connector could damage the cable or radio.

3. Disconnect the antenna cable from radio by pulling

the locking antenna connector (2) away from radio.

4. Disengage each of the retainers that secure the

cable to the instrument panel.

5. Remove the cable (1) from the instrument panel.

EXPORT

WARNING: Disable the airbag system before attempting any steering wheel, steering column, seat belt ten-
sioner, side airbag, or instrument panel component diagnosis or service. Disconnect and isolate the battery
negative (ground) cable, then wait two minutes for the airbag system capacitor to discharge before per-
forming further diagnosis or service. This is the only sure way to disable the airbag system. Failure to take
the proper precautions could result in accidental airbag deployment and possible personal injury.

8A - 50

AUDIO/VIDEO

KJ

1. Disconnect and isolate the battery negative cable.

2. Remove the instrument panel (Refer to 23 - BODY/

INSTRUMENT

PANEL/INSTRUMENT

PANEL

ASSEMBLY - REMOVAL).

CAUTION: Pulling the antenna cable straight out
of the radio without pulling on the locking antenna
connector could damage the cable or radio.

3. Disconnect antenna cable from radio by pulling on

the locking antenna connector (2)

.

4. Disengage each of the retainers that secure the

cable (2) to the instrument panel.

INSTALLATION

DOMESTIC

WARNING:

Disable

the

airbag

system

before

attempting any steering wheel, steering column,
seat belt tensioner, side airbag, or instrument
panel component diagnosis or service. Disconnect
and isolate the battery negative (ground) cable,
then wait two minutes for the airbag system
capacitor to discharge before performing further
diagnosis or service. This is the only sure way to
disable the airbag system. Failure to take the
proper precautions could result in accidental air-
bag deployment and possible personal injury.

1. Position the instrument panel antenna cable onto

the instrument panel.

2. Engage each of the retainers that secure the cable

to the back side of the instrument panel.

KJ

AUDIO/VIDEO

8A - 51


Content   ..  1434  1435  1436  1437   ..