Jeep Liberty KJ. Manual - part 114


  Index      Jeep     Jeep Liberty KJ - service repair manual 2006 year


Search            


Content   ..  112  113  114  115   ..


Jeep Liberty KJ. Manual - part 114


REAR LAMP UNIT

REMOVAL

BULB

NOTE: The rear lamp unit may contain up to four bulbs, depending upon the market for which the vehicle
was manufactured. The service procedures for each bulb are the same, only the bulb sizes and types may
differ.

1. Disconnect and isolate the battery negative cable.

2. Remove the rear lamp unit (1) from the end of the

quarter panel. (Refer to 8 - ELECTRICAL/LAMPS/
LIGHTING

-

EXTERIOR/REAR

LAMP UNIT -

REMOVAL).

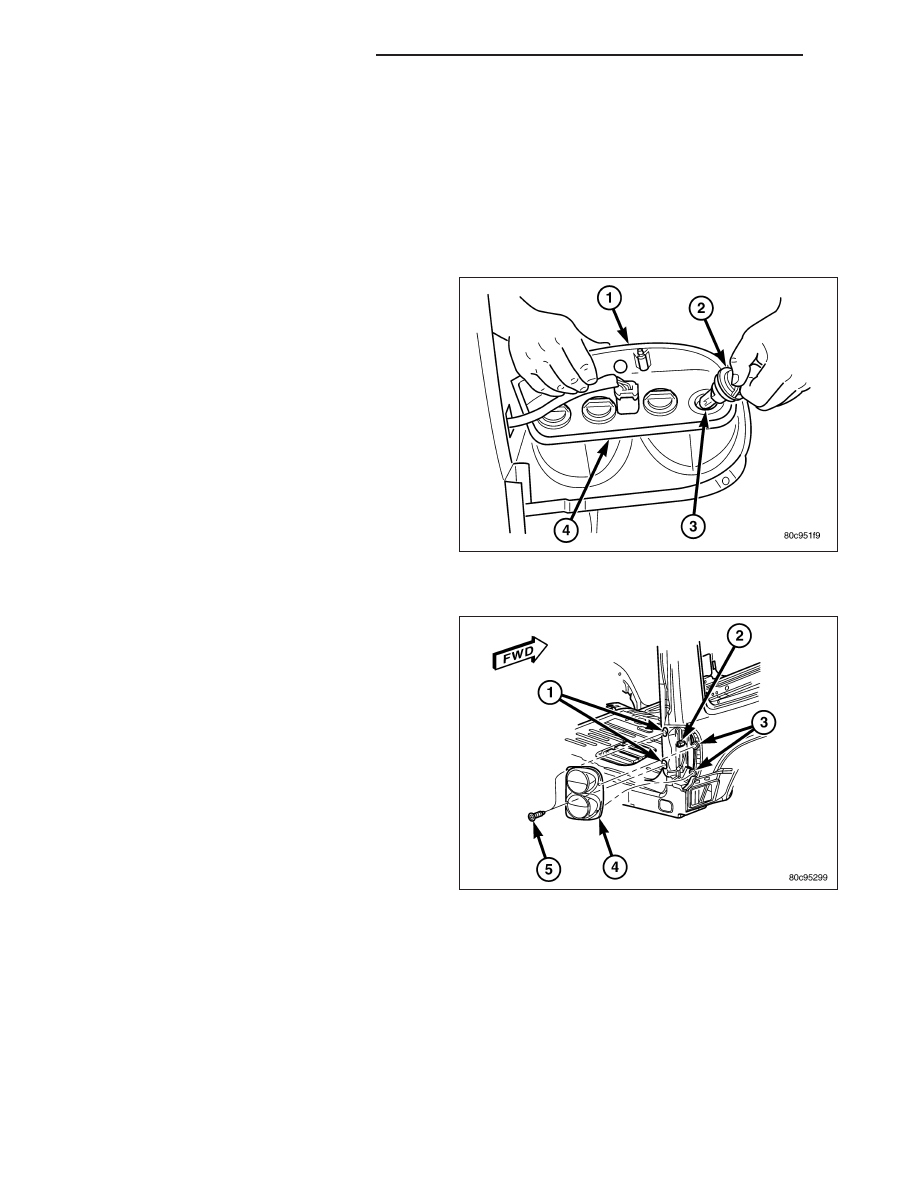
3. Firmly grasp the socket (2) on the socket plate (4)

on the back of the rear lamp unit housing for the
bulb that is being removed and rotate it counter-
clockwise about 30 degrees to unlock it.

4. Pull the socket and bulb (3) straight out of the

keyed opening in the socket plate.

5. Pull the base of the bulb straight out of the rear

lamp socket.

LAMP

1. Disconnect and isolate the battery negative cable.

2. Open the tailgate to access and remove the two

screws (5) that secure the rear lamp unit (4) to the
two plastic nuts (1) in the side jamb of the tailgate
opening.

3. Pull the outboard side of the rear lamp unit rear-

ward far enough to unsnap the two ball studs on
the outboard side of the lamp housing from the two
plastic grommets (3) in the quarter panel.

4. Disconnect the wire harness connector (2) from the

lamp socket plate connector.

5. Remove the lamp from the quarter panel.

6. Remove the two plastic grommets from the quarter

panel and discard.

INSTALLATION

BULB

CAUTION: Always use the correct bulb size and type for replacement. An incorrect bulb size or type may
overheat and cause damage to the lamp, the socket and/or the lamp wiring.

NOTE: The rear lamp unit may contain up to four bulbs, depending upon the market for which the vehicle
was manufactured. The service procedures for each bulb are the same, only the bulb sizes and types may
differ.

8L - 114

LAMPS/LIGHTING - EXTERIOR

KJ

1. Align the base of the bulb (3) with the rear lamp

socket (2).

2. Push the bulb straight into the socket until the base

is firmly seated.

3. Align the socket and bulb with the keyed opening

in the socket plate (4) on the back of the rear lamp
unit housing (1).

4. Insert the socket and bulb straight into the socket

plate until the socket is firmly seated.

5. Rotate the socket clockwise about 30 degrees to

lock it into place.

6. Reinstall the rear lamp unit onto the end of the

quarter panel. (Refer to 8 - ELECTRICAL/LAMPS/
LIGHTING

-

EXTERIOR/REAR

LAMP UNIT -

INSTALLATION).

7. Reconnect the battery negative cable.

LAMP

1. Install two new plastic grommets (3) into the quar-

ter panel.

2. Position the rear lamp unit (4) to the quarter panel.

3. Reconnect the wire harness connector (2) to the

lamp socket plate connector.

4. Align the two ball studs on the outboard side of the

rear lamp housing with the two plastic grommets in
the quarter panel.

5. Using hand pressure, push firmly and evenly on

the outboard side of the lamp until the two ball
studs snap into the plastic grommets.

6. Install and tighten the two screws (5) that secure

the inboard side of the lamp housing to the plastic
nuts (1) in the side jamb of the tailgate opening.
Tighten the screws to 2 N·m (20 in. lbs.).

7. Reconnect the battery negative cable.

KJ

LAMPS/LIGHTING - EXTERIOR

8L - 115

REPEATER LAMP

REMOVAL

BULB

NOTE: Side repeater lamps are used only on vehicles manufactured for certain markets where these lamps
are required.

1. Disconnect and isolate the battery negative cable.

2. Remove the repeater lamp unit from the front

fender panel (1). (Refer to 8 - ELECTRICAL/
LAMPS/LIGHTING - EXTERIOR/REPEATER LAMP
UNIT - REMOVAL).

3. Rotate the repeater lamp socket (2) in the lamp

lens (4) counterclockwise about 30 degrees to
unlock it.

4. Pull the socket and bulb (3) straight out of the

keyed opening in the lamp lens.

5. Pull the base of the bulb straight out of the lamp

socket.

LAMP

NOTE: Side repeater lamps are used only on vehicles manufactured for certain markets where these lamps
are required.

1. Disconnect and isolate the battery negative cable.

2. Using a trim stick or another suitable wide flat-

bladed tool, carefully pry at the clearance notch in
the lower edge of the repeater lamp lens (1) to dis-
engage the snap features of the lens from the
mounting hole in the front fender panel (2).

3. Pull the lamp unit out from the front fender panel

far enough to access and disconnect the wire har-
ness connector from the lamp socket.

4. Remove the lamp unit from the front fender panel.

INSTALLATION

BULB

CAUTION: Always use the correct bulb size and type for replacement. An incorrect bulb size or type may
overheat and cause damage to the lamp, the socket and/or the lamp wiring.

NOTE: Side repeater lamps are used only on vehicles manufactured for certain markets where these lamps
are required.

8L - 116

LAMPS/LIGHTING - EXTERIOR

KJ

1. Align the base of the bulb (3) with the repeater

lamp socket (2).

2. Push the bulb straight into the socket until the base

is firmly seated.

3. Align the socket and bulb with the keyed opening

on the back of the repeater lamp lens (4).

4. Insert the socket and bulb straight into the lens

until the socket is firmly seated

5. Rotate the socket clockwise in the lens about 30

degrees to lock it into place.

6. Reinstall the repeater lamp unit onto the front

fender panel (1). (Refer to 8 - ELECTRICAL/
LAMPS/LIGHTING - EXTERIOR/REPEATER LAMP
UNIT - INSTALLATION).

7. Reconnect the battery negative cable.

LAMP

NOTE: Side repeater lamps are used only on vehicles manufactured for certain markets where these lamps
are required.

1. Position the repeater lamp unit (1) to the front

fender panel (2).

2. Reconnect the wire harness connector to the lamp

socket.

3. Position the lamp unit into the mounting hole in the

front fender panel. Be certain that the clearance
notch on the edge of the lamp lens is oriented
towards the bottom.

4. Using hand pressure, press on the lamp lens firmly

and evenly until the snap features of the lamp are
fully engaged in the mounting hole of the front
fender panel.

5. Reconnect the battery negative cable.

KJ

LAMPS/LIGHTING - EXTERIOR

8L - 117


Content   ..  112  113  114  115   ..