Jeep Liberty KJ. Manual - part 105


  Index      Jeep     Jeep Liberty KJ - service repair manual 2006 year


Search            


Content   ..  103  104  105  106   ..


Jeep Liberty KJ. Manual - part 105


7. Pull the bulb (1) straight out of the keyed opening

in the headlamp reflector (4).

INSTALLATION

LAMP

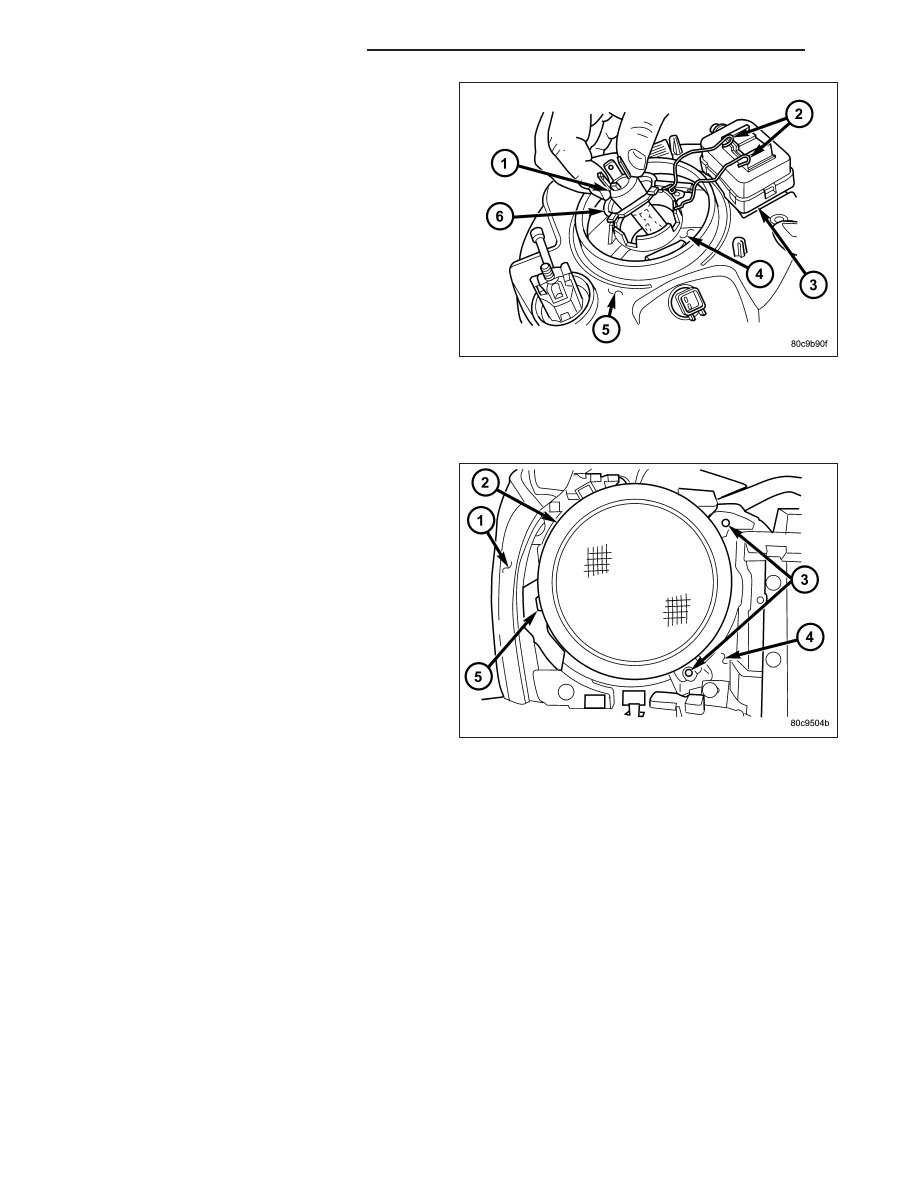
1. Position the headlamp unit (2) to the grille opening

reinforcement (4).

2. Reconnect the wire harness connectors to the

headlamp bulb socket (North America), the head-
lamp bulb base (Export), the front position lamp
socket (if equipped), and the headlamp leveling
motor (if equipped).

3. Engage the locator tab (5) on the outboard side of

the headlamp unit into the engagement slot in the
outboard edge of the grille opening reinforcement.

4. Align the two mounting tabs (3) on the inboard side

of the headlamp unit housing to the mounting holes
in the grille opening reinforcement.

5. Install and tighten the two screws that secure the

mounting tabs on the inboard side of the headlamp
housing to the grille opening reinforcement. Tighten
the screws to 3 N·m (30 in. lbs.).

6. Reinstall the grille panel onto the grille opening reinforcement. (Refer to 23 - BODY/EXTERIOR/GRILLE -

INSTALLATION).

7. Reconnect the battery negative cable.

8. Confirm proper headlamp unit alignment. (Refer to 8 - ELECTRICAL/LAMPS/LIGHTING - EXTERIOR/HEAD-

LAMP UNIT - ADJUSTMENTS).

BULB - NORTH AMERICA

CAUTION: Always use the correct bulb size and type for replacement. An incorrect bulb size or type may
overheat and cause damage to the lamp, the socket and/or the lamp wiring.

CAUTION: Do not contaminate the bulb glass by touching it with your fingers or by allowing it to contact
other oily surfaces. Shortened bulb life will result.

8L - 78

LAMPS/LIGHTING - EXTERIOR

KJ

1. Position the headlamp bulb (1) and socket (2) into

the lock ring (3).

2. Reconnect the grille opening reinforcement wire

harness connector to the headlamp bulb socket
connector receptacle.

3. Position the lock ring (2), socket, and bulb (3)

down behind the upper radiator crossmember and
align them with the keyed opening on the back of
the headlamp unit housing (1).

4. Push the socket and bulb unit straight into the

headlamp housing until they are firmly seated.

5. Position the lock ring over the socket and engage it

with the flange on the back of the headlamp hous-
ing.

6. Rotate the lock ring on the back of the headlamp

housing clockwise about 30 degrees to lock it into
place.

7. Reconnect the battery negative cable.

BULB - EXPORT

CAUTION: Always use the correct bulb size and type for replacement. An incorrect bulb size or type may
overheat and cause damage to the lamp, the socket and/or the lamp wiring.

CAUTION: Do not contaminate the bulb glass by touching it with your fingers or by allowing it to contact
other oily surfaces. Shortened bulb life will result.

1. Position the bulb (1) into the keyed opening in the

headlamp reflector (4).

2. Pivot the headlamp bulb retainer clip (2) back over

the bulb flange (6).

KJ

LAMPS/LIGHTING - EXTERIOR

8L - 79

3. Pinch the two hooked ends of the wire headlamp

bulb retainer clip (1) together and engage them into
the slots (6) in the flange of the reflector (4).

4. Position the center opening of the boot seal (2)

over the base of the headlamp bulb (6) and pull it
downward until the seal is fully engaged over the
bulb base.

5. Position the outer circumference of the boot seal

over the flange on the back of the headlamp unit
housing and pull it downward until the seal is fully
engaged over the flange.

6. Reinstall the headlamp unit onto the grille opening

reinforcement. (Refer to 8 - ELECTRICAL/LAMPS/
LIGHTING

-

EXTERIOR/HEADLAMP

UNIT

-

INSTALLATION).

7. Reconnect the battery negative cable.

8. Confirm proper headlamp unit alignment. (Refer to

8 - ELECTRICAL/LAMPS/LIGHTING - EXTERIOR/
HEADLAMP UNIT - ADJUSTMENTS).

ADJUSTMENTS

HEADLAMP UNIT

VEHICLE PREPARATION FOR HEADLAMP ALIGNMENT

1. Verify headlamp dimmer (multi-function) switch and high beam indicator operation.

2. If the vehicle is equipped with headlamp leveling, be certain that the headlamp leveling switch is in the “0” posi-

tion.

3. Repair or replace any inoperative or damaged components that could hinder proper lamp alignment.

4. Verify proper tire inflation.

5. Clean headlamp lenses.

6. Verify that cargo area is not heavily loaded.

7. The fuel tank should be Full. Add 2.94 kilograms (6.5 pounds) of weight over the fuel tank for each estimated

gallon of missing fuel.

8L - 80

LAMPS/LIGHTING - EXTERIOR

KJ

HEADLAMP ALIGNMENT SCREEN PREPARATION

Prepare an alignment screen as illustrated.

1. Position the vehicle on a level surface perpendicular to a flat wall 7.62 meters (25 feet) away (3) from the front

of the headlamp lens (4) for North American vehicles, or 10.0 meters (32.81 feet) away from the front of the
headlamp lens (4) for Export vehicles. If necessary, tape a line on the floor at the appropriate distance away from
and parallel to the wall.

2. Measure up on the wall 1.27 meters (5 feet) from the floor and tape a vertical line on the alignment screen at the

centerline of the vehicle (5). Sight along the centerline of the vehicle (from the rear of the vehicle forward) to
verify the accuracy of the centerline placement.

3. Rock the vehicle from side-to-side three times to allow the suspension to stabilize, then jounce the front sus-

pension three times by pushing downward on the front bumper and releasing. Measure the distance from the
center of the headlamp lens to the floor (2). Transfer this measurement to the alignment screen and tape a
horizontal line on the wall at this mark. This line will be used for up-and-down adjustment reference.

4. Measure the distance from the centerline of the vehicle to the center of each headlamp being aligned. Transfer

these measurements to the alignment screen and tape a vertical line this distance to each side of the vehicle
centerline (1). These lines will be used for left/right reference.

HEADLAMP ADJUSTMENT

NOTE: A properly aligned headlamp will project a pattern on the alignment screen from just below horizon-
tal to 75 millimeters (3 inches) below the headlamp centerline for vehicles in North America, or from just
below horizontal to 125 millimeters (5 inches) below the headlamp horizontal centerline for vehicles in
Export.

KJ

LAMPS/LIGHTING - EXTERIOR

8L - 81


Content   ..  103  104  105  106   ..