Jeep Grand Cherokee WK. Manual - part 445


  Index      Jeep     Jeep Grand Cherokee WK - service repair manual 2005 year


Search            


Content   ..  443  444  445  446   ..


Jeep Grand Cherokee WK. Manual - part 445


INSTALLATION

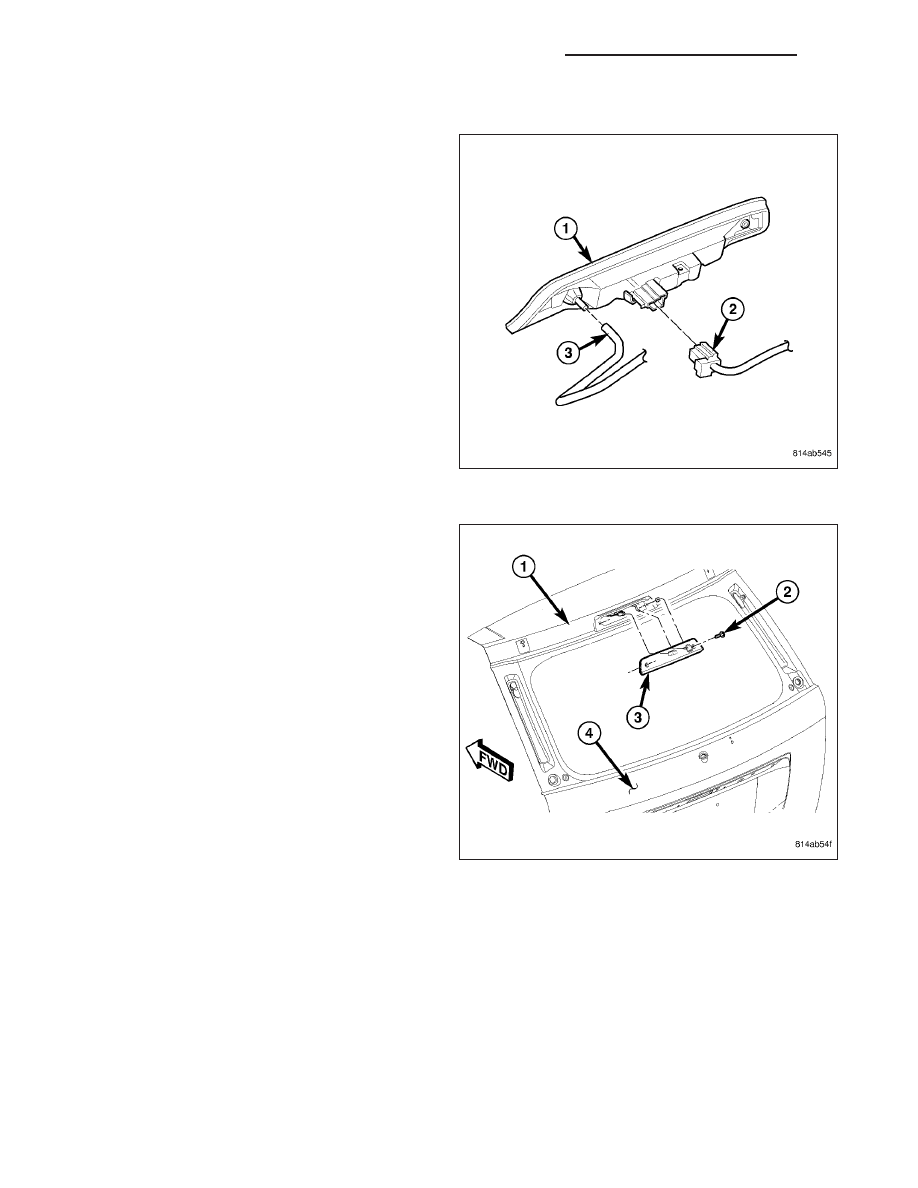
1. Connect the wire harness connector (2).

2. Position the CHMSL (1) on liftgate.

3. Install the screws attaching the CHMSL (2) to the

liftgate (1).

4. Connect battery negative cable.

8L - 90

LAMPS/LIGHTING - EXTERIOR - SERVICE INFORMATION

WK

FOG LAMP

REMOVAL

1. Access the rear of the fog lamp assembly by

removing the inner fender well to lower front fasica
push pins.

2. Disconnect the fog lamp harness connector from

the fog lamp (1).

3. Rotate the fog lamp (1) 1/4 turn counterclockwise.

4. Remove the fog lamp from lamp unit.

INSTALLATION

CAUTION: Do not touch the bulb glass with fin-
gers or other oily surfaces. Reduced bulb life will
result.

1. Position the fog lamp (1) in fog lamp unit.

2. Rotate the fog lamp 1/4 turn clockwise.

3. Connect the fog lamp harness connector.

4. Align the inner fender well with the lower front fas-

cia and install the push pins.

WK

LAMPS/LIGHTING - EXTERIOR - SERVICE INFORMATION

8L - 91

FOG LAMP UNIT

REMOVAL

1. Disconnect and isolate the battery negative cable.

2. Access the rear of the fog lamp assembly by

removing the inner fender well to lower front fascia
push pins.

3. Disengage the fog lamp electrical connector (4).

4. Grasp the fog lamp (1) and rotate the quarter turn

counterclockwise to release the lamp (1) from the
housing.

5. Remove the two fog lamp unit screws (3) and

remove the fog lamp through the front of the lower
fascia.

INSTALLATION

1. Position the fog lamp unit in the lower fascia. There

are two alignment dowels (2) to assist in this step.

2. Install the two screws (3) attaching fog lamp unit to

fascia.

3. Install the fog lamp (1) and turn it one quarter turn

clockwise.

4. Connect the fog lamp electrical connector (4).

5. Align the fog lamp, if necessary (Refer to 8 -

ELECTRICAL/LAMPS/LIGHTING

-

EXTERIOR/

FOG LAMP UNIT - ADJUSTMENTS).

6. Align the inner wheel well with the lower front fas-

cia and install push pins.

7. Connect the battery negative cable.

ADJUSTMENTS

FOG LAMP ALIGNMENT

VEHICLE PREPARATION FOR LAMP ALIGNMENT

1. Verify headlamp dimmer switch and high beam indicator operation.

2. Correct defective components that could hinder proper lamp alignment.

3. Verify proper tire inflation.

4. Clean lamp lenses.

5. Verify that luggage area is not heavily loaded.

8L - 92

LAMPS/LIGHTING - EXTERIOR - SERVICE INFORMATION

WK

6. Fuel tank should be FULL. Add 2.94 kg (6.5 lbs.) of weight over the fuel tank for each estimated gallon of miss-

ing fuel.

LAMP ALIGNMENT SCREEN PREPARATION

1. Position vehicle on a level surface perpendicular to a flat wall 7.62 meters (25 ft) away (6) from front of head-

lamp lens.

2. If necessary, tape a line on the floor (7) 7.62 meters (25 ft) away from and parallel to the wall.

3. Measure from the floor up 1.27 meters (5 ft) and tape a line on the wall at the centerline of the vehicle. Sight

along the centerline of the vehicle (from rear of vehicle forward) to verify accuracy of the line placement (1).

4. Rock vehicle side-to-side three times to allow suspension to stabilize.

5. Jounce front suspension three times by pushing downward on front bumper and releasing.

6. Measure the distance from the center of fog lamp lens to the floor. Transfer measurement to the alignment

screen (4). Use this line for up/down adjustment reference.

7. Measure distance from the centerline of the vehicle to the center of each fog lamp being aligned. Transfer mea-

surements to screen (with tape) to each side of vehicle centerline. Use these lines for left/right adjustment ref-
erence.

WK

LAMPS/LIGHTING - EXTERIOR - SERVICE INFORMATION

8L - 93


Content   ..  443  444  445  446   ..