Jeep Grand Cherokee WK. Manual - part 1773


  Index      Jeep     Jeep Grand Cherokee WK - service repair manual 2005 year


Search            


Content   ..  1771  1772  1773  1774   ..


Jeep Grand Cherokee WK. Manual - part 1773


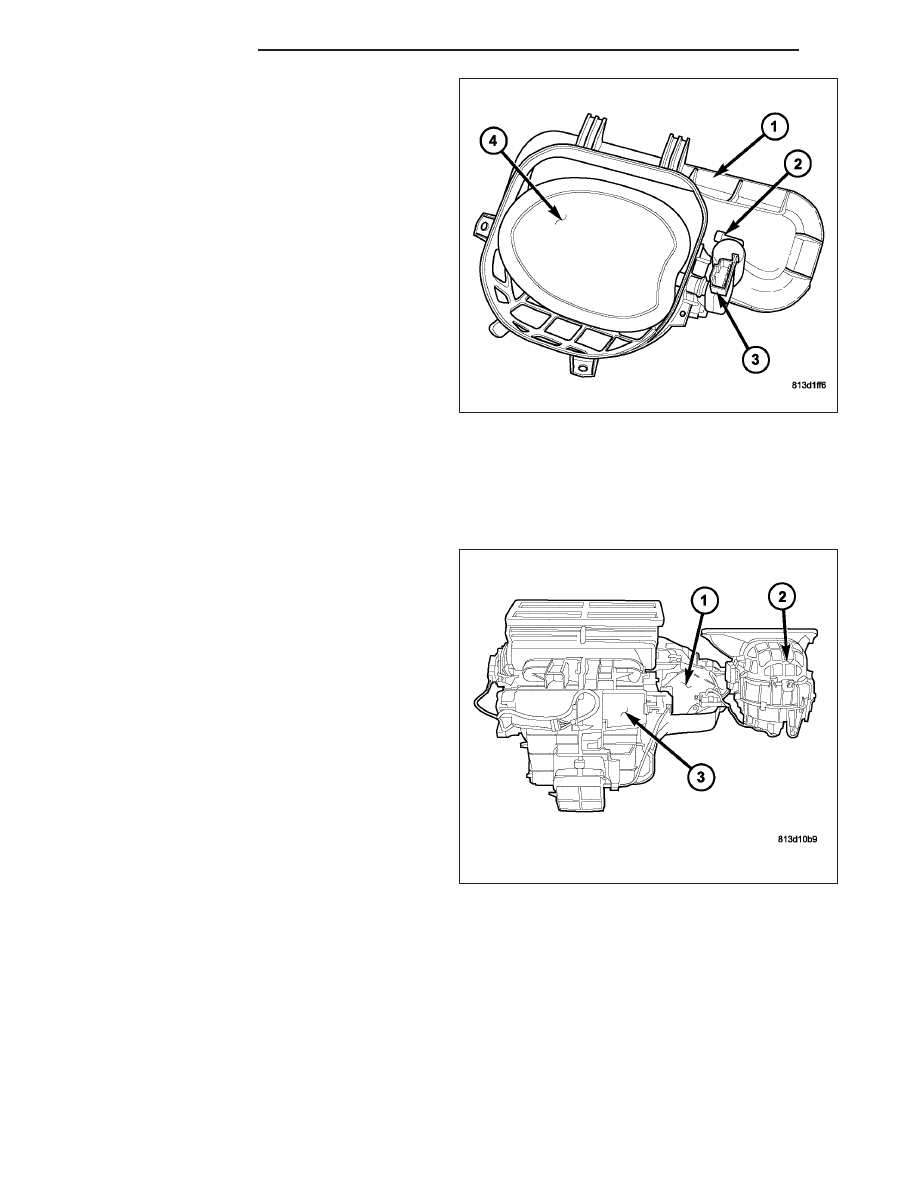
1. Remove the air inlet housing (1) from the HVAC

housing and place it on a workbench (Refer to 24 -
HEATING & AIR CONDITIONING/DISTRIBUTION/
HOUSING-HVAC

-

AIR

INLET

HOUSING

-

REMOVAL)

2. Remove the two screws (2) that secure the recircu-

lation door actuator (3) to the left side of the air
inlet housing and remove the actuator.

NOTE: If the foam seal on the recirculation-air
door or the air inlet housing is deformed or dam-
aged, it must be replaced.

3. Carefully remove the recirculation-air door (4) from

the air inlet housing.

HVAC HOUSING

NOTE: The HVAC housing must be removed from the vehicle and disassembled for service of the A/C
evaporator.

1. Remove the HVAC housing assembly and place it

on a workbench (Refer to 24 - HEATING & AIR
CONDITIONING/DISTRIBUTION /HOUSING-HVAC
- HVAC HOUSING ASSEMBLY - REMOVAL).

2. Remove the air distribution housing (3) from the

HVAC housing (1) (Refer to 24 - HEATING & AIR
CONDITIONING/DISTRIBUTION/HOUSING-HVAC
- AIR DISTRIBUTION HOUSING - REMOVAL).

3. Remove the air inlet housing (2) from the HVAC

housing (Refer to 24 - HEATING & AIR CONDI-
TIONING/DISTRIBUTION/HOUSING-HVAC - AIR
INLET HOUSING - REMOVAL).

24 - 440

DISTRIBUTION

WK

4. Disconnect the HVAC wire harness (1) from the

evaporator temperature sensor (2) and the blower
motor resistor or power module (4) (depending on
application).

5. Disconnect the wire harness for the blower motor

(3) from the blower motor resistor or power module
(depending on application).

6. Disengage the two HVAC wire harness retainers

from the HVAC housing (5) and remove the wire
harness.

7. Remove the blower motor (Refer to 24 - HEATING

& AIR

CONDITIONING/DISTRIBUTION/MOTOR-

BLOWER - REMOVAL).

8. Remove the blower motor resistor or power mod-

ule, depending on application (Refer to 24 - HEAT-
ING

&

AIR

CONDITIONING/CONTROLS/

RESISTOR-BLOWER MOTOR - REMOVAL) or
(Refer to 24 - HEATING & AIR CONDITIONING/
CONTROLS/MODULE-POWER-BLOWER MOTOR
- REMOVAL).

9. Remove the evaporator temperature sensor (Refer

to 24 - HEATING & AIR CONDITIONING/CON-
TROLS/SENSOR-EVAPORATOR TEMPERATURE
- REMOVAL).

10. Remove the two bolts (1) that secure the A/C

expansion valve (2) to the evaporator tube tap-
ping block (3) located at the front of the HVAC
housing (4).

11. Remove the A/C expansion valve from the evapo-

rator tube tapping block and remove and discard
the O-ring seals.

12. Install plugs in, or tape over the opened evapora-

tor tube fittings and all expansion valve ports.

WK

DISTRIBUTION

24 - 441

13. Carefully cut the foam seal (1) along the parting

line (2) of the upper half of the HVAC housing (3)
and the lower half of the HVAC housing (4). If the
seal

is

deformed

or

damaged,

it

must

be

replaced.

14. Remove the three metal retaining clips (5) that

secure the two halves of the HVAC housing
together.

15. Remove the ten screws (6) that secure the two

halves of the HVAC housing together.

16. Disengage the two plastic retaining clips (7) and

separate the two halves of the HVAC housing.

17. Open the rubber seal (1) and carefully lift the A/C

evaporator (2) and insulator (3) out of the lower
half of the HVAC housing (4).

18. If required, remove the rubber seal from the lower

half of the HVAC housing. If the seal is deformed
or damaged, it must be replaced.

19. If required, remove the insulator from the A/C

evaporator. If the insulator is deformed or dam-
aged, it must be replaced.

ASSEMBLY

AIR DISTRIBUTION HOUSING

NOTE: The air distribution housing must be removed from the HVAC housing and disassembled for service
of the mode-air and blend-air doors.

24 - 442

DISTRIBUTION

WK

1. Install the upper defrost/panel-air door (1), lower

defrost/panel-air door (2), directional vane (3) and
the blend-air door (4) into the driver side air distri-
bution housing (5) as required. Align the air doors
with the pivot shaft holes in the housing.

2. Install the upper defrost/panel-air door (1), lower

defrost/panel-air door (2), directional vane (3), rear
outlet-air door (4) and the blend-air door (5) into
the passenger side air distribution housing (6) as
required. Align the air doors with the pivot shaft
holes in the housing.

WK

DISTRIBUTION

24 - 443


Content   ..  1771  1772  1773  1774   ..