Jeep Grand Cherokee WK. Manual - part 1628


  Index      Jeep     Jeep Grand Cherokee WK - service repair manual 2005 year


Search            


Content   ..  1626  1627  1628  1629   ..


Jeep Grand Cherokee WK. Manual - part 1628


CAUTION: Protect all painted and trimmed surfaces from coming in contact with urethane or primers.
Be careful not to damage painted surfaces when removing moldings or cutting urethane around windshield.

QUARTER GLASS

REMOVAL

1. Before proceeding with the following repair proce-

dure, review all warnings and cautions (Refer to 23
- BODY/STATIONARY GLASS - WARNING).

2. Remove the quarter panel trim from the side of the

vehicle being serviced (Refer to 23 - BODY/INTE-
RIOR/QUARTER PANEL TRIM - REMOVAL).

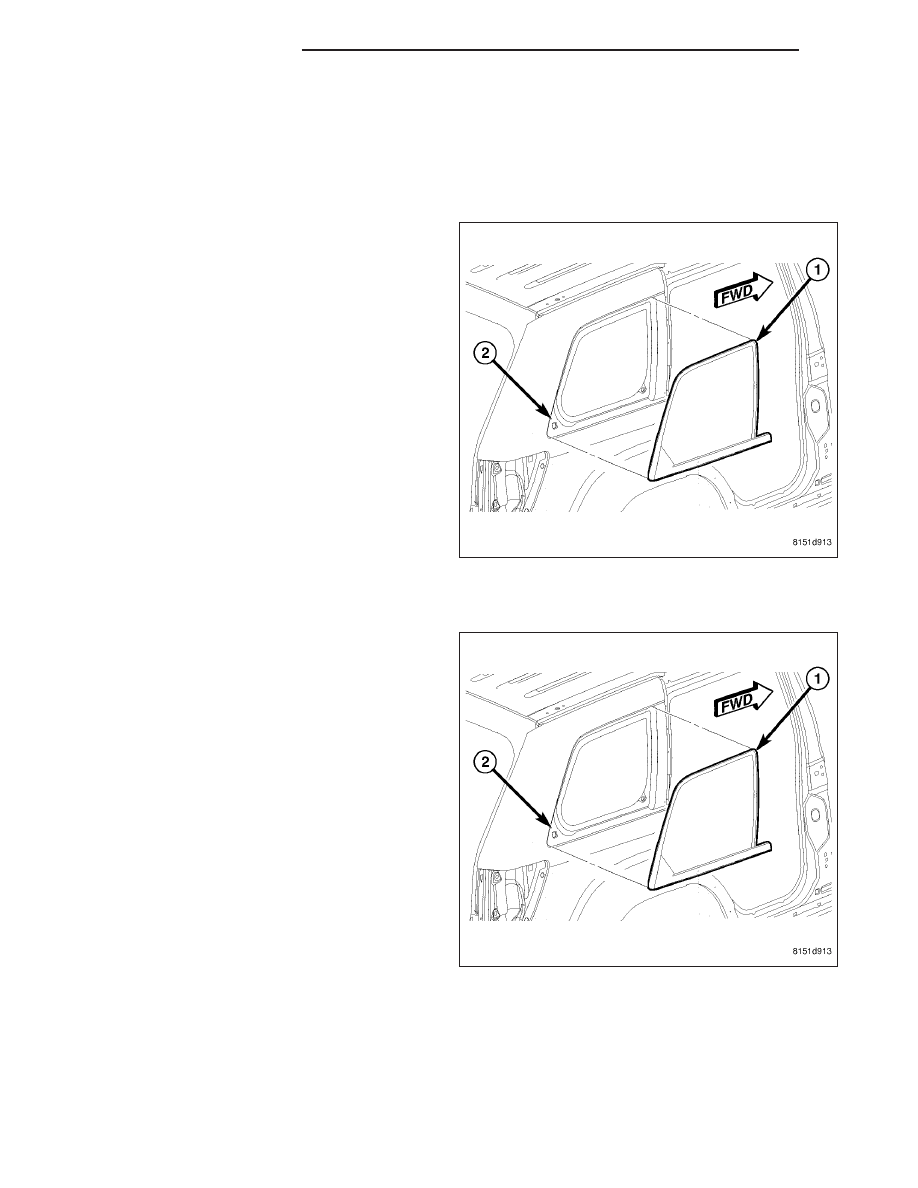
3. Carefully pull down the headliner to access the

upper mounting studs that secure the quarter glass
(1) to the window fence (2) and, remove the nuts
from the studs.

4. Remove the nuts that secure the lower mounting

studs to the window fence and, remove the nuts
from the studs.

5. Using razor knife, cut butyl sealer between the

mounting studs that secure the quarter glass to
window fence.

6. Carefully push the quarter window glass from the

opening.

INSTALLATION

CAUTION: Roll down the left and right front door
glass and open the liftgate glass before installing
quarter glass to avoid pressurizing the passenger
compartment if a door is slammed before urethane
is cured. Water leaks can result.

NOTE: The quarter glass fence should be cleaned
of all old butyl sealer. Do not grind sealer off the
fence, the paint finish will be adversely affected.

1. Apply 6 mm (0.25 in.) wide butyl tape around

perimeter of the quarter glass (1) approximately 5
mm (0.2 in.) from the edge of the glass. Ensure the
butyl tape is wrapped around the mounting studs.

2. Place the quarter glass into the window opening (2)

and insert mounting studs through the holes in the
window fence.

3. Install the nuts that secure the quarter glass to the

window fence. Tighten the nuts to 4.5 N·m (40 in. lbs.).

4. Install the headliner.

5. Install the quarter panel trim (Refer to 23 - BODY/INTERIOR/QUARTER PANEL TRIM - INSTALLATION).

23 - 170

STATIONARY GLASS

WK

WINDSHIELD

DESCRIPTION

The windshield is attached to the window frame (fence) with urethane adhesive. The urethane adhesive is applied
cold and seals the surface area between the window opening and the glass. The primer adheres the urethane adhe-
sive to the windshield.

It is difficult to salvage a windshield during the removal operation. The windshield is part of the structural support for
the roof. The urethane bonding used to secure the windshield to the fence is difficult to cut or clean from any sur-
face. If the rubber seals are set in urethane, it would also be unlikely they could be salvaged. Before removing the
windshield, check the availability of the windshield and seals from the parts supplier.

REMOVAL

1. Before proceeding with the following repair proce-

dure, review all warnings and cautions (Refer to 23
- BODY/STATIONARY GLASS - WARNING).

2. Remove the rear view mirror (Refer to 23 - BODY/

INTERIOR/REAR VIEW MIRROR - REMOVAL).

3. Remove the rain sensor module from the wind-

shield (Refer to 8 - ELECTRICAL/WIPERS/WASH-
ERS/RAIN SENSOR MODULE - REMOVAL).

4. Remove the cowl grille (Refer to 23 - BODY/EXTE-

RIOR/COWL GRILLE - REMOVAL.)

CAUTION: Be careful not to damage painted sur-
faces when removing moldings or cutting ure-
thane around the windshield.

5. Remove molding from the top of the windsield.

6. Using an assistant and a wire-type windshield cut-

out tool (1, 3 and 4), cut and separate the urethane
adhesive (2) securing the windshield to the wind-
shield fence.

7. Carefully remove the windshield from the vehicle.

INSTALLATION

WARNING: Do not operate the vehicle within 24 hours of windshield installation. It takes at least 24 hours
for urethane adhesive to cure. If it is not cured, the windshield may not perform properly if the vehicle is in
an accident.

CAUTION: To help prevent water leaks, partially roll down the left and right door glass before installing the
windshield. This avoids pressurizing the passenger compartment if a door is slammed before the urethane
is cured.

CAUTION: Protect all painted and trimmed surfaces from coming in contact with urethane or primers.

WK

STATIONARY GLASS

23 - 171

1. If the windshield (1) is being reused, remove the as

much original urethane (3) as possible from the
glass surface using a razor knife (2).

NOTE: To prevent corrosion, do not damage paint
on windshield fence when removing original ure-
thane.

NOTE: The windshield fence should be cleaned of
most of its old urethane adhesive. A small amount
of old urethane, approximately 1 mm in height
should remain on the fence. Do not completely
remove all old urethane from the fence, the paint
finish and bonding strength will be adversely
affected. Support spacers located near the cowl at
the bottom of the windshield fence should be
replaced with new spacers. Replace any missing
or damaged spacers around the perimeter of the
windshield fence.

2. Using a razor knife (2), level the original bead of urethane (1) on the windshield fence (3) to a thickness of

approximately 1 mm (0.04 in.) and remove any damaged adhesive backed spacers.

3. Install new adhesive backed spacers (4) along the

windshield fence as required.

4. Install a new rubber seal (2) along the top of the

windshield (1).

5. Using an assistant, position the windshield into the

windshield opening and against the windshield
fence (3) and spacers.

6. Verify the windshield lays evenly against the fence

at the top, bottom and sides of the opening. If not,
the fence must be formed to the shape of the wind-
shield.

7. Mark the windshield and the windshield fence with

a grease pencil or pieces of masking tape to use
as a reference for installation.

8. Using an assistant, remove the windshield from the

windshield opening and place it on a suitable pad-
ded work surface.

23 - 172

STATIONARY GLASS

WK

WARNING: Do not use solvent based glass clean-
ers to clean the windshield before applying glass
prep and primer or poor glass adhesion may
result.

9. Clean the inside of the windshield with an ammonia

based glass cleaner and a lint-free cloth.

10. Apply glass prep adhesion promoter 25 mm (1 in.)

wide (1) around the perimeter of the windshield
(2) and 5 mm (0.2 in.) from the edge of the glass
and wipe dry with a clean lint-free cloth until no
streaks are visible.

11. Apply glass primer 25 mm (1 in.) wide (1) around

the perimeter of the windshield (2) and 5 mm (0.2
in.) from the edge of the glass. Allow at least three
minutes drying time.

12. Using a flashlight, verify that the primer is completely and evenly installed along the perimeter of the windshield.

13. Re-prime any area that is not fully and evenly primed.

14. Clean the windshield fence with an ammonia

based glass cleaner and a lint-free cloth.

15. Apply pinch weld primer 15 mm (0.75 in.) wide (1)

around the windshield fence (2). Allow at least
three minutes drying time.

16. Using a flashlight, verify that the primer is com-

pletely and evenly installed along the windshield
fence.

17. Re-prime any area that is not fully and evenly

primed.

CAUTION: Always apply the bead of adhesive to
the

windshield. Always

install

the

windshield

within 5 minutes after applying the adhesive.

NOTE: If the original urethane adhesive has been
exposed for more than 12 hours, the entire adhe-
sive area will need to be re-primed prior to install-
ing new adhesive.

18. Apply approximately a 10 mm (0.4 in.) wide bead

of adhesive (1) with a triangular nozzle approxi-
mately 6 mm (0.230 in.) from the edge of the
glass (2) starting at the bottom center of the
windshield.

WK

STATIONARY GLASS

23 - 173


Content   ..  1626  1627  1628  1629   ..