Jeep Grand Cherokee WK. Manual - part 1195


  Index      Jeep     Jeep Grand Cherokee WK - service repair manual 2005 year


Search            


Content   ..  1193  1194  1195  1196   ..


Jeep Grand Cherokee WK. Manual - part 1195


INSTALLATION

CAUTION: To prevent severe damage to the Crank-
shaft, Damper or Special Tool 8512, thoroughly
clean the damper bore and the crankshaft nose
before installing Damper.

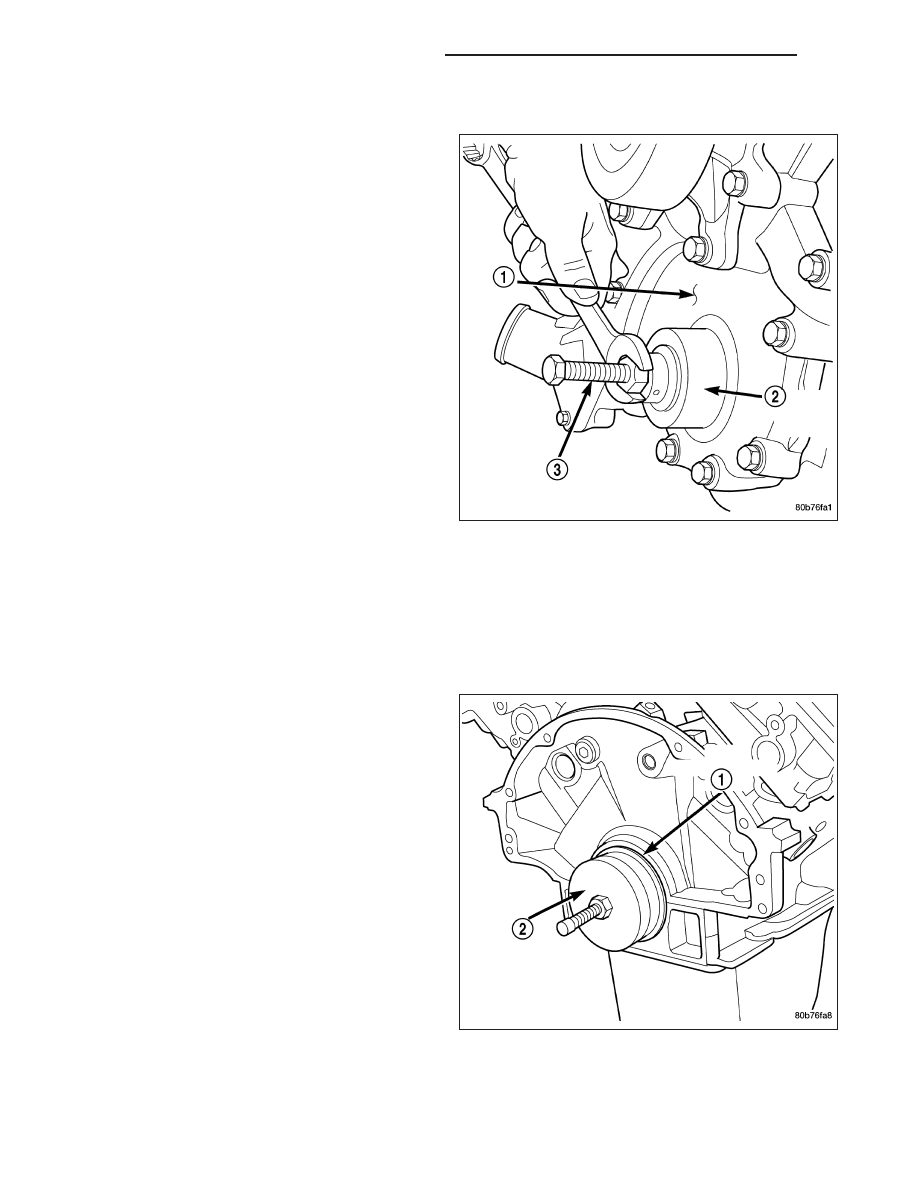
1. Using Special Tool 8348 and 8512 (2,3), install

crankshaft front seal.

2. Install vibration damper (Refer to 9 - ENGINE/EN-

GINE BLOCK/VIBRATION DAMPER - INSTALLA-
TION).

3. Install radiator cooling fan and shroud (Refer to 7 -

COOLING/ENGINE/RADIATOR FAN - INSTALLA-
TION).

4. Install upper radiator hose.

5. Install A/C compressor and tighten fasteners to 54

N·m (40 ft. lbs.).

6. Install accessory drive belt refer (Refer to 7 -

COOLING/ACCESSORY DRIVE/DRIVE BELTS -
INSTALLATION).

7. Refill cooling system (Refer to 7 - COOLING -

STANDARD PROCEDURE).

8. Connect negative cable to battery.

CRANKSHAFT OIL SEAL - REAR

REMOVAL

NOTE: This procedure can be performed in vehi-
cle.

1. If being performed in vehicle, remove the transmis-

sion.

2. Remove the flexplate (Refer to 9 - ENGINE/EN-

GINE BLOCK/FLEX PLATE - REMOVAL).

NOTE: The crankshaft oil seal CAN NOT be reused
after removal.

NOTE: The crankshaft rear oil seal remover Spe-
cial Tool 8506 must be installed deeply into the
seal. Continue to tighten the removal tool into the
seal until the tool can not be turned farther. Fail-
ure to install tool correctly the first time will cause
tool to pull free of seal without removing seal from
engine.

3. Using Special Tool 8506 (2), remove the crankshaft rear oil seal (1)

9 - 1376

ENGINE - 4.7L SERVICE INFORMATION

WK

INSTALLATION

1. Lubricate the crankshaft flange with engine oil.

2. Position the magnetic seal guide Special Tool

8349-2 onto the crankshaft rear face. Then position
the crankshaft rear oil seal (1) onto the guide (2).

3. Using Special Tools 8349 Crankshaft Rear Oil Seal

Installer (2) and C-4171 Driver Handle (3), with a
hammer, tap the seal (1) into place. Continue to
tap on the driver handle until the seal installer
seats against the cylinder block crankshaft bore.

4. Install the flexplate.

5. Install the transmission.

WK

ENGINE - 4.7L SERVICE INFORMATION

9 - 1377

FLEX PLATE

REMOVAL

1. Remove the transmission. (Refer to 21 - TRANS-

MISSION/TRANSAXLE/AUTOMATIC

-

45RFE/

545RFE - REMOVAL).

2. Remove the bolts and flexplate (1).

INSTALLATION

1. Position the flexplate onto the crankshaft and install

the bolts hand tight.

2. Tighten the flexplate retaining bolts to 60 N·m (45

ft. lbs.) in the sequence shown.

3. Install the transmission. (Refer to 21 - TRANSMIS-

SION/TRANSAXLE/AUTOMATIC - 45RFE/545RFE
- INSTALLATION).

9 - 1378

ENGINE - 4.7L SERVICE INFORMATION

WK

ROD - PISTON & CONNECTING

DESCRIPTION

CAUTION: Do not use a metal stamp to mark connecting rods as damage may result, instead use ink or a
scratch awl.

The pistons are made of a high strength aluminum alloy. The anodized top ring groove and crown has been
replaced with a coated top ring that is blue in color on the bottom surface. Piston skirts are coated with a solid
lubricant (Molykote) to reduce friction and provide scuff resistance. The connecting rods are made of forged pow-
dered metal, with a “fractured cap” design. A pressed fit piston pin is used to attach the piston and connecting rod
on the 4.7L.

STANDARD PROCEDURE - PISTON FITTING

1. To correctly select the proper size piston, a cylinder bore gauge, capable of reading in 0.003 mm ( .0001 in.)

INCREMENTS is required. If a bore gauge is not available, do not use an inside micrometer.

2. Measure the inside diameter of the cylinder bore at a point 38.0 mm (1.5 inches) below top of bore. Start per-

pendicular (across or at 90 degrees) to the axis of the crankshaft at point A and then take an additional bore
reading 90 degrees to that at point B.

WK

ENGINE - 4.7L SERVICE INFORMATION

9 - 1379


Content   ..  1193  1194  1195  1196   ..