Jeep Grand Cherokee WJ. Manual - part 889
 

  Index      Jeep     Jeep Grand Cherokee WJ - service repair manual 2001 year


Search            


Content   ..  887  888  889  890   ..


Jeep Grand Cherokee WJ. Manual - part 889


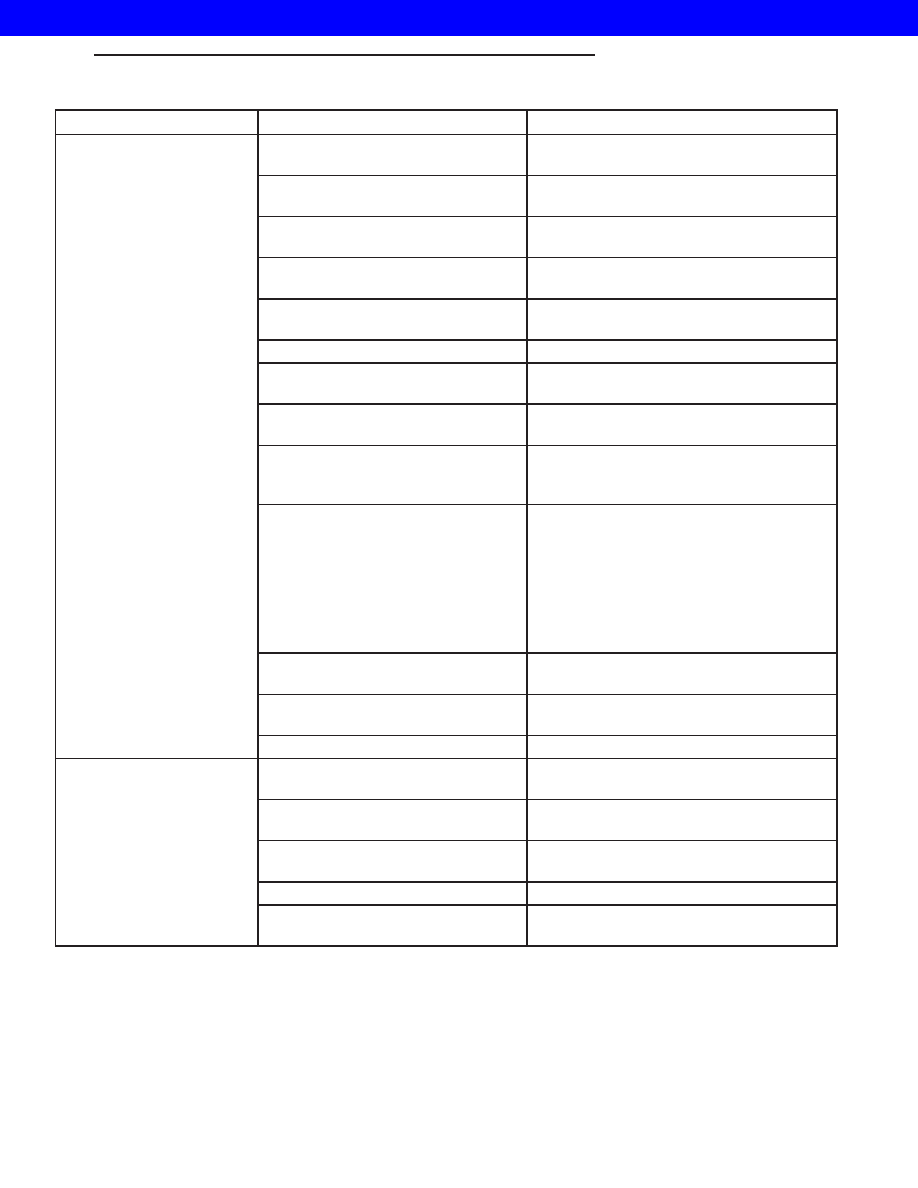
CONDITION

POSSIBLE CAUSES

CORRECTION

OIL LEAKS.

1. Fluid Lines and Fittings Loose/
Leaks/Damaged.

1. Tighten fittings. If leaks persist, replace
fittings and lines if necessary.

2. Fill Tube (where tube enters case)
Leaks/Damaged.

2. Replace tube seal. Inspect tube for
cracks in fill tube.

3. Pressure Port Plug Loose
Loose/Damaged.

3. Tighten to correct torque. Replace plug
or reseal if leak persists.

4. Pan Gasket Leaks.

4. Tighten pan screws (150 in. lbs.). If leaks
persist, replace gasket.

5. Valve Body Manual Lever Shaft
Seal Leaks/Worn.

5. Replace shaft seal.

6. Rear Bearing Access Plate Leaks.

6. Replace gasket. Tighten screws.

7. Gasket Damaged or Bolts are
Loose.

7. Replace bolts or gasket or tighten both.

8. Adapter/Extension Gasket
Damaged Leaks/Damaged.

8. Replace gasket.

9. Park/Neutral Switch, or
Transmission Range Sensor
Leaks/Damaged.

9. Replace switch and gasket.

10. Converter Housing Area Leaks.

10. Check for leaks at seal caused by worn
seal or burr on converter hub (cutting seal),
worn bushing, missing oil return, oil in front
pump housing or hole plugged. Check for
leaks past O-ring seal on pump or past
pump-to-case bolts; pump housing porous,
oil coming out vent due to overfill or leak
past front band shaft access plug.

11. Pump Seal Leaks/Worn/
Damaged.

11. Replace seal.

12. Torque Converter Weld
Leak/Cracked Hub.

12. Replace converter.

13. Case Porosity Leaks.

13. Replace case.

NOISY OPERATION IN
FOURTH GEAR ONLY

1. Overdrive Clutch Discs, Plates or
Snap Rings Damaged.

1. Remove unit and rebuild clutch pack.

2. Overdrive Piston or Planetary
Thrust Bearing Damaged.

2. Remove and disassemble unit. Replace
either thrust bearing if damaged.

3. Output Shaft Bearings Scored/
Damaged.

3. Remove and disassemble unit. Replace
either bearing if damaged.

4. Planetary Gears Worn/Chipped.

4. Remove and overhaul overdrive unit.

5. Overdrive Unit Overrunning Clutch
Rollers Worn/Scored.

5. Remove and overhaul overdrive unit.

STANDARD PROCEDURE - ALUMINUM
THREAD REPAIR

Damaged or worn threads in the aluminum trans-

mission case and valve body can be repaired by the
use of Heli-Coils™, or equivalent. This repair con-
sists of drilling out the worn-out damaged threads.
Then tap the hole with a special Heli-Coil™ tap, or
equivalent, and installing a Heli-Coil™ insert, or

equivalent, into the hole. This brings the hole back to
its original thread size.

Heli-Coil™, or equivalent, tools and inserts are

readily available from most automotive parts suppli-
ers.

WG

AUTOMATIC - 44RE

21s - 63

AUTOMATIC - 44RE (Continued)

2001 JEEP GRAND CHEROKEE

REMOVAL

CAUTION: The transmission and torque converter
must be removed as an assembly to avoid compo-
nent damage. The converter drive plate, pump
bushing, or oil seal can be damaged if the con-
verter is left attached to the driveplate during
removal. Be sure to remove the transmission and
torque converter as an assembly.

(1) Open the hood and disconnect the negative bat-

tery cable.

(2) Remove the (2) upper fan shroud retaining

bolts.

(3) Remove the transmission dipstick tube support

bracket nut from the turbocharger heatshield (Fig.
13).

(4) Position a drainpan under the transmission.
(5) Pull the transmission dipstick tube from the

transmission housing.

(6) Raise the vehicle on a hoist.
(7) Remove the (2) lower fan shroud retaining

bolts.

CAUTION: Mark the position of the driveshaft in
relation to its companion flange prior to disassem-
bly. Driveshaft must be reinstalled in the same posi-
tion it was in prior to disassembly.

(8) Remove the front driveshaft retaining bolts

(Fig. 14) and remove the driveshaft from the transfer
case companion flange. Support the driveshaft with
mechanics wire.

Fig. 13 Transmission Dipstick Tube Support Bracket

Position and Orientation

1 - TRANSMISSION DIPSTICK TUBE
2 - TURBOCHARGER EXHAUST MANIFOLD HEATSHIELD
3 - TRANSMISSION DIPSTICK TUBE SUPPORT BRACKET
RETAINING NUT

Fig. 14 Front Driveshaft Retaining Bolts

1 - TRANSFER CASE
2 - FRONT DRIVESHAFT RETAINING BOLTS
3 - REFERENCE MARK

Fig. 15 Rear Driveshaft - Supported

1 - REAR DRIVESHAFT

21s - 64

AUTOMATIC - 44RE

WG

AUTOMATIC - 44RE (Continued)

2001 JEEP GRAND CHEROKEE

(9) Remove the rear driveshaft retaining bolts and

remove the driveshaft from the transfer case compan-
ion flange. Support the driveshaft with mechanics
wire (Fig. 15).

(10) Disconnect the transfer case shift cable from

the shifter arm.

(11) Disconnect the vent tube from the transfer

case (Fig. 16).

(12) Remove the transmission oil pan and drain

the transmission fluid. Reinstall the transmission oil
pan.

(13) Remove the drainpan.
(14) Remove

the

(4)

exhaust

system

support

bracket retaining bolts from the transmission sup-
port crossmember (Fig. 17).

(15) Unclip the wire harness from the transmis-

sion support crossmember.

(16) Position a jack under the transmission sup-

port crossmember.

(17) Remove the (8) transmission support cross-

member retaining bolts (Fig. 17).

(18) Position a transmission jack under the trans-

fer case.

(19) Lower the transmission assembly enough to

gain access and remove the transfer case to trans-
mission retaining nuts.

(20) Remove the transfer case from the vehicle.
(21) Remove the jack from the transmission sup-

port crossmember.

(22) Remove the (4) transmission mount retaining

bolts (Fig. 17) and remove the transmission support
crossmember and mount from the vehicle.

(23) Remove the transfer case shift cable bracket

from the transmission housing (Fig. 18).

(24) Disconnect the throttle valve cable at the ball

and socket connection by gently pulling straight
apart (Fig. 18).

(25) Remove

the

throttle

valve

cable

bracket

retaining fasteners and position the cable assembly
out of the way (Fig. 18).

(26) Remove the spring from the shift lever arm

(Fig. 18).

(27) Disconnect the shifter cable at the ball and

socket connection by gently pulling straight apart
(Fig. 18).

(28) Remove the shifter cable bracket retaining

bolt from the transmission housing (Fig. 18).

(29) Remove the transmission fluid cooler lines

from the transmission (Fig. 18).

(30) Disconnect all the transmission electrical con-

nectors and unclip the wire harness from the trans-
mission housing (Fig. 18).

Fig. 16 Disconnecting Transfer Case Shift Linkage

1 - TRANSFER CASE RETAINING NUTS
2 - TRANSFER CASE SHIFTER CABLE
3 - TRANSFER CASE VENT HOSE
4 - FLAT BLADED TOOL
5 - TRANSFER CASE
6 - TRANSMISSION ELECTRICAL CONNECTOR

Fig. 17 Transmission Support Crossmember

Position and Orientation

1 - TRANSFER CASE
2 - TRANSMISSION MOUNT RETAINING BOLTS (2 OF 4)
3 - EXHAUST SYSTEM SUPPORT BRACKET RETAINING BOLTS
4 - CROSSMEMBER RETAINING BOLTS
5 - TRANSMISSION
6 - CROSSMEMBER RETAINING BOLTS

WG

AUTOMATIC - 44RE

21s - 65

AUTOMATIC - 44RE (Continued)

2001 JEEP GRAND CHEROKEE

(31) Remove the exhaust system inlet pipe retain-

ing bolts from the turbocharger down pipe (Fig. 19).
Support the front portion of the exhaust system with
mechanics wire. Be certain to position the pipe out of
the way of the torque converter bolt access hole.
Located in the transmission bellhousing.

(32) Disconnect the engine speed sensor. Located

on the upper right side of the transmission bellhous-
ing.

(33) Remove the starter motor from the vehicle.

(Refer to 8 - ELECTRICAL/STARTING/STARTER
MOTOR - REMOVAL)

NOTE: Mark the position of the torque convertor in
relation to the driveplate so they can be reassem-
bled in the original position.

(34) Working through the torque convertor bolt

access hole (Fig. 20), remove the (4) torque convertor
to driveplate retaining bolts. Rotate the engine in a
clockwise direction to access the converter bolts.

(35) Place a jack under the transmission.

CAUTION: Be certain the engine speed sensor has
been disconnected before proceeding.

(36) Remove the (10) engine to transmission bell-

housing retaining bolts.

Fig. 18 Transmission Control Cables and Fluid

Lines

1 - TRANSMISSION SHIFTER CABLE
2 - THROTTLE VALVE CABLE
3 - TRANSFER CASE SHIFTER CABLE
4 - TRANSFER CASE SHIFTER CABLE BRACKET RETAINING
BOLT(S)
5 - THROTTLE VALVE CABLE BRACKET RETAINING BOLT
6 - ELECTRICAL CONNECTORS
7 - TRANSMISSION FLUID LINES

Fig. 19 Exhaust System Inlet Pipe Retaining Bolts

1 - EXHAUST SYSTEM INLET PIPE RETAINING BOLTS
2 - ENGINE OIL PAN

Fig. 20 Torque Converter Bolt Access Hole

1 - TORQUE CONVERTER BOLT ACCESS HOLE
2 - ENGINE OIL PAN
3 - TOP DEAD CENTER ALIGNMENT TOOL ACCESS HOLE

21s - 66

AUTOMATIC - 44RE

WG

AUTOMATIC - 44RE (Continued)

2001 JEEP GRAND CHEROKEE


Content   ..  887  888  889  890   ..