Jeep Grand Cherokee WJ. Manual - part 335


  Index      Jeep     Jeep Grand Cherokee WJ - service repair manual 2001 year


Search            


Content   ..  333  334  335  336   ..


Jeep Grand Cherokee WJ. Manual - part 335


CAUTION: If lash adjusters and rocker arms are to
be reused, always mark position for reassembly in
their original positions.

(3) Remove lash adjuster(s).

INSTALLATION

(1) Install hydraulic lash adjuster making sure

adjusters are at least partially full of oil. This can be
verified by little or no plunger travel when lash
adjuster is depressed.

(2) Install rocker arm(s). Refer to procedure in this

section.

(3) Install cylinder head cover(s). Refer to proce-

dure in this section.

CRANKSHAFT DAMPER

REMOVAL

(1) Disconnect negative cable from battery.
(2) Remove accessory drive belt. Refer to COOL-

ING SYSTEM.

(3) Drain cooling system. Refer to COOLING SYS-

TEM.

(4) Remove radiator upper hose.
(5) Remove upper fan shroud. Refer to COOLING

SYSTEM.

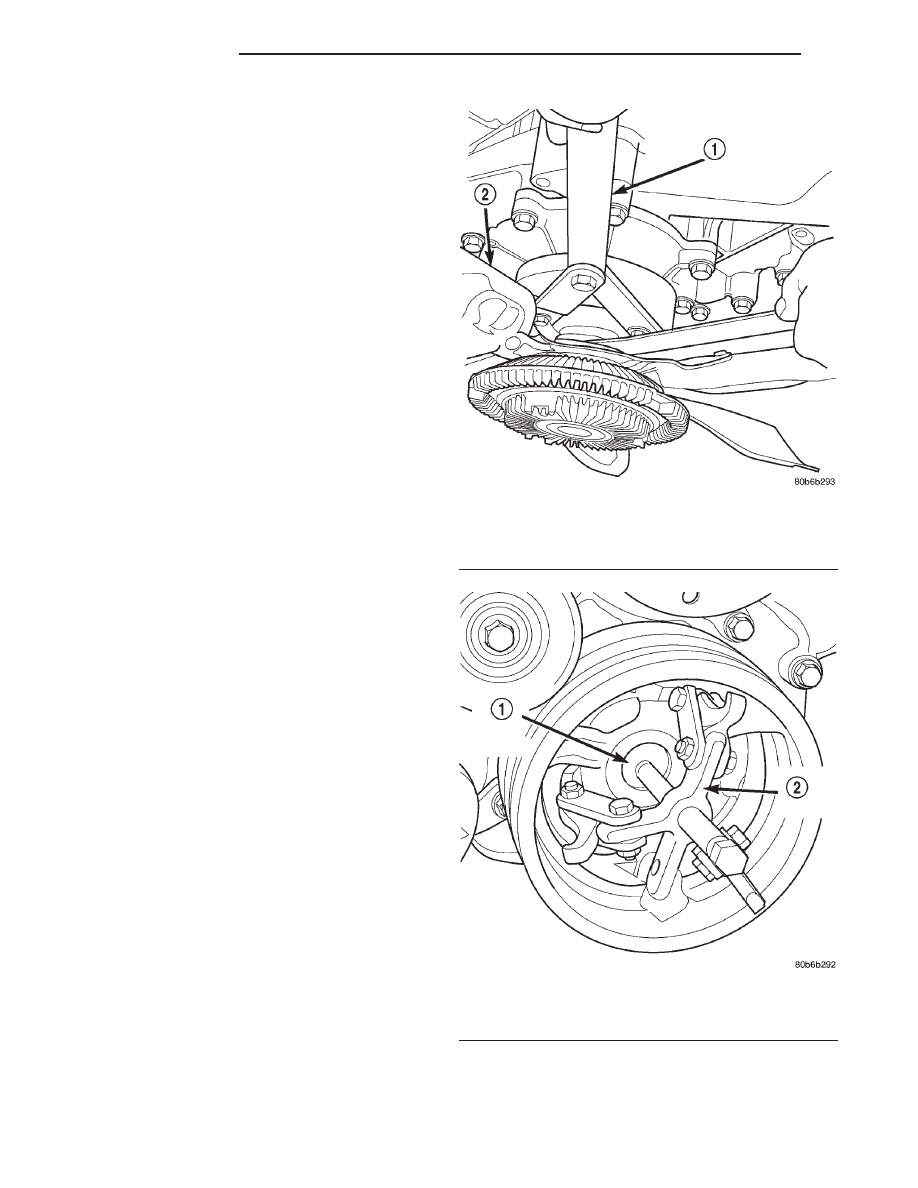
(6) Using Special Tools 6958 Spanner with Adapter

Pins 8346, loosen fan and viscous assembly from
water pump (Fig. 64).

(7) Remove fan and viscous assembly.
(8) Disconnect electrical connector for fan mounted

inside radiator shroud.

NOTE: Transmission cooler line snaps into shroud
lower right hand corner.

(9) Remove crankshaft damper bolt.
(10) Remove damper using Special Tools 8513

Insert and 1026 Three Jaw Puller (Fig. 65).

INSTALLATION

CAUTION: To prevent severe damage to the Crank-
shaft, Damper or Special Tool 8512, thoroughly
clean the damper bore and the crankshaft nose
before installing Damper.

(1) Align crankshaft damper slot with key in

crankshaft. Slide damper onto crankshaft slightly.

CAUTION: Special Tool 8512, is assembled in a
specific sequence. Failure to assemble this tool in
this sequence can result in tool failure and severe
damage to either the tool or the crankshaft.

(2) Assemble Special Tool 8512 as follows, The nut

is threaded onto the shaft first. Then the roller bear-
ing is placed onto the threaded rod (The hardened

Fig. 64 Fan Assembly—Removal/Installation

1 – SPECIAL TOOL 6958 SPANNER WRENCH WITH ADAPTER

PINS 8346

2 – FAN

Fig. 65 Crankshaft Damper—Removal

1 – SPECIAL TOOL 8513 INSERT
2 – SPECIAL TOOL 1026

9 - 106

4.7L ENGINE

WJ

REMOVAL AND INSTALLATION (Continued)

bearing surface of the bearing MUST face the nut).
Then the hardened washer slides onto the threaded
rod (Fig. 66). Once assembled coat the threaded rod’s
threads with Mopar

t Nickel Anti-Seize or (Loctite

No. 771).

(3) Using Special Tool 8512, press damper onto

crankshaft (Fig. 67).

(4) Install then tighten crankshaft damper bolt to

175 N·m (130 ft. lbs.).

(5) Install fan blade assembly.
(6) Install radiator upper shroud and tighten fas-

teners to 11 N·m (95 in. lbs.).

(7) Connect electrical connector for shroud fan.
(8) Install radiator upper hose.
(9) Install accessory drive belt.
(10) Refill cooling system.
(11) Connect negative cable to battery.

TIMING CHAIN COVER

REMOVAL

(1) Disconnect the battery negative cable.
(2) Drain cooling system and remove viscous fan

drive assembly. Refer to Group 7, Cooling System for
procedures.

(3) Remove radiator shroud. Refer to Group 7,

Cooling System for procedure.

(4) Disconnect both heater hoses at timing cover.
(5) Disconnect lower radiator hose at engine.
(6) Remove crankshaft damper. Refer to procedure

in this section.

(7) Remove accessory drive belt tensioner assembly

(Fig. 68).

(8) Remove the generator and A/C compressor.
(9) Remove cover and gasket (Fig. 69).

Fig. 66 Proper Assembly Method for Special Tool

8512

1 – BEARING
2 – NUT
3 – THREADED ROD
4 – BEARING HARDENED SURFACE (FACING NUT)
5 – HARDENED WASHER

Fig. 67 Crankshaft Damper—Installation

1 – SPECIAL TOOL 8512

Fig. 68 Accessory Drive Belt Tensioner

1 – TENSIONER ASSEMBLY
2 – FASTENER TENSIONER TO FRONT COVER

WJ

4.7L ENGINE

9 - 107

REMOVAL AND INSTALLATION (Continued)

INSTALLATION

(1) Clean timing chain cover and block surface.

Inspect cover gasket and replace as necessary.

(2) Install cover and gasket. Tighten fasteners in

sequence as shown in (Fig. 69) to 54 N·m (40 ft. lbs.).

(3) Install the A/C compressor and generator.
(4) Install crankshaft damper. Refer to procedure

in this section.

(5) Install accessory drive belt tensioner assembly.

Tighten fastener to 54 N·m (40 ft. lbs.).

(6) Install lower radiator hose.
(7) Install both heater hoses.
(8) Install radiator shroud and viscous fan drive

assembly. Refer to Group 7, Cooling System for pro-
cedure.

(9) Fill cooling system. Refer to Group 7, Cooling

System for procedures.

(10) Connect the battery negative cable.

TIMING CHAIN AND SPROCKETS

REMOVAL

(1) Disconnect negative cable from battery.
(2) Drain cooling system. Refer to Group 7, Cooling

System for procedures.

(3) Remove right and left cylinder head covers.

Refer to procedure in this section.

(4) Remove radiator fan shroud. Refer to Group 7,

Cooling System for procedure.

(5) Rotate engine until timing mark on crankshaft

damper aligns with TDC mark on timing chain cover
(Fig. 70) (#1 cylinder exhaust stroke) and the cam-
shaft sprocket “V8” marks are at the 12 o’clock posi-
tion (Fig. 71).

(6) Remove power steering pump. Refer to Group

19, Steering for procedures.

(7) Remove access plugs (2) from left and right cyl-

inder heads for access to chain guide fasteners (Fig.
72).

(8) Remove the oil fill housing to gain access to the

right side tensioner arm fastener.

(9) Remove crankshaft damper and timing chain

cover. Refer to procedures in this section.

(10) Collapse and pin primary chain tensioner

(Fig. 73).

CAUTION: Plate behind left secondary chain ten-
sioner could fall into oil pan. Therefore, cover pan
opening.

(11) Remove secondary chain tensioners.
(12) Remove camshaft position sensor from right

cylinder head (Fig. 74).

CAUTION: Care should be taken not to damage
camshaft target wheel. Do not hold target wheel
while loosening or tightening camshaft sprocket.
Do not place the target wheel near a magnetic
source of any kind. A damaged or magnetized tar-
get wheel could cause a vehicle no start condition.

Fig. 69 Timing Chain Cover Fasteners

Fig. 70 Engine Top Dead Center (TDC) Indicator

Mark

1 – TIMING CHAIN COVER
2 – CRANKSHAFT TIMING MARKS

9 - 108

4.7L ENGINE

WJ

REMOVAL AND INSTALLATION (Continued)

CAUTION: Do not forcefully rotate the camshafts or
crankshaft independently of each other. Damaging
intake valve to piston contact will occur. Ensure
negative battery cable is disconnected to guard
against accidental starter engagement.

Fig. 71 Camshaft Sprocket V8 Marks

1 – LEFT CYLINDER HEAD
2 – RIGHT CYLINDER HEAD

Fig. 72 Cylinder Head Access Plug Location

1 – RIGHT CYLINDER HEAD ACCESS PLUG
2 – LEFT CYLINDER HEAD ACCESS PLUG

Fig. 73 Collapsing And Pinning Primary Chain

Tensioner

1 – PRIMARY CHAIN TENSIONER
2 – ADJUSTABLE PLIERS
3 – SPECIAL TOOL 8514

WJ

4.7L ENGINE

9 - 109

REMOVAL AND INSTALLATION (Continued)


Content   ..  333  334  335  336   ..