Jeep Grand Cherokee WJ. Manual - part 132


  Index      Jeep     Jeep Grand Cherokee WJ - service repair manual 2001 year


Search            


Content   ..  130  131  132  133   ..


Jeep Grand Cherokee WJ. Manual - part 132


LAMP BULB SERVICE

TABLE OF CONTENTS

page

page

REMOVAL AND INSTALLATION

HEADLAMP BULB . . . . . . . . . . . . . . . . . . . . . . . . . 8
FOG LAMP BULB. . . . . . . . . . . . . . . . . . . . . . . . . . 8
FRONT TURN SIGNAL BULB . . . . . . . . . . . . . . . . . 9
PARK LAMP BULB . . . . . . . . . . . . . . . . . . . . . . . . . 9
FRONT SIDE MARKER LAMP BULB . . . . . . . . . . . 9
TAIL, BRAKE, TURN SIGNAL AND BACK-UP

LAMP BULBS . . . . . . . . . . . . . . . . . . . . . . . . . . . 9

BACK-UP LAMP BULB . . . . . . . . . . . . . . . . . . . . . . 9
REAR SIDE MARKER LAMP BULB . . . . . . . . . . . . 9

LICENSE PLATE LAMP BULB . . . . . . . . . . . . . . . 10
CENTER HIGH MOUNTED STOP LAMP

(CHMSL) BULB . . . . . . . . . . . . . . . . . . . . . . . . . 10

UNDERHOOD LAMP BULB . . . . . . . . . . . . . . . . . 10
DOOR COURTESY LAMP BULB. . . . . . . . . . . . . . 10
VISOR VANITY LAMP BULB . . . . . . . . . . . . . . . . . 11
DOME/READING LAMP BULB . . . . . . . . . . . . . . . 11
OVERHEAD CONSOLE READING LAMP BULB . . 11
CARGO LAMP BULB . . . . . . . . . . . . . . . . . . . . . . 11

REMOVAL AND INSTALLATION

HEADLAMP BULB

REMOVAL

(1) Remove headlamp.
(2) Turn bulb socket one quarter turn counter

clockwise.

(3) Remove socket from lamp (Fig. 1).
(4) Pull bulb from socket.

INSTALLATION

CAUTION: Do not touch the bulb glass with fingers
or other oily surfaces. Reduced bulb life will result.

(1) Position bulb into socket and push into place.
(2) Position bulb socket in headlamp and turn bulb

socket one quarter turn clockwise.

(3) Install headlamp.

FOG LAMP BULB

REMOVAL

(1) Disconnect fog lamp harness connector.
(2) Rotate bulb socket 1/4 turn counter clockwise.
(3) Remove bulb socket from lamp (Fig. 2).

INSTALLATION

CAUTION: Do not touch the bulb glass with fingers
or other oily surfaces. Reduced bulb life will result.

(1) Position bulb socket in fog lamp.
(2) Rotate bulb socket 1/4 turn clockwise.
(3) Connect fog lamp harness connector.

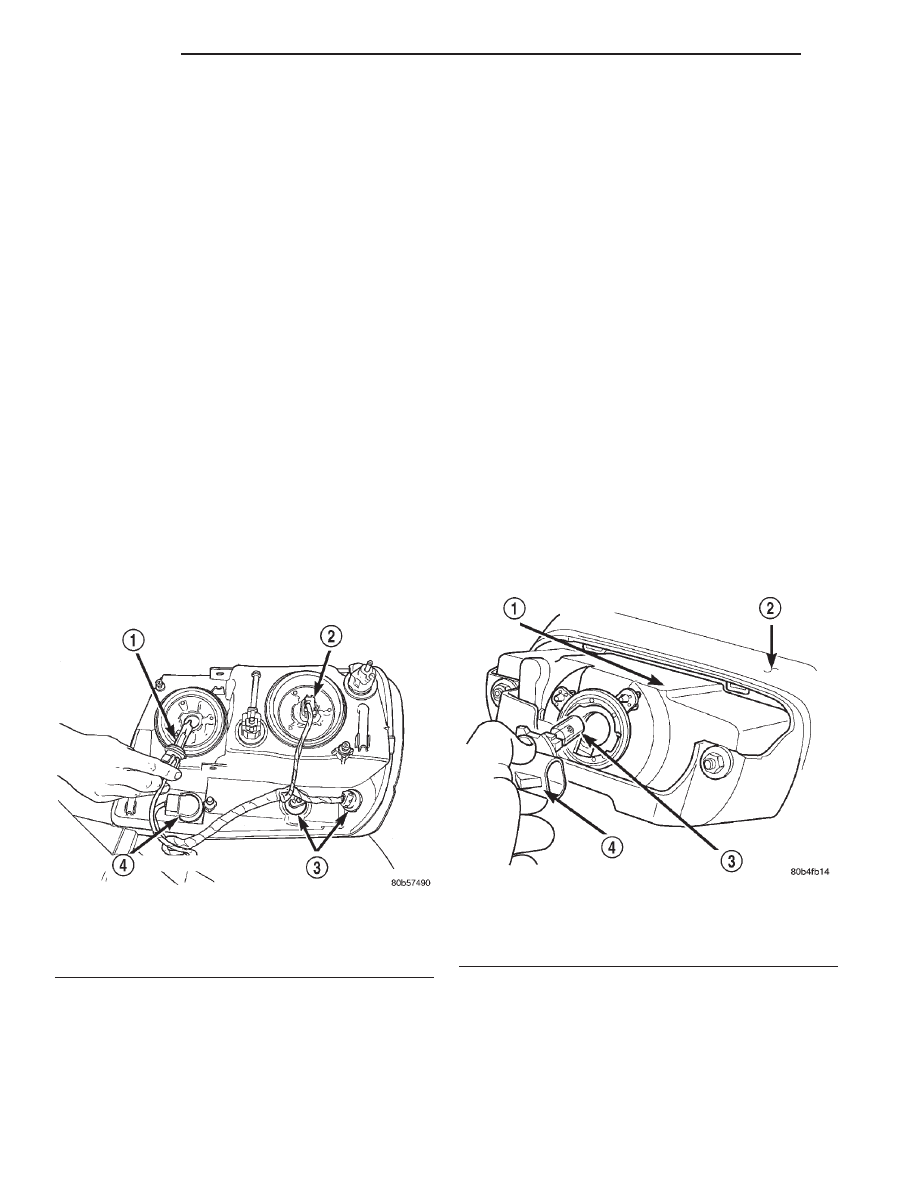
Fig. 1 Headlamp Bulb

1 – HIGH BEAM BULB
2 – LOW BEAM BULB
3 – MARKER BULB
4 – PARK/TURN SIGNAL BULB

Fig. 2 Fog Lamp Bulb

1 – FOG LAMP
2 – FASCIA
3 – BULB
4 – BULB SOCKET

8L - 8

LAMPS

WJ

FRONT TURN SIGNAL BULB

REMOVAL

(1) Remove headlamp module.
(2) Rotate turn signal bulb socket 1/4 turn counter

clockwise (Fig. 1).

(3) Remove bulb socket from module.
(4) Pull bulb from socket.

INSTALLATION

(1) Press bulb into socket.
(2) Position bulb socket in module.
(3) Rotate turn signal bulb socket 1/4 turn clock-

wise.

(4) Install headlamp module.

PARK LAMP BULB

REMOVAL

(1) Remove the headlamp module. Refer to Head-

lamp Removal/Installation procedure.

(2) Rotate the headlamp module to access the bulb

sockets (Fig. 1).

(3) Remove the park lamp socket.
(4) Grasp the bulb and remove from socket.

INSTALLATION

(1) Engage the bulb in the lamp socket.
(2) Install the lamp socket into the headlamp mod-

ule.

(3) Install the headlamp module on the vehicle.

FRONT SIDE MARKER LAMP BULB

REMOVAL

(1) Remove headlamp module.
(2) Rotate

side

marker

bulb

socket

1/4

turn

counter clockwise (Fig. 1).

(3) Remove bulb socket from module.
(4) Pull bulb from socket.

INSTALLATION

(1) Press bulb into socket.
(2) Position bulb socket in module.
(3) Rotate side marker bulb socket 1/4 turn clock-

wise.

(4) Install headlamp module.

TAIL, BRAKE, TURN SIGNAL AND BACK-UP
LAMP BULBS

The brake, turn signal, back-up, and side marker

lamp bulbs are incorporated into the tail lamp.

REMOVAL

(1) Remove tail lamp.
(2) Grasp bulb socket and rotate counterclockwise.
(3) Separate socket from lamp
(4) Pull bulb from socket (Fig. 3).

INSTALLATION

(1) Position bulb in socket and push into place.
(2) Position bulb socket in lamp and rotate clock-

wise.

(3) Install lamp.

BACK-UP LAMP BULB

REMOVAL

(1) Remove tail lamp.
(2) Grasp bulb socket and rotate counterclockwise.
(3) Separate socket from lamp
(4) Pull bulb from socket (Fig. 3).

INSTALLATION

(1) Position bulb in socket and push into place.
(2) Position bulb socket in lamp and rotate clock-

wise.

(3) Install lamp.

REAR SIDE MARKER LAMP BULB

REMOVAL

(1) Remove the tail lamp assembly.
(2) Remove the bulb socket from the lamp (Fig. 3).
(3) Grasp the bulb and remove.

INSTALLATION

(1) Install the bulb in the socket.
(2) Install the bulb socket in the lamp.
(3) Position the tail lamp assembly on the vehicle.

Install the screws.

Fig. 3 Tail Lamp Bulbs

1 – TAIL/STOP BULB
2 – TAIL LAMP
3 – BACK-UP BULB
4 – TURN SIGNAL BULB

WJ

LAMPS

8L - 9

REMOVAL AND INSTALLATION (Continued)

LICENSE PLATE LAMP BULB

REMOVAL

(1) Remove lamp assembly from liftgate lamp mod-

ule.

(2) Rotate bulb socket counterclockwise to discon-

nect bulb socket from lamp.

(3) Remove bulb from socket.

INSTALLATION

(1) Install bulb in socket.
(2) Install socket and bulb assembly in lamp housing.
(3) Install lamp assembly in liftgate lamp module.

CENTER HIGH MOUNTED STOP LAMP
(CHMSL) BULB

REMOVAL

(1) Remove screws attaching lamp housing to lift-

gate.

(2) Rotate bulb socket 1/4 turn and pull from hous-

ing (Fig. 4).

(3) Grasp bulb and pull from socket.

INSTALLATION

(1) Push bulb into socket.
(2) Position socket in lamp and rotate 1/4 turn.
(3) Install screws attaching the lamp housing to

liftgate.

UNDERHOOD LAMP BULB

REMOVAL

(1) Insert a small flat blade in access slot between

lamp base and lamp lens.

(2) Pry lamp lens upward and remove lamp lens

(Fig. 5).

(3) Depress bulb terminal inward (Fig. 6) to

release bulb.

INSTALLATION

(1) Engage replacement bulb wire loop to terminal

closest to lamp base wire connector.

(2) Depress opposite terminal inward and engage

remaining bulb wire loop.

(3) Position lamp lens on lamp base and press into

place.

DOOR COURTESY LAMP BULB

REMOVAL

(1) Remove door trim panel. Refer to Group 23,

Body Components for service procedures.

Fig. 4 CHMSL Bulb

1 – CHMSL
2 – CHMSL BULB

Fig. 5 Underhood Lamp Lens

1 – LAMP
2 – LAMP LENS

Fig. 6 Underhood Lamp Bulb

1 – BULB
2 – DEPRESS TERMINAL INWARD
3 – BULB WIRE LOOP
4 – LAMP BASE

8L - 10

LAMPS

WJ

REMOVAL AND INSTALLATION (Continued)

(2) Remove bulb socket from lamp.
(3) Pull bulb from socket.

INSTALLATION

(1) Position bulb in socket and press into place.
(2) Install bulb socket in lamp.
(3) Install door trim panel.

VISOR VANITY LAMP BULB

REMOVAL

(1) Using a small flat blade, carefully pry each cor-

ner of the lens out of the lamp.

(2) Separate the lens from the lamp.
(3) Grasp the bulb and pull out.

INSTALLATION

(1) Position the bulb in the socket and push in

place.

(2) Position the lens on the lamp and snap into

place.

DOME/READING LAMP BULB

REMOVAL

(1) Rotate the grab handle down.
(2) Remove the screws retaining the grab handle/

dome lens.

(3) Remove grab handle/lens from module.
(4) Remove bulb from lamp terminals.

INSTALLATION

(1) Insert bulb into lamp terminals.
(2) Position the grab handle/lens on lamp module.
(3) Install the screws retaining the grab handle/

lens to the lamp module.

OVERHEAD CONSOLE READING LAMP BULB

REMOVAL

(1) Remove the overhead console.
(2) Rotate the console until the bulb is visible (Fig.

7).

(3) Grasp the bulb and remove from the socket.

INSTALLATION

(1) Push the bulb into the bulb socket.
(2) Install the console on the headliner and roof

panel.

(3) Align the screw hole and install the screw.

CARGO LAMP BULB

REMOVAL

(1) Using a small flat blade, pry forward corners of

lamp lens from lamp.

(2) Pull bulb from lamp (Fig. 8).

INSTALLATION

(1) Position bulb in lamp and press into place.
(2) Position lamp lens on lamp and press into

place.

Fig. 7 Overhead Console Reading Lamp Bulb

1 – BULB

Fig. 8 Cargo Lamp Bulb

1 – CARGO LAMP BULB
2 – CARGO LAMP

WJ

LAMPS

8L - 11

REMOVAL AND INSTALLATION (Continued)


Content   ..  130  131  132  133   ..