Infiniti QX56 (JA60). Manual - part 967


  Index      Infiniti     Infiniti QX56 (JA60) - service repair manual 2010 year


Search            


Content   ..  965  966  967  968   ..


Infiniti QX56 (JA60). Manual - part 967


TM-170

< ON-VEHICLE REPAIR >

OIL PAN

OIL PAN

Oil Pan

INFOID:0000000005148740

REMOVAL AND INSTALLATION

Removal

1. Drain A/T fluid. Refer to 

TM-150, "Changing the A/T Fluid (ATF)"

.

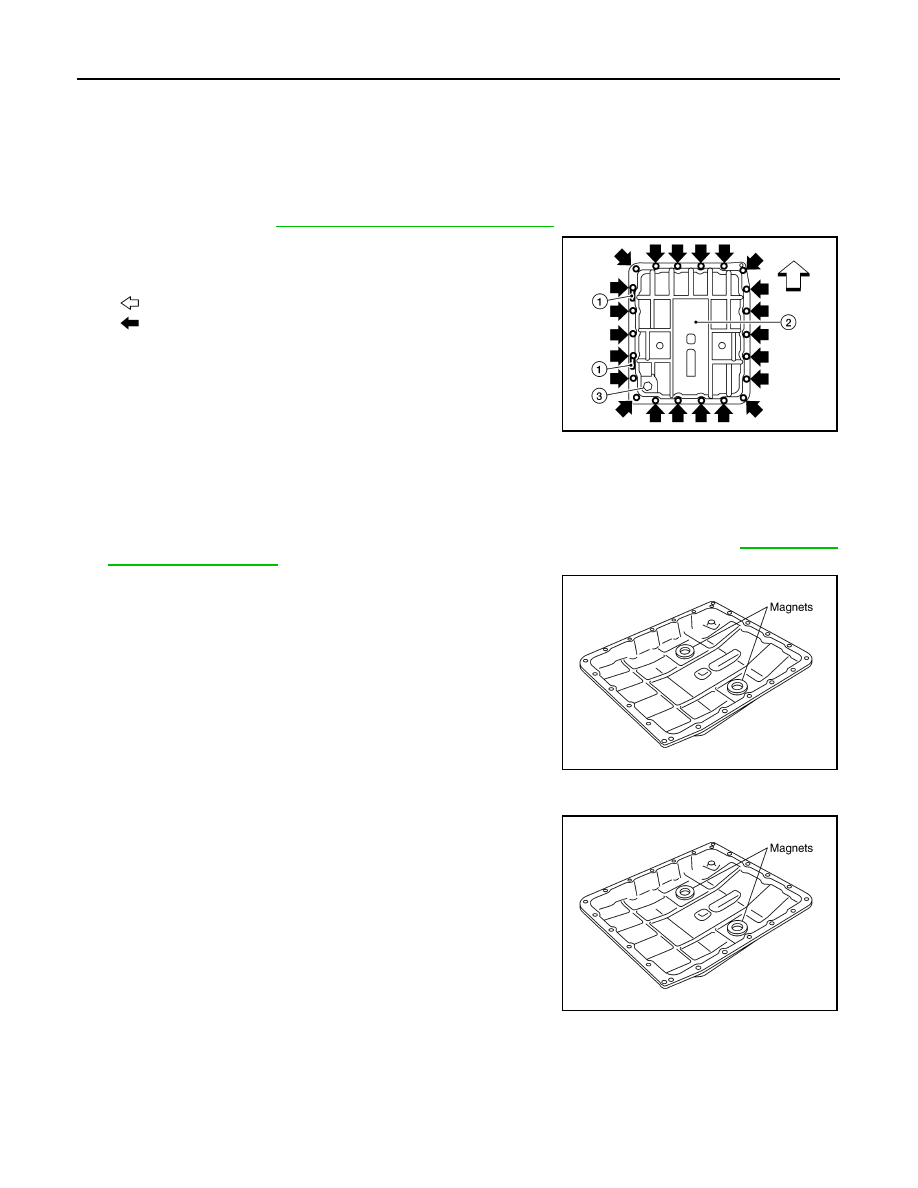
2. Remove oil pan clips (1).
3. Remove oil pan (2).
4. Remove oil pan gasket.

: Vehicle front

: Oil pan bolts

• Drain plug (3)

5. Check foreign materials in oil pan to help determine cause of malfunction. If the A/T fluid is very dark, has

some burned smell, or contains foreign particles, friction material (clutches, band) may need replacement.

A tacky film that will not wipe clean indicates varnish build up. Varnish can cause valves, servo, and

clutches to stick and can inhibit pump pressure.

CAUTION:

If friction material is detected, flush the transmission cooler after repair. Refer to 

TM-152, "A/T

Fluid Cooler Cleaning"

.

6. Remove magnets from oil pan.

Installation

1. Install the oil pan magnets as shown.

AWDIA0023ZZ

SCIA5200E

SCIA5200E

OIL PAN

TM-171

< ON-VEHICLE REPAIR >

C

E

F

G

H

I

J

K

L

M

A

B

TM

N

O

P

2. Install the oil pan and new oil pan gasket.

: Vehicle front

: Oil pan bolts

• Clips (1)

• Drain plug (3)

CAUTION:

• Be sure the oil pan drain plug hole is located to the rear of

the transmission assembly.

• Before installing oil pan bolts, remove any traces of old

sealant from the sealing surfaces and threaded holes.

• Do not reuse the oil pan gasket.

• Always replace the oil pan bolts as they are self-sealing.

• Partially install the oil pan bolts in a criss-cross pattern to prevent dislocation of the gasket.

3. Install new oil pan bolts and clips tighten in numerical order as

shown.

4. Install drain plug with new gasket to oil pan and tighten to speci-

fication.

CAUTION:

Do not reuse the drain plug gasket.

5. Refill the A/T with fluid and check for fluid leakage. Refer to 

TM-

148, "Checking the A/T Fluid (ATF)"

.

AWDIA0023ZZ

Oil pan bolts

: 7.9 N·m (0.81 kg-m, 70 in-lb) 

Drain plug

: 34 N·m (3.5 kg-m, 25 ft-lb)

SCIA4113E

TM-172

< ON-VEHICLE REPAIR >

CONTROL VALVE WITH TCM

CONTROL VALVE WITH TCM

Control Valve with TCM and A/T Fluid Temperature Sensor 2 and Plug

INFOID:0000000005148741

COMPONENTS

CONTROL VALVE WITH TCM REMOVAL AND INSTALLATION

Removal

1. Disconnect negative battery terminal.
2. Drain A/T fluid. Refer to 

TM-150, "Changing the A/T Fluid (ATF)"

.

3. Disconnect A/T assembly harness connector.

1.

Transmission

2.

Snap ring

3.

Sub-harness

4.

Control valve with TCM

5.

Bracket

6.

A/T fluid temperature sensor 2

7.

Oil pan gasket

8.

Brackets

9.

Oil pan bolt

10. Oil pan

11. Magnet

12. Drain plug

13. Drain plug gasket

14. Terminal cord assembly

15.  O-ring

16. O-ring

17. Plug

A/T fluid temperature sensor 2 (A) can be changed to plug (B), depending on vehicles.

JSDIA1314GB

CONTROL VALVE WITH TCM

TM-173

< ON-VEHICLE REPAIR >

C

E

F

G

H

I

J

K

L

M

A

B

TM

N

O

P

4. Remove snap ring from A/T assembly harness connector.

5. Push A/T assembly harness connector.

CAUTION:

Do not damage connector.

6. Remove oil pan and oil pan gasket. Refer to 

TM-170, "Oil Pan"

.

7. If an A/T fluid temperature sensor 2 is attached, disconnect the A/T fluid temperature sensor 2 connector

as shown below.

a. Disconnect A/T fluid temperature sensor 2 connector (A).

CAUTION:

 Do not damage connector.

b. Straighten the four terminal clips (

) to free the terminal cord

assembly for A/T fluid temperature sensor 2 harness.

8. Straighten terminal clip (

) to free the output speed sensor har-

ness.

9. Disconnect output speed sensor connector (1).

CAUTION:

Do not damage connector.

SCIA5021E

SCIA5022E

SCIA8124E

JSDIA1316ZZ


Content   ..  965  966  967  968   ..