Infiniti QX56 (Z62). Manual - part 1320


  Index      Infiniti     Infiniti QX56 (Z62) - service repair manual 2011 year


Search            


Content   ..  1318  1319  1320  1321   ..


Infiniti QX56 (Z62). Manual - part 1320


PARKING COMPONENTS

TM-189

< REMOVAL AND INSTALLATION >

[7AT: RE7R01B]

C

E

F

G

H

I

J

K

L

M

A

B

TM

N

O

P

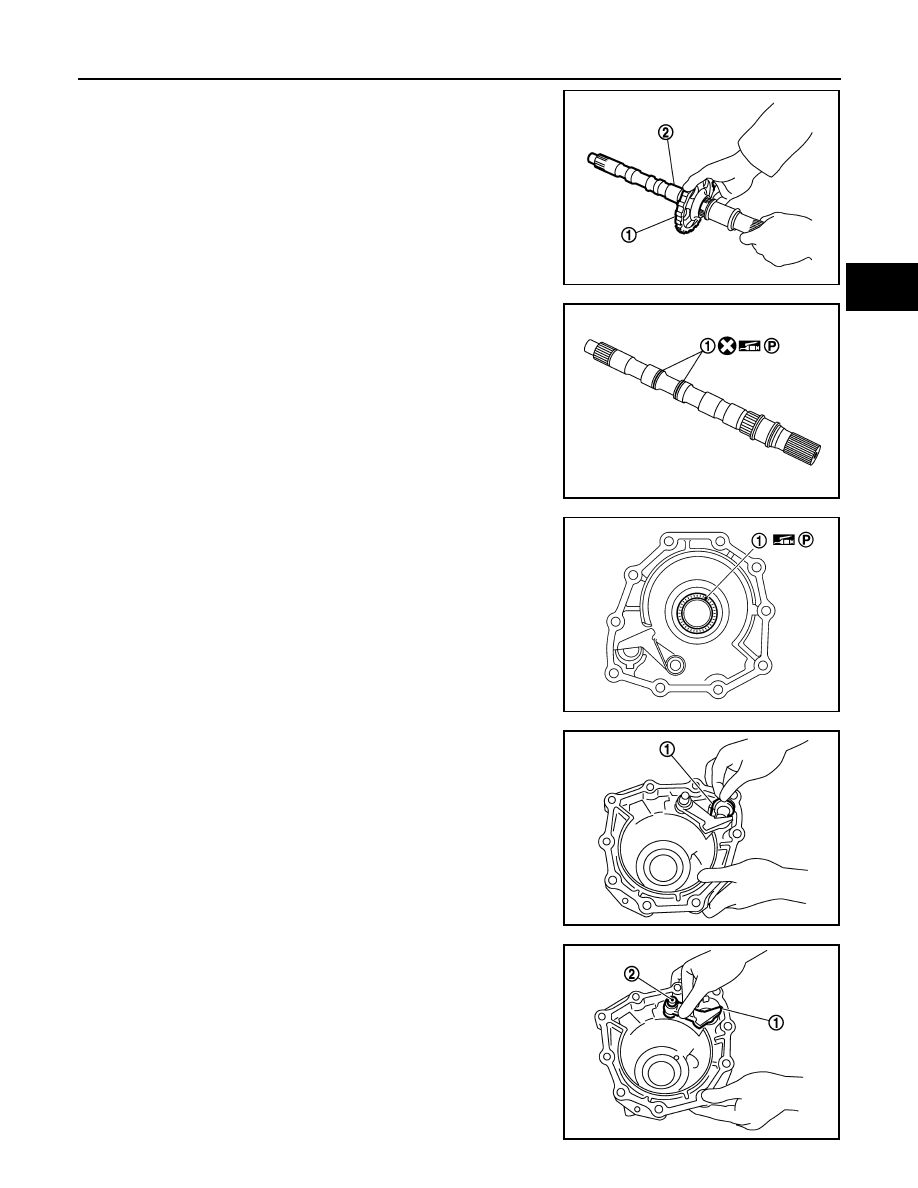
11. Remove parking gear (1) from output shaft (2).

12. Remove seal rings (1) from output shaft.

13. Remove needle bearing (1) from rear extension.

14. Remove parking actuator support (1) from rear extension.

15. Remove parking pawl (with return spring) (1) and pawl shaft (2)

from rear extension.

JPDIA0029ZZ

JPDIA0030ZZ

SCIA6179J

JPDIA0031ZZ

JPDIA0032ZZ

TM-190

< REMOVAL AND INSTALLATION >

[7AT: RE7R01B]

PARKING COMPONENTS

16. Remove return spring (1) from parking pawl (2).

INSTALLATION

Note the following, and install in the reverse order of removal.

CAUTION:

• Never reuse seal rings and drain plug gasket.
• Apply petroleum jelly to needle bearing and seal rings.
• Insert the tip of parking rod between the parking pawl and the parking actuator support when assem-

bling the rear extension assembly. 

• Refer to the followings installing rear extension assembly.
- Apply recommended sealant (Genuine Anaerobic Liquid Gasket or

equivalent. Refer to 

GI-22, "Recommended Chemical Products

and Sealants"

.) to rear extension assembly as shown in the figure.

CAUTION:

Completely remove all moisture, oil and old sealant, etc. from
the transmission case and rear extension assembly mounting
surfaces.

- Tighten rear extension assembly bolts to the specified torque.

2WD : Inspection

INFOID:0000000006233260

INSPECTION AFTER REMOVAL

SCIA6180J

Sealant starting 
point and end-
point (A)

: Start and finish point shall be in 
the center of two bolts.

Overlap width of 
sealant starting 
point and end-
point (B)

: 3 – 5 mm (0.12 – 0.20 in)

Sealant width (C)

: 1.0 – 2.0 mm (0.04 – 0.08 in)

Sealant height (C)

: 0.4 – 1.0 mm (0.016 – 0.04 in)

JSDIA1855ZZ

1

:  Bracket

A

:  Bolt

B

: Self-sealing bolt

JSDIA1845ZZ

PARKING COMPONENTS

TM-191

< REMOVAL AND INSTALLATION >

[7AT: RE7R01B]

C

E

F

G

H

I

J

K

L

M

A

B

TM

N

O

P

If the contact surface on parking actuator support (1), parking pawl
(2) and etc. has excessive wear, abrasion, bend, or any other dam-
age, replace the components.

INSPECTION AFTER INSTALLATION

Check A/T fluid leakage. Refer to 

TM-175, "Inspection"

.

JPDIA0034ZZ

TM-192

< REMOVAL AND INSTALLATION >

[7AT: RE7R01B]

REAR OIL SEAL

REAR OIL SEAL

2WD

2WD : Exploded View

INFOID:0000000006228060

2WD : Removal and Installation

INFOID:0000000006228061

REMOVAL

1.

Remove propeller shaft assembly. Refer to 

DLN-144, "Removal and Installation"

.

2.

Remove rear oil seal (1) using a flat-bladed screwdriver (A).

CAUTION:

Be careful not to scratch rear extension assembly.

INSTALLATION

Note the following and install in the reverse order of removal.
• As shown in the figure, use the drift [SST: ST33400001 (J-26082)]

(A) to drive rear oil seal into rear extension assembly until it is
flush.

CAUTION:

• Never reuse rear oil seal.
• Apply ATF to rear oil seal.

1.

A/T

2.

Rear oil seal

Refer to 

GI-4, "Components"

 for symbols in the figure.

JSDIA1843ZZ

JPDIA0037ZZ

JPDIA0039ZZ


Content   ..  1318  1319  1320  1321   ..