Infiniti QX56 (Z62). Manual - part 1097


  Index      Infiniti     Infiniti QX56 (Z62) - service repair manual 2011 year


Search            


Content   ..  1095  1096  1097  1098   ..


Infiniti QX56 (Z62). Manual - part 1097


CHECK SHOCK ABSORBER FOR MALFUNCTION

SCS-25

< BASIC INSPECTION >

[HBMC]

C

D

F

G

H

I

J

K

L

M

A

B

SCS

N

O

P

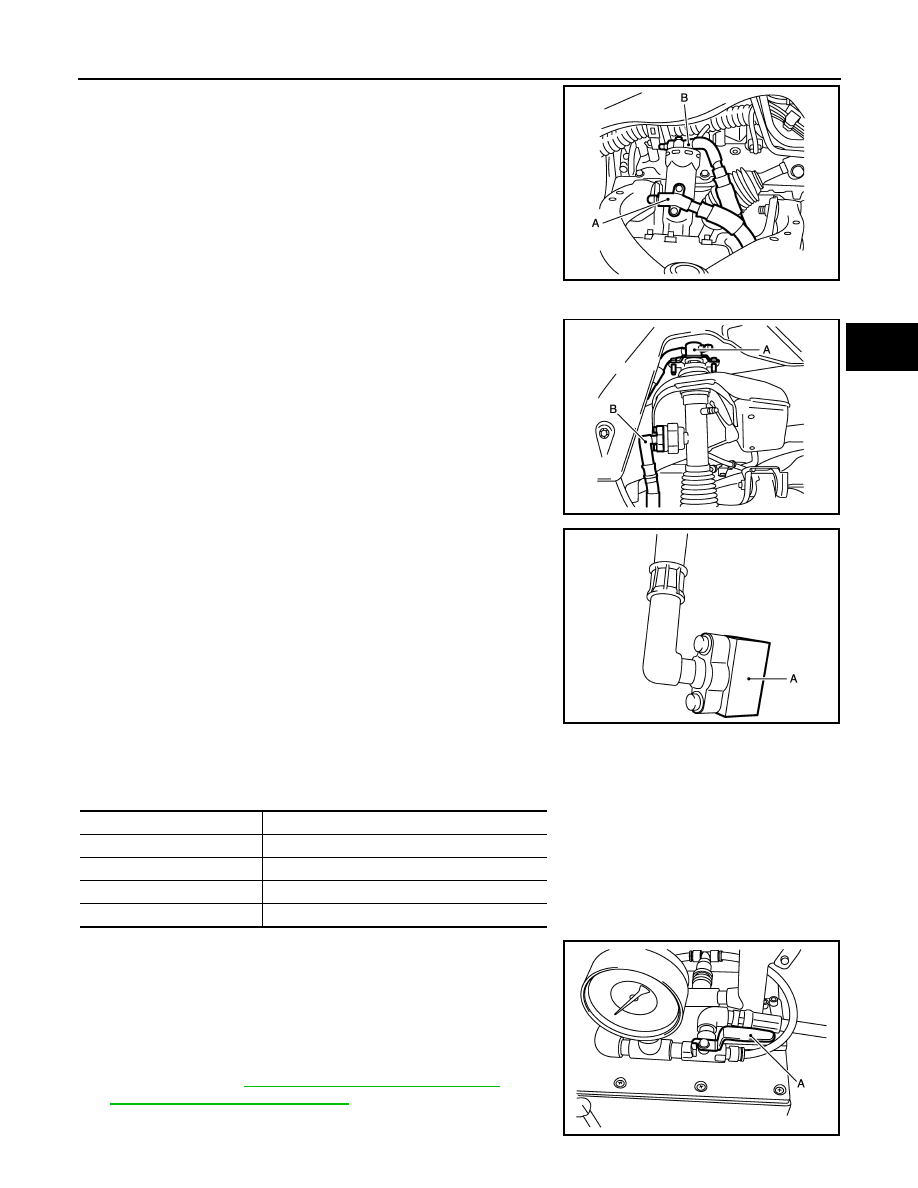
- Disconnect upper side pipe (B) of front shock absorber.

• For rear shock absorber
- Disconnect lower side pipe (B) of rear shock absorber.

9.

Install a leak check plug (SST: KV40108400) (A) to the removed
pipe and tighten the leak check plug to the specified torque. 

CAUTION:

• O-ring must be free of scratches and damage.
• Piping must be kept free of the intrusion of dust and dirt.

10. Loosen lock nuts of needle valves B and D of PPMU and then

tighten needle valves B and D.

11. Loosening position of needle valve of PPMU varies according to

shock absorber that is checked. Loosen needle valve of PPMU
by approximately 2 rotations, as per the following table.

CAUTION:

Never loosen the needle valve more than required.

12. Set knob (A) of suspension oil pump to the direction as shown in

the figure.

13. Apply pressure of up to 2.4 MPa.
14. Go to step 15 when oil comes out from lower portion of shock

absorber which pipe is removed from. Go to step 16 when oil
does not come out.

15. Replace shock absorber, since shock absorber has internal

leakage. Refer to 

FSU-10, "Removal and Installation"

 (front),

RSU-8, "Removal and Installation"

 (rear).

A

: Lower side pipe

JSEIA0233ZZ

A

: Upper side pipe

JSEIA0203ZZ

Tightening torque

: 5.0 N·m (0.51 kg-m, 44 in-lb)

Shock absorber

Loosening position of needle valve

Front LH

C

Rear LH

C

Front RH

A

Rear RH

A

JSEIA0210ZZ

JSEIA0191ZZ

SCS-26

< BASIC INSPECTION >

[HBMC]

CHECK SHOCK ABSORBER FOR MALFUNCTION

16. Shock absorber that is checked is normal. Set knob (A) of sus-

pension oil pump to the direction as shown in the figure and
check that reading of pressure gauge is 0 MPa.

17. Tighten the loosened needle valve of PPMU.

18. Remove leak check plug from pipe. Install pipe to lower portion

of shock absorber and tighten pipe to the specified torque.

CAUTION:

• O-ring must be free of scratches and damage.
• Piping must be kept free of the intrusion of dust and dirt.

19. Check other shock absorbers in accordance with procedures of steps 8 to 18.

20. Tighten needle valves A, C, and E of PPMU to the specified torque, after completion of check.

21. Loosen needle valves B and D of PPMU by approximately 2 rotations and then tighten lock nuts to the

specified torque.

CAUTION:

Never loosen the needle valve more than required.

Tightening torque

: 5.0 N·m (0.51 kg-m, 44 in-lb)

Tightening torque

: 8.3 N·m (0.85 kg-m, 73 in-lb)

Tightening torque

: 20 N·m (2.0 kg-m, 15 ft-lb)

JSEIA0193ZZ

CHECK ORIFICE FOR CLOGGING

SCS-27

< BASIC INSPECTION >

[HBMC]

C

D

F

G

H

I

J

K

L

M

A

B

SCS

N

O

P

CHECK ORIFICE FOR CLOGGING

Work Procedure

INFOID:0000000006256015

CAUTION:

• Clean surrounding areas of oil injection jack using steam before starting operation, since there may

be mud on it.

• Clean oil pressure gauge (special service tool: KV40108000) jack with steam before use.

1.

Remove protector of PPMU.

2.

Remove cap of oil injection jack.

3.

Install an oil pressure gauge (SST: KV40108000) (A) to oil injec-
tion jack. 

CAUTION:

• Jack must be securely inserted until a click sound can be

heard.

• Pressure reducing valve (B) of the oil pressure gauge

must be closed.

4.

Loosen needle valves A, C, and E of PPMU by approximately 2
rotations.

CAUTION:

Never loosen the needle valve more than required.

5.

Lift up the vehicle.

CAUTION:

Check that tires never contact the ground.

6.

Tighten needle valves A, C, and E of PPMU.

7.

Lift down the vehicle.

CAUTION:

Check that the lift is fully lowered.

8.

Loosen pressure reducing valve (A) of oil pressure gauge and
then lower pressure.

CAUTION:

Be careful since oil drains swiftly from oil drain hole (B).

9.

Check that reading of oil pressure gauge is 0 MPa. Close pres-
sure reducing valve.

10. Loosen needle valve E of PPMU by approximately 2 rotations.

CAUTION:

Never loosen the needle valve more than required.

11. Write down a value of the oil pressure gauge.

12. Tighten needle valve E of PPMU.

13. Loosen pressure reducing valve of oil pressure gauge and then lower pressure.

CAUTION:

Be careful since oil drains swiftly from oil drain hole.

14. Check that reading of oil pressure gauge is 0 MPa. Close pressure reducing valve.

15. Loosen needle valve A of PPMU by approximately 2 rotations.

CAUTION:

Never loosen the needle valve more than required.

16. Read a value of the oil pressure gauge after 5 minutes.
17. Compare difference of reading with pressure reading in step 11.

JSEIA0186ZZ

JSEIA0187ZZ

JSEIA0188ZZ

SCS-28

< BASIC INSPECTION >

[HBMC]

CHECK ORIFICE FOR CLOGGING

18. Tighten needle valve A of PPMU.

19. Loosen pressure reducing valve of oil pressure gauge and then lower pressure.

CAUTION:

Be careful since oil drains swiftly from oil drain hole.

20. Check that reading of oil pressure gauge is 0 MPa. Close pressure reducing valve.
21. Loosen needle valve C of PPMU by approximately 2 rotations.

CAUTION:

Never loosen the needle valve more than required.

22. Read a value of the oil pressure gauge after 5 minutes.

23. Compare difference of reading with pressure reading in step 11.

24. Tighten needle valve C of PPMU.
25. Loosen pressure reducing valve of oil pressure gauge and then lower pressure.

CAUTION:

Be careful since oil drains swiftly from oil drain hole.

26. Check that reading of oil pressure gauge is 0 MPa.

27. Remove oil pressure gauge.

28. Tighten needle valves A, C, and E of PPMU to the specified torque.

Pressure difference

0.2 MPa or more

: Replace the PPMU. Refer to 

SCS-39, "PPMU, 

MIDDLE TUBE ASSEMBLY, PPMU PIPE : Removal 
and Installation"

.

0.2 MPa or less

: Normal

Pressure difference

0.2 MPa or more

: Replace the PPMU. Refer to 

SCS-39, "PPMU, 

MIDDLE TUBE ASSEMBLY, PPMU PIPE : Remov-
al and Installation"

.

0.2 MPa or less

: Normal

: 8.3 N·m (0.85 kg-m, 73 in-lb)


Content   ..  1095  1096  1097  1098   ..