Infiniti QX4 (R50). Manual - part 588


  Index      Infiniti     Infiniti QX4 (R50) - service repair manual 2001 year


Search            copyright infringement  


Content   ..  586  587  588  589   ..


Infiniti QX4 (R50). Manual - part 588


SMT087D

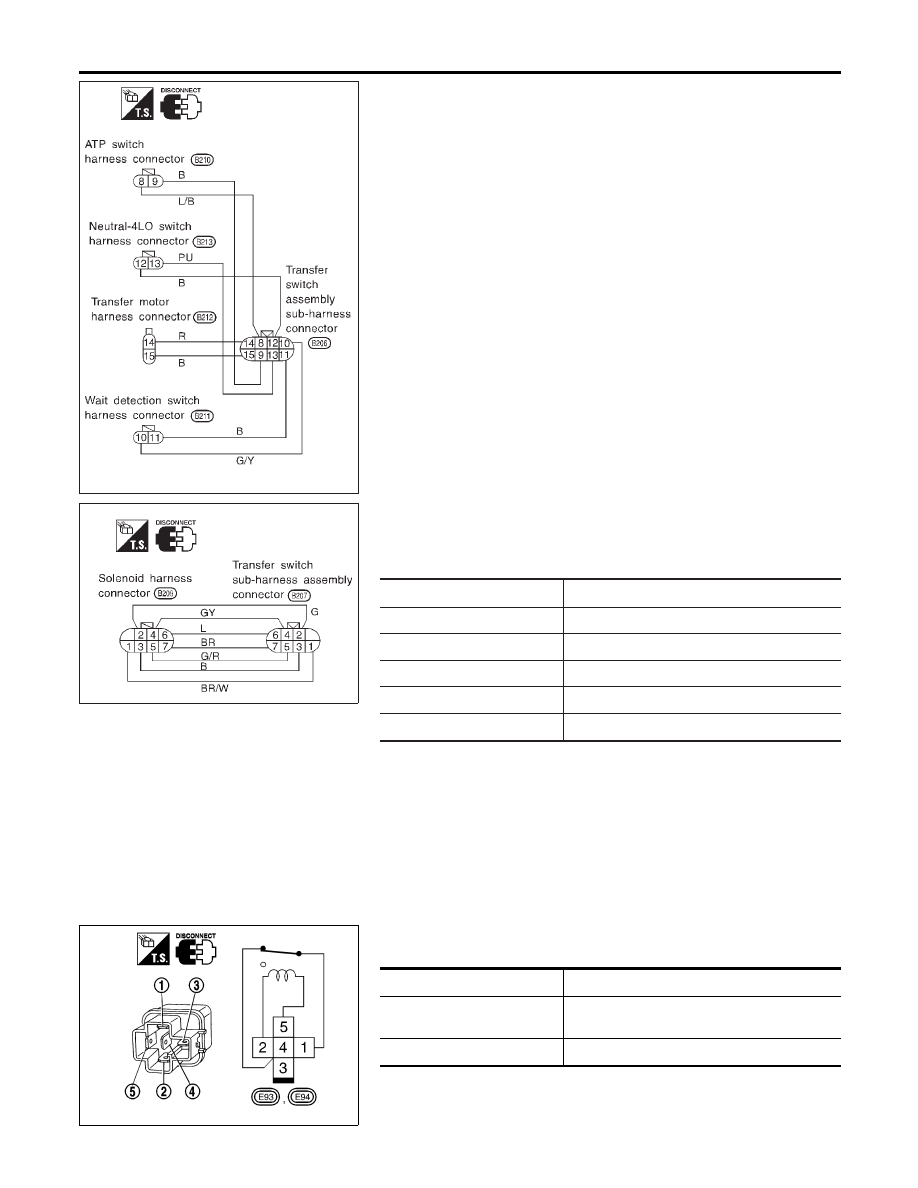
TRANSFER SWITCH ASSEMBLY SUB-HARNESS
CONNECTOR

NBTF0038S0902

Check continuity between terminals shown in the figure.

SMT088D

TRANSFER TERMINAL CORD ASSEMBLY
SUB-HARNESS CONNECTOR

NBTF0038S0903

Check continuity between terminals shown in the figure.
Terminals on solenoid valve

Terminals

Components

6

4WD solenoid valve

4, 5

2-4WD shift solenoid valve

2, 3

Transfer fluid temperature sensor

7

Clutch pressure switch

1

Line pressure switch

SMT807D

Transfer Shift Relay (High & low)

NBTF0038S10

Check continuity between terminals 3 and 4.

Condition

Continuity

12V direct current supply

between terminals 1 and 2

No

No current supply

Yes

COMPONENT INSPECTION

Transfer Sub-harness (Cont’d)

TF-114

SMT812D

Actuator & Actuator Position Switch

NBTF0038S11

ACTUATOR

NBTF0038S1101

Operation & resistance check

I

Apply battery voltage directly to actuator assembly.

Operating check

Battery positive terminal

Battery negative terminal

1

4

3

2

3

4

Check

Approx. 0.2

(When the motor is not operated.)

SMT838D

ACTUATOR POSITION SWITCH

NBTF0038S1102

Continuity check

Continuity check

Battery positive

terminal

Battery negative

terminal

Continuity

1

4

3

1 - 5

2

3

4

2 - 5

GI

MA

EM

LC

EC

FE

AT

PD

AX

SU

BR

ST

RS

BT

HA

SC

EL

IDX

COMPONENT INSPECTION

Actuator & Actuator Position Switch

TF-115

SMT844DB

Replacing Oil Seal

NBTF0068

FRONT CASE OIL SEAL

NBTF0068S01

1.

Drain transfer fluid.

2.

Remove exhaust front tube and heat insulator. Refer to
“Removal”, TF-119.

3.

Remove front propeller shaft. Refer to PD-6, “Removal and
Installation”.

4.

Remove companion flange lock nut.

I

Do not reuse lock nut.

SMT112D

5.

Put a matchmark on top of drive pinion thread. The mark
should be in line with the mark on the companion flange.

I

Always mark top of drive pinion screw using paint.

SMT802C

6.

Remove companion flange.

SMT803C

7.

Remove front case oil seal.

8.

Install front case oil seal.

I

Before installing, apply multi-purpose grease to seal lip.

9.

Install companion flange.

SMT845DB

10. Tighten nut to the specified torque.

Refer to TF-121.

11. Install front propeller shaft.

ON-VEHICLE SERVICE

Replacing Oil Seal

TF-116

SMT808D

SHIFT SHAFT OIL SEAL

NBTF0068S02

1.

Remove front propeller shaft. Refer to PD-6, “Removal and
Installation”.

2.

Remove companion flange. Refer to “FRONT CASE OIL
SEAL”, TF-116.

3.

Remove actuator lever from transfer outer shift lever. Then
remove outer shift lever.

SMT491A

4.

Remove shift shaft oil seal.

I

Be careful not to damage cross shaft.

SMT805C

5.

Install shift shaft oil seal.

I

Before installing, apply multi-purpose grease to seal lip.

6.

Install transfer control linkage.

7.

Install companion flange. Refer to “FRONT CASE OIL SEAL”,
TF-116.

8.

Install front propeller shaft.

SMT892C

REAR OIL SEAL

NBTF0068S03

1.

Remove rear propeller shaft. Refer to PD-6, “Removal and
Installation”.

2.

Remove rear oil seal.

3.

Install rear oil seal.

I

Before installing, apply multi-purpose grease to seal lip.

4.

Install rear propeller shaft.

SMT874C

Transfer Motor

REMOVAL

NBTF0069

1.

Disconnect transfer motor harness connector.

2.

Remove breather pipe from transfer motor.

3.

Remove bolts to detach transfer motor.

I

After removing transfer motor, be sure to replace O-ring
with new one.

INSTALLATION

NBTF0070

1.

Apply petroleum jelly or ATF to O-ring.

GI

MA

EM

LC

EC

FE

AT

PD

AX

SU

BR

ST

RS

BT

HA

SC

EL

IDX

ON-VEHICLE SERVICE

Replacing Oil Seal (Cont’d)

TF-117


Content   ..  586  587  588  589   ..