Infiniti QX4 (R50). Manual - part 417


  Index      Infiniti     Infiniti QX4 (R50) - service repair manual 2001 year


Search            copyright infringement  


Content   ..  415  416  417  418   ..


Infiniti QX4 (R50). Manual - part 417


SEM919EA

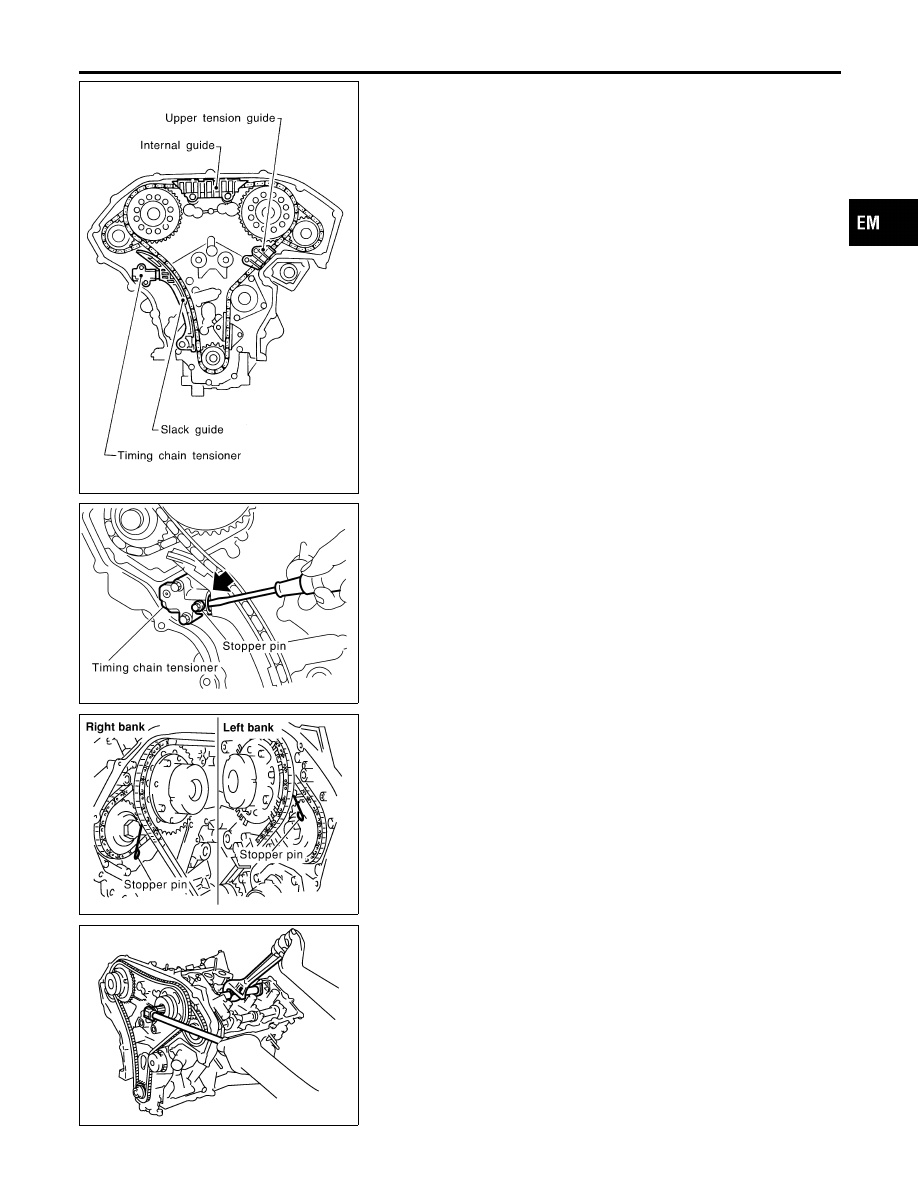
30. Remove internal chain guide.
31. Remove upper tension guide.
32. Remove timing chain tensioner and slack guide.

SEM966F

I

Remove timing chain tensioner. (Push piston and insert a suit-
able pin into pinhole.)

SEM425G

33. Attach a suitable stopper pin to RH and LH camshaft chain

tensioners.

SEM426G

34. Remove intake and exhaust camshaft sprocket bolts.

I

Apply paint to timing chain and camshaft sprockets for
alignment during installation.

I

Secure the hexagonal head of the camshaft using a span-
ner to loosen mounting bolts.

GI

MA

LC

EC

FE

AT

TF

PD

AX

SU

BR

ST

RS

BT

HA

SC

EL

IDX

TIMING CHAIN

Removal (Cont’d)

EM-27

SEM427G

35. Remove primary and secondary timing chains along with the

camshaft sprockets.

I

Do not disassemble the intake camshaft sprocket.

I

Avoid damaging the signal mark protrusion area at the front of
the left bank intake camshaft sprocket. Keep it away from
magnetized objects.

SEM924E

36. Remove lower chain guide.
37. Remove crankshaft sprocket.

SEM428G

38. Use a scraper to remove all traces of liquid gasket from front

timing chain case.

SEM161F

I

Remove old liquid gasket from the bolt hole and thread.

SEM429G

39. Use a scraper to remove all traces of liquid gasket from CVTC

cover.

TIMING CHAIN

Removal (Cont’d)

EM-28

SEM928E

Inspection

NBEM0013

Check for cracks and excessive wear at roller links. Replace
chain if necessary.

SEM930E

Installation

NBEM0014

1.

Position crankshaft so that No. 1 piston is set at TDC on com-
pression stroke.

SEM929E

2.

Install crankshaft sprocket on crankshaft.

I

Make sure that mating marks on crankshaft sprocket face
front of engine.

SEM931E

3.

Install lower chain guide on dowel pin, with front mark on the
guide facing upside.

SEM430G

4.

Press and shrink the secondary chain tensioner sleeve, and fix
it using stopper pins.

I

Lubricate threads and seat surfaces of camshaft sprocket bolts
with new engine oil.

GI

MA

LC

EC

FE

AT

TF

PD

AX

SU

BR

ST

RS

BT

HA

SC

EL

IDX

TIMING CHAIN

Inspection

EM-29

SEM431G

5.

Install secondary timing chain and sprocket to one of the banks
(Right bank shown in the figure) as described below.

a.

Align mating marks (golden links) on secondary timing chain
with those (punched marks) on the intake and exhaust sprock-
ets.

b.

Align camshaft knock pins with the sprocket groove and hole.

I

Because camshaft sprocket mounting bolts are tightened in
step 7, perform manual tightening to the extent necessary to
keep camshaft knock pin from dislocating.

SEM432G

I

Matching marks of the intake sprocket are on the back side of
the secondary sprockets. There are two types of the marks;
round and oval types, which should be used for right and left
banks respectively.

Right bank: Round
Left bank: Oval

SEM433G

I

It may be difficult to visually check the dislocation of mating
marks during and after installation. To make the matching
easier, make a mating mark on the sprocket teeth in advance
using paint.

SEM434G

6.

Install secondary timing chain and sprocket to the other bank.
Install primary timing chain at the same time.

I

Installation of the secondary timing chain follows the procedure
described in step 5.

I

Install primary timing chain so that mating mark (punched) on
camshaft sprocket is aligned with that (yellow link) on the tim-
ing chain, and mating mark (notched) on crankshaft sprocket
is aligned with that on the timing chain, respectively.

I

When it is difficult to align mating marks of the primary timing
chain with each sprocket, gradually turn the camshaft hexago-
nal head using a spanner so it is aligned with the mating mark.

I

During alignment, be careful to prevent dislocation of mating
marks on the secondary timing chain.

TIMING CHAIN

Installation (Cont’d)

EM-30


Content   ..  415  416  417  418   ..