Infiniti Q45. Manual - part 683


  Index      Infiniti     Infiniti Q45 - service repair manual 2006 year


Search            copyright infringement  


Content   ..  681  682  683  684   ..


Infiniti Q45. Manual - part 683


HEADLAMP AIMING CONTROL (AUTO)

LT-69

C

D

E

F

G

H

I

J

L

M

A

B

LT

Headlamp Aiming Motor Does Not Operate (Both Sides)

NKS0018D

1. 

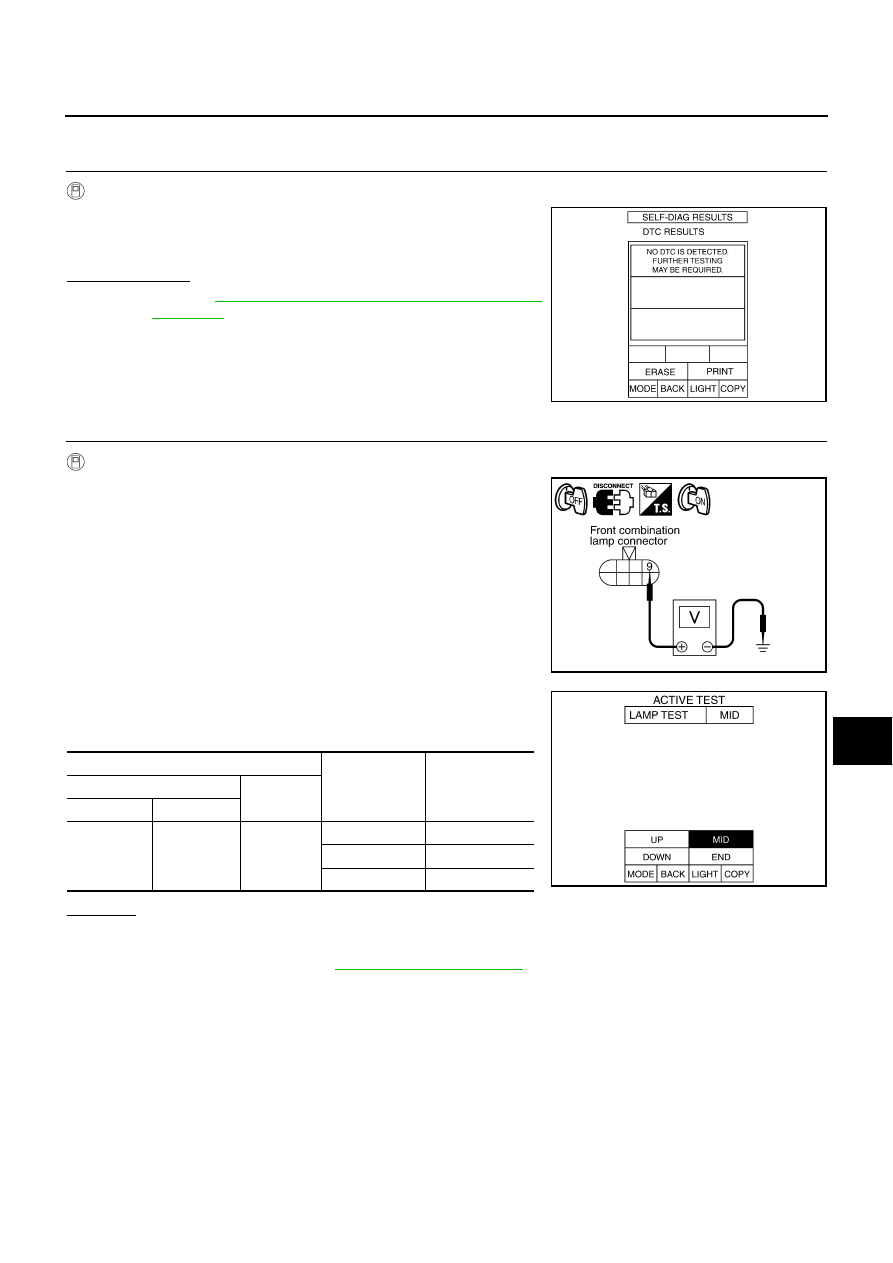
CHECK DIAGNOSIS RESULT

WITH CONSULT-II

1.

Turn ignition switch ON.

2.

Select “HEADLAMP LEVELIZER” on CONSULT-II, and select
“SELF-DIAG RESULT” on “SELECT DIAG MODE” screen.

Is DTC detected?

YES

>> Refer to 

LT-65, "Description of DTC and Solutions after

Detection"

 .

NO

>>  GO TO 2.

2. 

CHECK HEADLAMP AIMING MOTOR DRIVE SIGNAL

WITH CONSULT II

1.

Disconnect front combination lamp connector (LH and RH).

2.

Turn ignition switch ON.

3.

Select “HEAD LAMP LEVELIZER” on CONSULT-II, and select
“ACTIVE TEST” on “SELECT DIAG MODE” screen.

4.

Touch “LAMP TEST”.

5.

Check voltage between front combination lamp harness connec-
tor terminal 9 and ground for each of UP, MID, and DOWN
active test positions.

OK or NG

OK

>> GO TO 3.

NG

>>

If voltage is detected but does not vary according to positions, replace and initialize headlamp
aiming sensor. Refer to 

LT-64, "WORK SUPPORT"

 .

If voltage is 0 V and stays unchanged, GO TO 7.

PKIB0115E

PKIB0116E

Terminal

Condition

Voltage 

(+)

(

)

Connector

Terminal

E46, E66

9

Ground

UP

Approx. 2.5 V

MID

Approx. 6 V

DOWN

Approx. 7.8 V

PKIB0117E

LT-70

HEADLAMP AIMING CONTROL (AUTO)

3. 

CHECK VOLTAGE HEADLAMP AIMING MOTOR

Check voltage between front combination lamp harness connector
(E46 and E66) terminal 12 and ground.

OK or NG

OK

>> GO TO 4.

NG

>> Repair harness or connector.

4. 

CHECK HEADLAMP AIMING MOTOR GROUND

Check continuity between front combination lamp connector (E46
and E66) terminal 10 and ground.

OK or NG

OK

>> Replace front combination lamp assembly. Refer to 

LT-

33, "Removal and Installation"

 .

NG

>> Repair harness or connector. 

5. 

CHECK CONTINUITY BETWEEN HEADLAMP AIMING SENSOR AND FRONT COMBINATION LAMP

1.

Turn ignition switch OFF.

2.

Disconnect headlamp aiming sensor connector.

3.

Check continuity between headlamp aiming sensor harness
connector and front combination lamp harness connector.

OK or NG

OK

>> Replace headlamp aiming sensor and initialize it. Refer to 

LT-76, "Removal and Installation"

  and

LT-64, "WORK SUPPORT"

 .

NG

>> Repair harness or connector.

12 - Ground 

: Battery voltage

PKIB0118E

10 - Ground

: Continuity should exist.

PKIB0119E

Terminal

Continuity

Front combination 

lamp connector

Terminal 

Headlamp aiming 

sensor connector

Terminal

RH

E46

9 B622

Yes

LH

E66

PKIB0120E

HEADLAMP AIMING CONTROL (AUTO)

LT-71

C

D

E

F

G

H

I

J

L

M

A

B

LT

Headlamp Aiming Motor Does Not Operate (One Side)

NKS0018E

1. 

CHECK VOLTAGE HEADLAMP AIMING MOTOR

1.

Turn ignition switch OFF.

2.

Disconnect front combination lamp connector (LH and RH).

3.

Turn ignition switch ON.

4.

Check voltage between front combination lamp harness connec-
tor (E46 or E66) terminal 12 and ground.

OK or NG

OK

>> GO TO 2.

NG

>> Repair harness or connector.

2. 

CHECK HEADLAMP AIMING MOTOR GROUND

1.

Turn ignition switch OFF.

2.

Check continuity between front combination lamp harness con-
nector (E46 or E66) terminal 10 and ground.

OK or NG

OK

>> GO TO 3.

NG

>> Repair harness or connector.

3. 

CHECK CONTINUITY BETWEEN HEADLAMP AIMING SENSOR AND FRONT COMBINATION LAMP

1.

Disconnect headlamp aiming sensor connector.

2.

Check continuity between headlamp aiming sensor harness
connector and front combination lamp harness connector.

OK or NG

OK

>> Replace front combination lamp assembly. Refer to 

LT-

33, "Removal and Installation"

 .

NG

>> Repair harness or connector.

12 - Ground

: Battery voltage

PKIB0118E

10 - Ground

: Continuity should exist.

PKIB0119E

Terminal

Continuity

Front combination 

lamp connector

Terminal 

Headlamp aiming 

sensor connector

Terminal 

RH

E46

9 B622

7

Yes

LH

E66

PKIB0120E

LT-72

HEADLAMP AIMING CONTROL (AUTO)

DTC B2081 [INITIAL NOT DONE]

NKS0018F

1. 

INITIALIZE HEADLAMP AIMING SENSOR

1.

Turn ignition switch OFF.

2.

Set the vehicle in unload condition. (Removal all loads in pas-
senger and trunk rooms.)

3.

Select “HEAD LAMP LEVELIZER” on CONSULT-II, and select
“WORK SUPPORT” on “SELECT DIAG MODE” screen.

4.

Select “SENSOR INITIALISE” on “SELECT WORK ITEM”
screen.

5.

Touch “WRITE”.

6.

When “INITIALISE COMPLETE” is indicated, touch “END”.

7.

Check if headlamp aiming motor operates.

OK or NG

OK

>> INSPECTION END

NG >>

When “INCORRECT CONDITION” is displayed, check connect CONSULT-II and headlamp
aiming sensor connector, and then initialize again. Refer to 

LT-64, "WORK SUPPORT"

 . 

When “NO CAR TYPE SELECT” is displayed, replace headlamp aiming sensor and initialize it.
Refer to 

LT-76, "Removal and Installation"

  an

LT-64, "WORK SUPPORT"

 .

When “INITIALISE NOT DONE“ is displayed, initialize again. If “ INITIALISE NOT DONE” is dis-
played again, replace headlamp aiming sensor and initialize it. Refer to 

LT-76, "Removal and

Installation"

  an

LT-64, "WORK SUPPORT"

 .

DTC B2082 [SENSOR OUT OF RANGE], DTC B2083 [SEN SIG NOT PLAUSIBLE]

NKS0018G

1. 

CHECK THE HEADLAMP AIMING SENSOR 

Check the installation condition of the headlamp aiming sensor.
OK or NG

OK

>> Replace headlamp aiming sensor and initialize it. Refer to 

LT-76, "Removal and Installation"

  and

LT-64, "WORK SUPPORT"

 .

NG

>> Adjust the headlamp aiming sensor, and erase self-diagnosis result.

DTC B2084 [VOLTAGE UNDER LIMIT]

NKS0018H

1. 

CHECK HEADLAMP AIMING SENSOR VOLTAGE

1.

Turn ignition switch OFF.

2.

Disconnect headlamp aiming sensor connector.

3.

Turn ignition switch ON.

4.

Check voltage between headlamp aiming sensor harness con-
nector B622 terminal 2 and ground.

OK or NG

OK

>> If the self-diagnosis result code [B2084] reappears when

performing the self-diagnosis again after erasing the
self-diagnosis result, replace and initialize the headlamp
aiming sensor. Refer to 

LT-76, "Removal and Installation"

  an

LT-64, "WORK SUPPORT"

 . 

NG

>> Repair harness or connector.

PKIB0124E

2 - Ground

: Battery voltage

PKIB0113E


Content   ..  681  682  683  684   ..