Infiniti Q45. Manual - part 674


  Index      Infiniti     Infiniti Q45 - service repair manual 2006 year


Search            copyright infringement  


Content   ..  672  673  674  675   ..


Infiniti Q45. Manual - part 674


HEADLAMP (FOR USA)

LT-33

C

D

E

F

G

H

I

J

L

M

A

B

LT

Removal and Installation

NKS0017P

REMOVAL

1.

Disconnect the battery cable from the negative terminal or
remove the power fuse.

2.

Remove front grille. Refer to 

EI-21, "FRONT GRILLE"

 .

3.

Remove filler cap on washer tank and front air guide.

4.

Remove front undercover and fender protector. Refer to 

EI-24,

"FENDER PROTECTOR"

 .

5.

Remove mounting clip on top of the front bumper and mounting
bolts on the side of the front bumper. Refer to 

EI-14, "FRONT

BUMPER"

 .

6.

Pull the side of the front bumper toward the front of the vehicle
and disengage it from clips on the body.
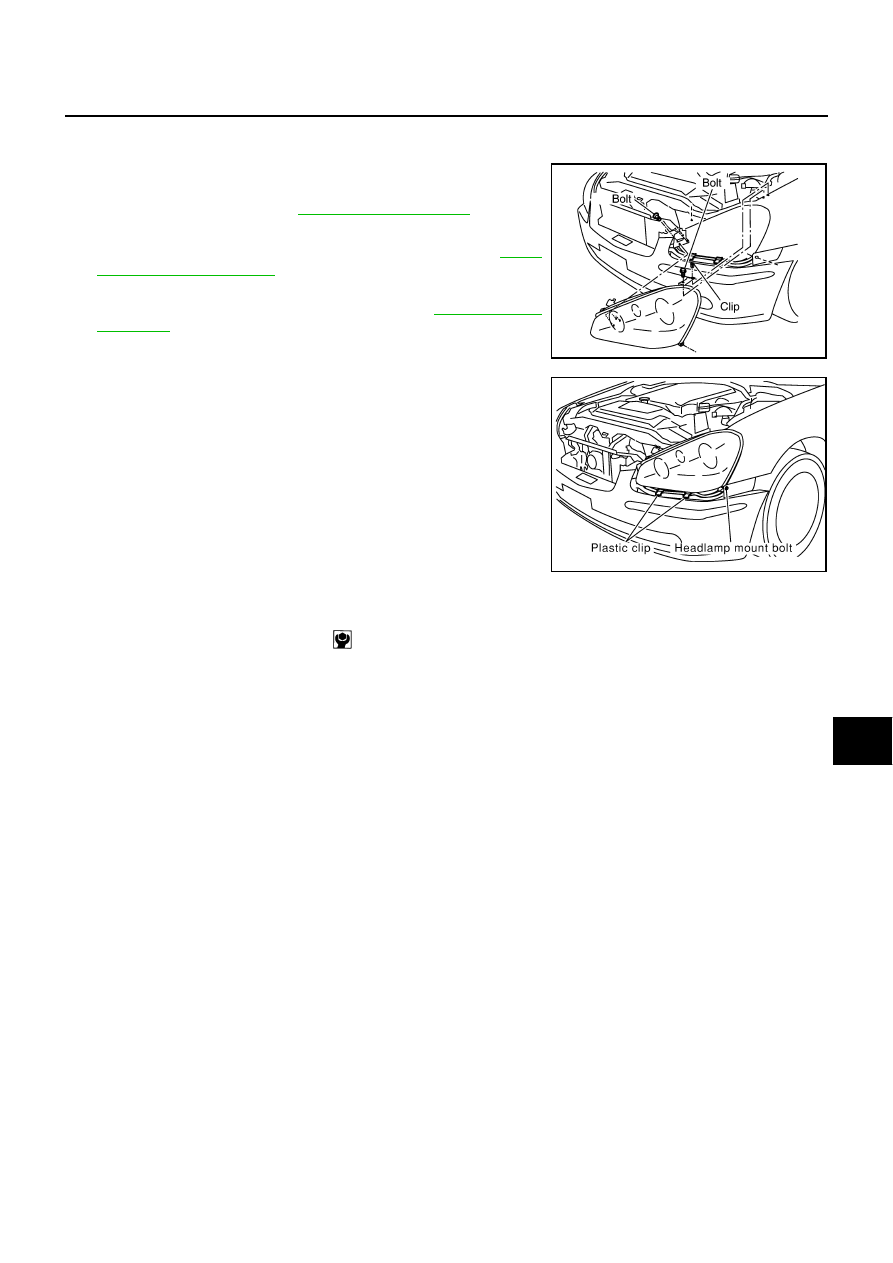
7.

Remove headlamp mounting bolts and clip.

8.

Remove headlamp mounting bolts inside headlamp.

9.

Pull the headlamp toward the front of the vehicle, disconnect the
connector, and remove from the vehicle.

CAUTION:

 When removing headlamp, place a rag between headlamp
and bumper to protect the bumper.

INSTALLATION

Note the following, and installation is the reverse order of removal.

PKIA6638E

PKIA0054E

Headlamp mounting bolt

: 5.5 N·m (0.56 kg-m, 49 in-lb)

LT-34

HEADLAMP (FOR USA)

Disassembly and Assembly

NKS0017Q

DISASSEMBLY

1.

Turn plastic cap counterclockwise and remove it.

2.

Turn xenon bulb socket counterclockwise and disconnect it.

3.

Release retaining spring and remove xenon bulb (low).

4.

Remove HID control unit mounting screws.

5.

Disconnect connector and ground cable from HID control unit.

6.

Turn front side marker lamp bulb socket counter clockwise and remove it.

7.

Remove front side marker lamp bulb from its socket.

8.

Turn parking lamp bulb socket counterclockwise and remove it.

9.

Remove front side marker lamp bulb from its socket.

10. Turn front turn signal lamp bulb socket counterclockwise and remove it.

11. Remove front turn signal lamp bulb from its socket.

12. Disconnect connector from halogen bulb (high).

13. Turn halogen bulb (high) counterclockwise and remove it.

14. Disconnect headlamp auto levelizer connector. Remove two screws and remove harness connector and

bracket.

PKIC1389E

1.

Retaining spring

2.

Xenon bulb (low)

3.

Xenon bulb (low) socket

4.

Seal packing

5.

Plastic cap

6.

Front turn signal lamp bulb

7.

Front turn signal lamp bulb socket

8.

Front side marker lamp bulb

9.

Front side marker lamp bulb socket

10.

Harness connector and bracket

11.

Parking lamp bulb

12. Parking lamp bulb socket

13.

HID control unit

14. Seal packing

15. Halogen bulb (high)

16.

Headlamp housing assembly

HEADLAMP (FOR USA)

LT-35

C

D

E

F

G

H

I

J

L

M

A

B

LT

ASSEMBLY

Note the following, and assembly is the reverse order of disassembly.

CAUTION:

When HID control unit is removed, reinstall it securely and avoid any looseness.

After installing bulb, be sure to install plastic cap and bulb socket securely to ensure watertight-
ness.

HID control unit

: 3.2 N·m (0.33 kg-m, 28 in-lb)

LT-36

HEADLAMP (FOR CANADA) - DAYTIME LIGHT SYSTEM -

HEADLAMP (FOR CANADA) - DAYTIME LIGHT SYSTEM -

PFP:26010

Component Parts and Harness Connector Location

NKS0017R

System Description

NKS0017S

The headlamp system for Canada vehicles is equipped with a daytime light control unit that activates the high
beam headlamps at approximately half illumination whenever the engine is running. If the parking brake is
applied before the engine is started the daytime lights will not be illuminated. The daytime lights will illuminate
once the parking brake is released. Thereafter, the daytime lights will continue to operate when the parking
brake is applied.
And battery saver system is controlled by the headlamp battery saver control unit and BCM (body control
module).
Power is supplied at all times

headlamp relay-1 terminal 2 from battery,

to headlamp relay-1 terminal 3

PKIB0995E


Content   ..  672  673  674  675   ..