Infiniti Q45 (FY33). Manual - part 535


  Index      Infiniti     Infiniti Q45 (FY33) - service repair manual 2001 year


Search            copyright infringement  


Content   ..  533  534  535  536   ..


Infiniti Q45 (FY33). Manual - part 535


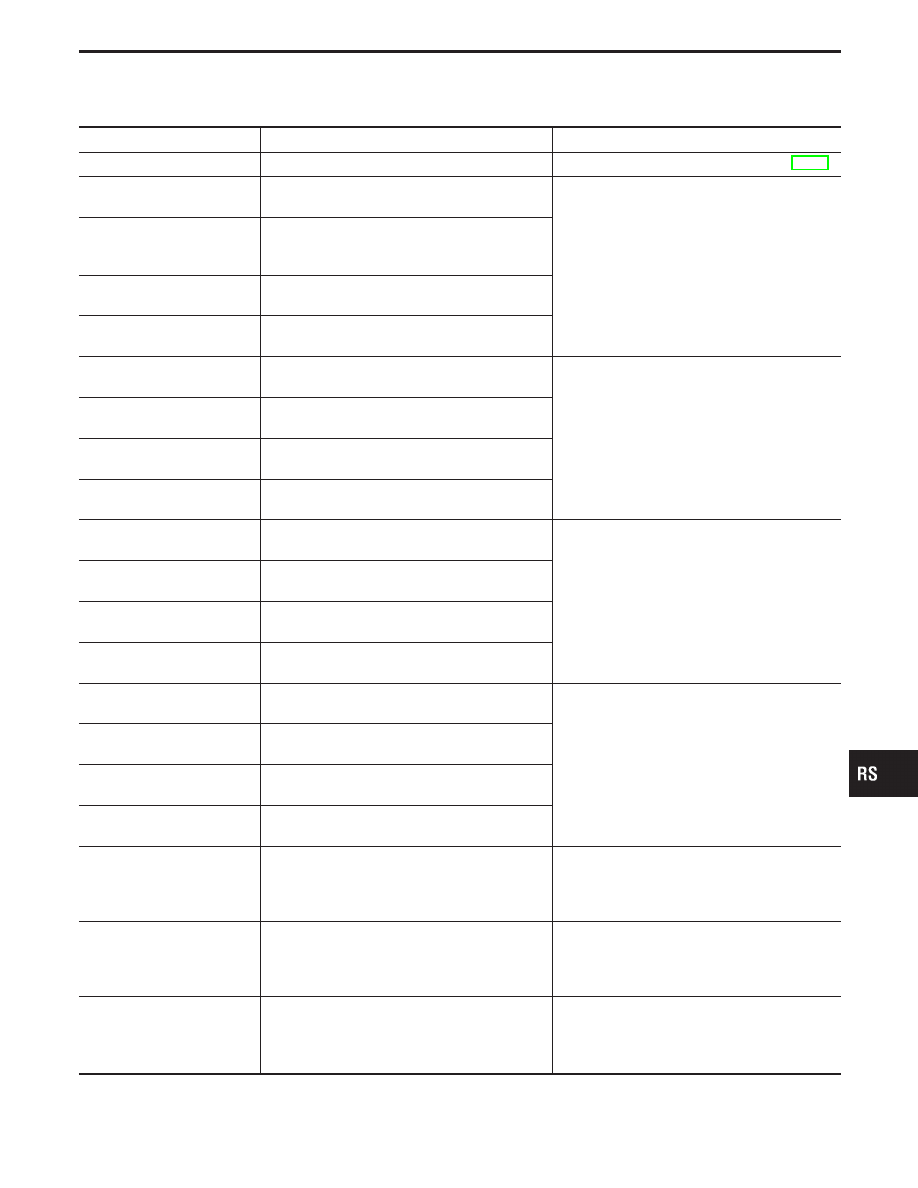
INTERMITTENT MALFUNCTION DIAGNOSTIC CODE CHART (“SELF-DIAG [PAST] or
TROUBLE DIAG RECORD”)

Diagnostic item

Explanation

Repair order

NO DTC IS DETECTED

I

No malfunction is detected.

I

Go to DIAGNOSTIC PROCEDURE 4 (RS-48).

AIRBAG MODULE
[OPEN]

I

Driver’s air bag module circuit is open.
(including the spiral cable)

1. Visually check the wiring harness connection.
2. Replace the harness if it has visible damage.
3. If the harness check is OK, replace the spiral

cable, diagnosis sensor unit and driver air
bag module. (Before disposing the driver air
bag module, it must be deployed.)

AIRBAG MODULE
[VB-SHORT]

I

Driver’s air bag module circuit is shorted to
some power supply circuit. (including the spi-
ral cable)

AIRBAG MODULE
[GND-SHORT]

I

Driver’s air bag module circuit is shorted to
ground. (including the spiral cable)

AIRBAG MODULE
[SHORT]

I

Driver’s air bag module circuits are shorted to
each other.

ASSIST A/B MODULE
[VB-SHORT]

I

Front passenger air bag module circuit is
shorted to some power supply circuit.

1. Visually check the wiring harness connection.
2. Replace the harness if it has visible damage.
3. If the harness check is OK, replace the diag-

nosis sensor unit and passenger air bag
module. (Before disposing the passenger air
bag module, it must be deployed.)

ASSIST A/B MODULE
[OPEN]

I

Front passenger air bag module circuit is
open.

ASSIST A/B MODULE
[GND-SHORT]

I

Front passenger air bag module circuit is
shorted to ground.

ASSIST A/B MODULE
[SHORT]

I

Front passenger air bag module circuits are
shorted to each other.

SIDE MODULE LH
[OPEN]

I

Side air bag module (LH) circuit is open.

1. Visually check the wiring harness connection.
2. Replace the harness if it has visible damage.
3. If the harness check is OK, replace the diag-

nosis sensor unit and side air bag module
(LH). (Before disposing the side air bag mod-
ule (LH), it must be deployed.)

SIDE MODULE LH
[VB-SHORT]

I

Side air bag module (LH) circuit is shorted to
some power supply circuits.

SIDE MODULE LH
[GND-SHORT]

I

Side air bag module (LH) circuit is shorted to
ground.

SIDE MODULE LH
[SHORT]

I

Side air bag module (LH) circuits are shorted
to each other.

SIDE MODULE RH
[OPEN]

I

Side air bag module (RH) circuit is open.

1. Visually check the wiring harness connection.
2. Replace the harness if it has visible damage.
3. If the harness check is OK, replace the diag-

nosis sensor unit and side air bag module
(RH). (Before disposing the side air bag mod-
ule (RH), it must be deployed.)

SIDE MODULE RH
[VB-SHORT]

I

Side air bag module (RH) circuit is shorted to
some power supply circuits.

SIDE MODULE RH
[GND-SHORT]

I

Side air bag module (RH) circuit is shorted to
ground.

SIDE MODULE RH
[SHORT]

I

Side air bag module (RH) circuits are shorted
to each other.

SATELLITE SENS LH
[UNIT FAIL]
SATELLITE SENS LH
[COMM FAIL]

I

Satellite sensor (LH)

1. Visually check the wiring harness connection.
2. Replace the harness if it has visible damage.
3. If the harness check is OK, replace the diag-

nosis sensor unit and satellite sensor (LH).

SATELLITE SENS RH
[UNIT FAIL]
SATELLITE SENS RH
[COMM FAIL]

I

Satellite sensor (RH)

1. Visually check the wiring harness connection.
2. Replace the harness if it has visible damage.
3. If the harness check is OK, replace the diag-

nosis sensor unit and satellite sensor (RH).

CONTROL UNIT

I

Diagnosis sensor unit is malfunctioning.

1. Visually check the wiring harness connection.
2. Replace the harness if it has visible damage.
3. If the harness check is OK, replace the diag-

nosis sensor unit.

* Follow the procedures in numerical order when repairing malfunctioning parts, then make the final system check.

GI

MA

EM

LC

EC

FE

AT

PD

FA

RA

BR

ST

BT

HA

EL

IDX

TROUBLE DIAGNOSES — Supplemental Restraint System (SRS)

Self-diagnosis (Cont’d)

RS-55

SRS248

Trouble Diagnoses for Air Bag Warning Lamp

DIAGNOSTIC PROCEDURE 9

SYMPTOM: “AIR BAG” warning lamp does not turn off.

SRS771

Is air bag deployed?

No

E

Yes

Refer to COLLISION DIAG-
NOSIS (RS-60).

Is SRS “AIR BAG” fuse OK?

Yes

E

No

Replace fuse and turn igni-
tion switch ON. If SRS “AIR
BAG” fuse blows again,
repair main harness and/or
replace air bag harness.

Connect CONSULT-II and touch
“START”.

I

Is “AIR BAG” displayed on
CONSULT-II?

Yes

E

No

Visually check the wiring
harness connection of diag-
nosis sensor unit. If the har-
ness connection check is
OK, replace diagnosis sen-
sor unit.

Is harness connection between warning
lamp and diagnosis sensor unit OK?

Yes

E

No

Connect warning lamp and
diagnosis sensor unit con-
nector properly. If warning
lamp still does not go off,
replace harness.

Replace diagnosis sensor unit.

SRS249

DIAGNOSTIC PROCEDURE 10

SYMPTOM: “AIR BAG” warning lamp does not turn on.

Is meter fuse OK?

Yes

E

No

Replace fuse and turn igni-
tion switch ON. If meter
fuse blows again, repair
main harness.

Is warning lamp LED OK?

Yes

E

No

Replace warning lamp LED.

1. Disconnect diagnosis sensor unit con-

nector.

2. Turn the ignition key to ON position.

I

Does warning lamp turn on?

Yes

E

No

Check the ground circuit of
“AIR BAG” warning lamp.

Replace diagnosis sensor unit.

TROUBLE DIAGNOSES — Supplemental Restraint System (SRS)

H

H

H

H

H

H

H

RS-56

SRS263

DIAGNOSTIC PROCEDURE 11

SYMPTOM: SRS does not enter Diagnosis mode using door
switch.

SEL927U

Disconnect both battery cables and check
battery voltage using circuit tester.

I

Is battery voltage more than 9V?

Yes

E

No

Charge battery.

Check harness continuity between driver’s
door switch connector terminal

q

1

and

body ground.

I

Does continuity exist?

Yes

E

No

Replace driver’s door
switch. If SRS still does not
enter Diagnosis mode,
replace or repair harness.

Replace diagnosis sensor unit.

Go to DIAGNOSTIC PROCEDURE 1 (RS-
38).

GI

MA

EM

LC

EC

FE

AT

PD

FA

RA

BR

ST

BT

HA

EL

IDX

TROUBLE DIAGNOSES — Supplemental Restraint System (SRS)

Trouble Diagnoses for Air Bag Warning Lamp
(Cont’d)

H

H

H

RS-57

SEL928U

Trouble Diagnosis for Seat Belt Pre-tensioner
Warning Lamp

DIAGNOSTIC PROCEDURE 12

SYMPTOM: “SEAT BELT” warning lamp does not turn off.

Is the seat belt pre-tensioner (and driver’s
and passenger’s air bags) deployed?

No

E

Yes

Refer to COLLISION DIAG-
NOSIS (RS-60).

Is driver’s seat belt fastened?

Yes

E

No

Check “SEAT BELT” warn-
ing lamp operation after the
seat belt is fastened.

Check driver’s seat belt buckle switch.
1. Disconnect the seat belt buckle switch

connector.

2. Check continuity between terminals

q

41

and

q

14

.

WARNING:

Do not measure resistance with harness
side connector.

OK

E

NG

Replace the seat belt
buckle switch.

1. Visually check the wiring harness con-

nection.

2. Replace the diagnosis unit.
3. Fasten the seat belt.
4. Turn ignition switch to ON position.
5. Does the “SEAT BELT” warning lamp

illuminate for about 7 seconds and then
turn off?

No

E

Yes

System is OK.

1. Replace combination meter assembly.

2. Fasten the seat belt.
3. Turn ignition switch to ON position.
4. Does the “SEAT BELT” warning lamp

illuminate for about 7 seconds and then
turn off?

No

E

Yes

System is OK.

Replace the main harness and air bag har-
ness.

Condition of seat belt

Continuity

Unfastened

Yes

Fastened

No

TROUBLE DIAGNOSES — Supplemental Restraint System (SRS)

H

H

H

H

H

RS-58


Content   ..  533  534  535  536   ..