Infiniti M45 (Y34). Manual - part 638
 

  Index      Infiniti     Infiniti M45 (Y34) - service repair manual 2004 year


Search            copyright infringement  


Content   ..  636  637  638  639   ..


Infiniti M45 (Y34). Manual - part 638


HEADLAMP (FOR CANADA) - DAYTIME LIGHT SYSTEM -

LT-59

C

D

E

F

G

H

I

J

L

M

A

B

LT

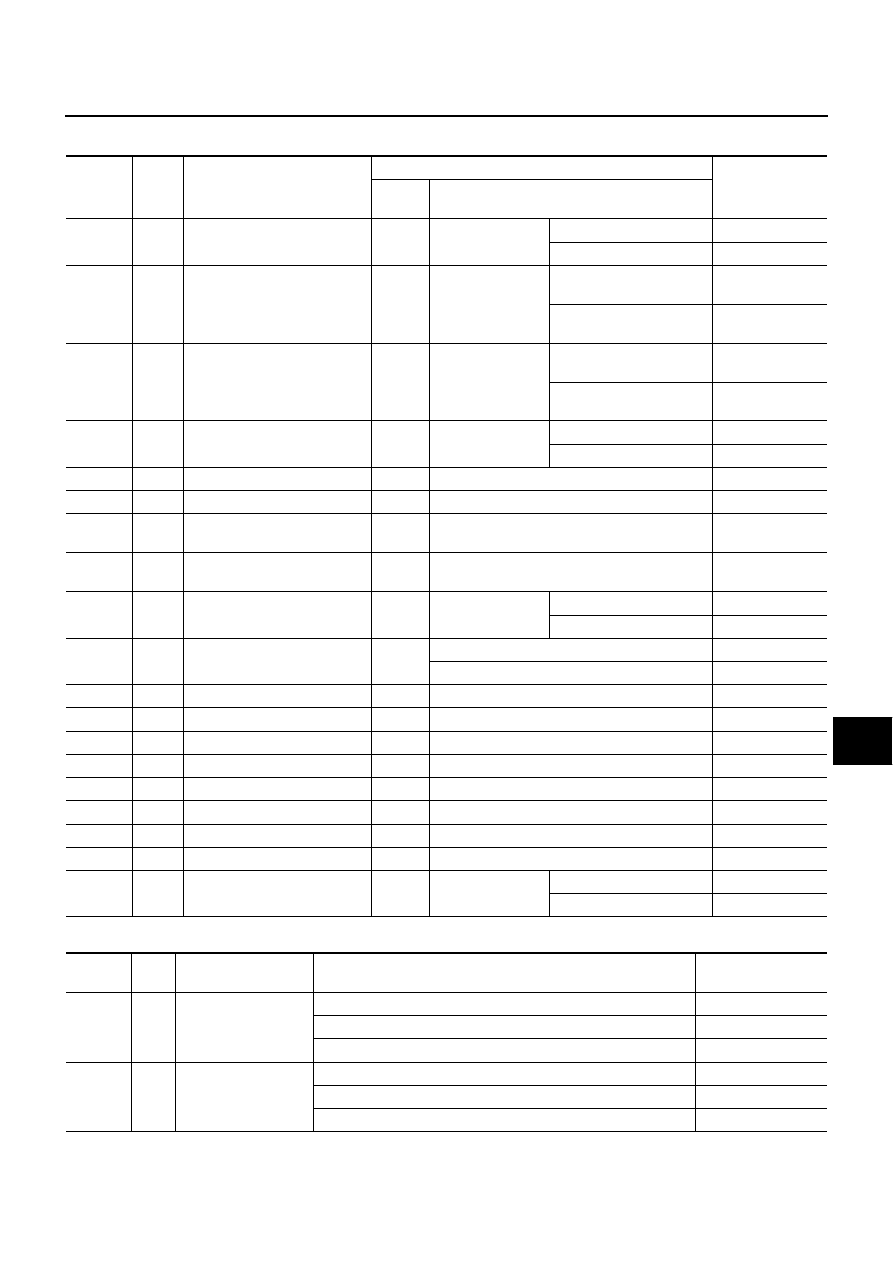
Terminals and Reference Value for BCM

AKS004D1

Terminals and Reference Value for Daytime Light Control Unit

AKS004T0

Terminal 

No.

Wire 

color

Item

Measuring condition

Reference value

Ignition 

switch

Operation or condition

3

R/L

Tail lamp signal

ON

Lighting switch: 1st

ON

Battery voltage

OFF

Approx. 0V

5

W/PU

Headlamp relay control signal

ON

Lighting switch: 
AUTO

Light is applied to optical 
sensor.

Battery voltage

Light is not applied to opti-
cal sensor.

Approx. 0V

11

LG/B

Tail lamp relay control signal

ON

Light switch: 
AUTO

Light is applied to optical 
sensor.

Battery voltage

Light is not applied to opti-
cal sensor.

Approx. 0V

14

Y/L

Lighting switch AUTO signal

ON

Lighting switch

AUTO

Approx. 0V

OFF

Approx. 8V

17

BR/Y

Data link RX

18

P

Data link TX

30

PU

Communication signal TX
(BCM-AV: Transmission)

31

LG

Communication signal RX
(AV-BCM: Receiving)

37

LG

Front door switch 
(Passenger side) signal

OFF

Front door switch 
(Passenger side)

ON (open)

Approx. 0V

OFF (close)

Battery voltage

52

G/R

Auto light sensor signal

ON

Light is applied to optical sensor.

3V or more

Light is not applied to optical sensor.

Approx. 0V

56

B

Ground

Approx. 0V

58

Y/B

Auto light sensor ground

ON

Approx. 0V

59

SB

Auto light sensor power supply

ON

5V or more

60

L/OR

Ignition switch ACC or ON

ACC

Battery voltage

68

W/B

Ignition switch ON or START

ON

Battery voltage

105

Y/L

Battery power supply

OFF

Battery voltage

113

B

Ground

Approx. 0V

135

Y/G

RAP output signal

OFF

When headlamp battery saver timer is operated.

Approx. 0V

142

R/Y

Front door switch (Driver side) 
signal

OFF

Front door switch 
(Driver side) signal

ON (open)

Approx. 0V

OFF (close)

Battery voltage

Terminal 

No.

Wire 

color

Item

Condition

Reference value

1

W/R

Alternator

When turning ignition switch to “ON”

Approx. 0V

When engine is running

Battery voltage

When turning ignition switch to “OFF” and “ACC”

Approx. 0V

2

SB

Ignition switch START

When turning ignition switch to “START”

Battery voltage

When turning ignition switch to “ON” from “START”

Approx. 0V

When turning ignition switch to “OFF” and “ACC”

Approx. 0V

LT-60

HEADLAMP (FOR CANADA) - DAYTIME LIGHT SYSTEM -

3

W/G

Ignition switch ON or 
START

When turning ignition switch to “ON”

Battery voltage

When turning ignition switch to “START”

Battery voltage

When turning ignition switch to “OFF” and “ACC”

Approx. 0V

4

W/G

RH light fuse

When lighting switch is turned to the 2ND position with “HI BEAM” 
or “FLASH TO PASS” position   

Battery voltage

When lighting switch is turned to “FLASH TO PASS” position with 
ignition switch “ON” position

Battery voltage

5

W/G

LH light fuse

When lighting switch is turned to the 2ND position with “HI BEAM” 
or “FLASH TO PASS” position

Battery voltage

When lighting switch is turned to “FLASH TO PASS” position with 
ignition switch “ON” position

Battery voltage

6

R/W

LH high

When lighting switch is turned to the 2ND position with “HI BEAM” 
or “FLASH TO PASS” position

Battery voltage

When releasing parking brake with engine running and turning 
lighting switch to “OFF” (daytime light operation)

CAUTION:

Block wheels and ensure selector lever is in N or P position.

Half battery voltage

7

R/W

RH high

When lighting switch is turned to the 2ND position with “HI BEAM” 
or “FLASH TO PASS” position

Battery voltage

When releasing parking brake with engine running and turning 
lighting switch to “OFF” (daytime light operation)

CAUTION:

Block wheels and ensure selector lever is in N or P position.

Battery voltage

9

P

RH high main
(ground)

When turning lighting switch to the 2ND position with “HI BEAM“ 
or “FLASH TO PASS” position

Approx. 0V

When releasing parking brake with engine running and turning 
lighting switch to “OFF” (daytime light operation)

CAUTION:

Block wheels and ensure selector lever is in N or P position.

Half battery voltage

10

L/Y

LH high main
(ground)

When turning lighting switch to the 2ND position with “HI BEAM” 
or “FLASH TO PASS” position

Approx. 0V

When releasing parking brake with engine running and turning 
lighting switch to “OFF” (daytime light operation)

CAUTION:

Block wheels and ensure selector lever is in N or P position.

Approx. 0V

13

L/R

LH light main switch
(High beam)

When turning lighting switch to the 2ND position with “HI BEAM” 
or “FLASH TO PASS” position

Approx. 0V

14

P

RH light main switch
(High beam)

When turning lighting switch to the 2ND position with “HI BEAM” 
or “FLASH TO PASS” position

Approx. 0V

16

B

Ground

Approx. 0V

17

Y/R

Parking brake switch

When parking brake is released

Battery voltage

When parking brake is set

Approx. 0V

Terminal 

No.

Wire 

color

Item

Condition

Reference value

HEADLAMP (FOR CANADA) - DAYTIME LIGHT SYSTEM -

LT-61

C

D

E

F

G

H

I

J

L

M

A

B

LT

Symptom Chart

AKS002FL

Power Supply and Ground Circuit Inspection

AKS003SD

1. 

CHECK FUSE

Check for blown headlamp battery saver control unit, headlamp relay-1 and -2, and daytime light control unit
fuses.

Refer to 

LT-49, "Wiring Diagram — DTRL —"

 .

OK or NG

OK

>> GO TO 2.

NG

>> If fuse is blown, be sure to eliminate cause of malfunction before installing new fuse.

Symptom

Possible cause and reference

Neither headlamp operates.

Refer to 

LT-61, "Power Supply and Ground Circuit Inspection"

 .

Refer to 

LT-70, "Lighting Switch Circuit Inspection"

 .

If above systems are normal, replace the headlamp battery saver control unit.

Headlamp (low beam) does not operate, but head-
lamp (high beam) does operate.

Refer to 

LT-61, "Power Supply and Ground Circuit Inspection"

 .

Refer to 

LT-64, "Headlamp Relay-1 Circuit Inspection"

 .

If above systems are normal, replace the headlamp battery saver control unit.

Headlamp (high beam) does not operate, but head-
lamp (low beam) does operate.

Refer to 

LT-61, "Power Supply and Ground Circuit Inspection"

 .

Refer to 

LT-64, "Headlamp Relay-2 Circuit Inspection"

 .

If above systems are normal, replace the headlamp battery saver control unit.

RH low beam does not operate, but LH low beam 
does operate.

Refer to 

LT-61, "Power Supply and Ground Circuit Inspection"

 .

Refer to 

LT-64, "Headlamp Relay-1 Circuit Inspection"

 .

Refer to 

LT-65, "Headlamp (Low) Circuit Inspection"

 .

LH low beam does not operate, but RH low beam 
does operate.

RH high beam does not operate, but LH high beam 
does operate.

Refer to 

LT-68, "Headlamp RH (High) Circuit Inspection"

 .

Refer to 

LT-70, "Lighting Switch Circuit Inspection"

 .

If above systems are normal, replace the daytime light control unit.

LH high beam does not operate, but RH high beam 
does operate.

Refer to 

LT-66, "Headlamp LH (High) Circuit Inspection"

 .

Refer to 

LT-70, "Lighting Switch Circuit Inspection"

 .

If above systems are normal, replace the daytime light control unit.

High beam indicator does not work.

Refer to 

LT-69, "High Beam Indicator Circuit Inspection"

 .

If above system is normal, replace the combination meter.

Battery saver control does not operate properly.

Refer to 

LT-71, "Front Door Switch Circuit Inspection"

 .

Refer to 

LT-73, "Headlamp Battery Saver Control Unit Circuit Inspection"

 .

Refer to 

LT-70, "Lighting Switch Circuit Inspection"

 .

If the above systems are normal, replace the headlamp battery saver control unit.

Daytime light control does not operate properly.

Refer to 

LT-61, "Power Supply and Ground Circuit Inspection"

 .

Refer to 

LT-73, "Daytime Light Control Unit Circuit Inspection"

 .

If the above systems are normal, replace the daytime light control unit.

Unit or relay

Power source

Fuse No.

Headlamp battery saver control unit

Battery

6

Headlamp relay-1

Battery

55

57

Headlamp relay-2

Battery

73

Daytime light control unit

Ignition switch ON or START position

82

LT-62

HEADLAMP (FOR CANADA) - DAYTIME LIGHT SYSTEM -

2. 

CHECK HEADLAMP BATTERY SAVER CONTROL UNIT POWER SUPPLY CIRCUIT

1.

Turn ignition switch OFF.

2.

Disconnect headlamp battery saver control unit connector.

3.

Check voltage between headlamp battery saver control unit har-
ness connector M34 terminal 7 (Y/G) and ground.

OK or NG

OK

>> GO TO 3.

NG

>> Check harness for open or short between headlamp

battery saver control unit and fuse.

3. 

CHECK HEADLAMP RELAY-1 POWER SUPPLY CIRCUIT

1.

Remove headlamp relay-1.

2.

Check voltage between headlamp relay-1 harness connector
E3-4 terminals 2, 3 or 7 and ground.

OK or NG

OK

>> GO TO 4.

NG

>> Replace fuse, fusible link and relay block (J/B).

4. 

CHECK HEADLAMP RELAY-2 POWER SUPPLY CIRCUIT

1.

Remove headlamp relay-2.

2.

Check voltage between headlamp relay-2 harness connector E5
terminal 1 (PU) and ground.

3.

Check voltage between headlamp relay-2 harness connector E5
terminal 3 (PU) and ground.

OK or NG

OK

>> GO TO 5.

NG

>> Replace fuse, fusible link and relay block.

7 (Y/G) - Ground

: Battery voltage should exist.

PKIA5879E

Terminals

Ignition switch position

(+)

(-)

OFF

Connector

Terminal

E3 - 4

2

Ground

Battery voltage

3

7

PKIA5880E

1 (PU) - Ground

: Battery voltage should exist.

3 (PU) - Ground

: Battery voltage should exist.

PKIA5881E


Content   ..  636  637  638  639   ..