Infiniti M45 (Y34). Manual - part 633


  Index      Infiniti     Infiniti M45 (Y34) - service repair manual 2004 year


Search            copyright infringement  


Content   ..  631  632  633  634   ..


Infiniti M45 (Y34). Manual - part 633


HEADLAMP (FOR USA)

LT-39

C

D

E

F

G

H

I

J

L

M

A

B

LT

3. 

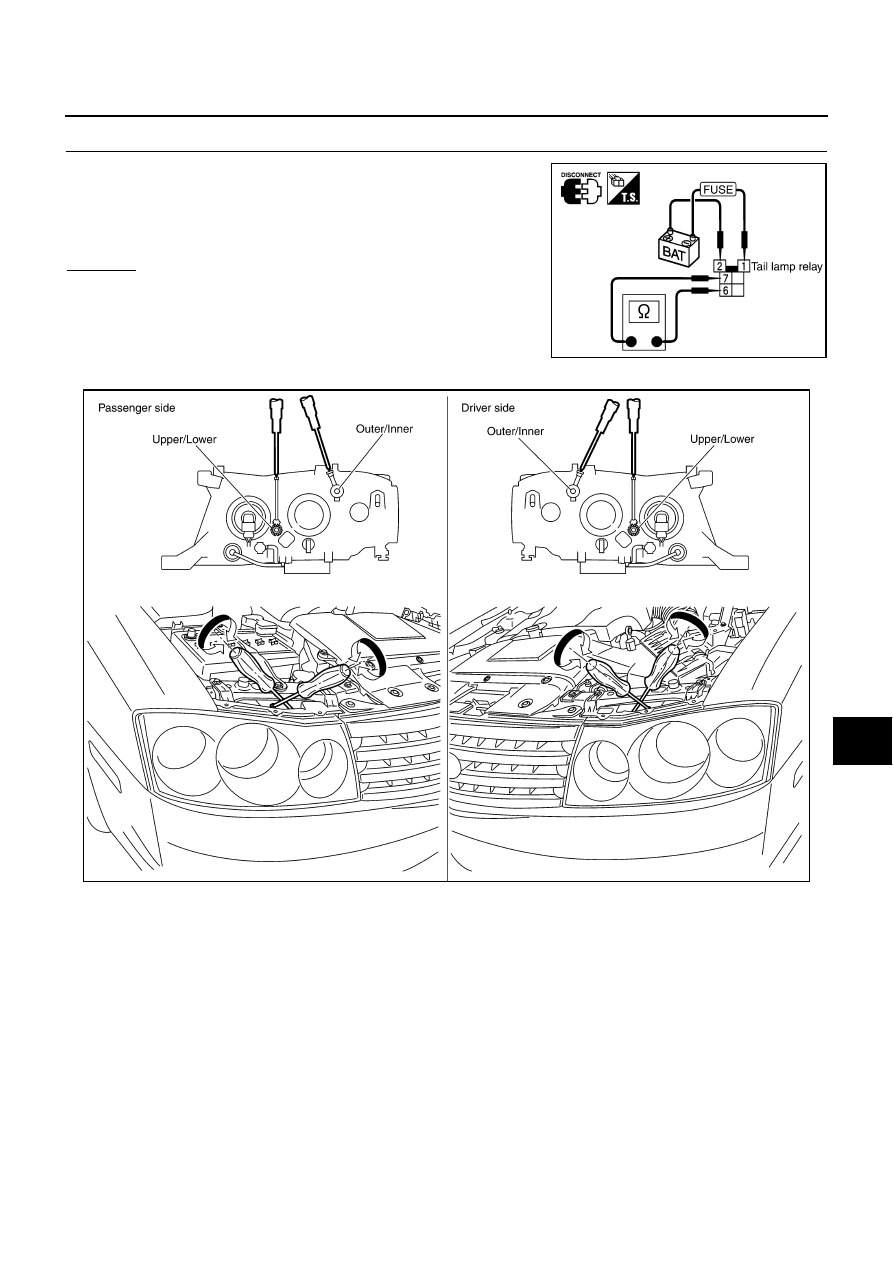
CHECK TAIL LAMP RELAY

1.

Remove tail lamp relay.

2.

Apply 12V between tail lamp relay terminals 2 and 1, and check
continuity between terminals 6 and 7.

OK or NG

OK

>> Check harness for open or short between BCM and tail

lamp relay.

NG

>> Replace tail lamp relay.

Aiming Adjustment

AKS002FC

For details, refer to the regulations in your own country.
Before performing aiming adjustment, check the following.

1.

Keep all tires inflated to correct pressures.

2.

Place vehicle on flat surface.

3.

See that there is no-load in vehicle other than the driver (or equivalent weight placed in driver's position).
Coolant, engine oil filled up to correct level and full fuel tank.

6 - 7

: Continuity should exist.

PKIA5876E

PKIA7883E

LT-40

HEADLAMP (FOR USA)

LOW BEAM AND HIGH BEAM

1.

Turn headlamp low beam on.

2.

Use adjusting screws to perform aiming adjustment.

First tighten the adjusting screw all the way and then make adjustment by loosening the screw.

If the vehicle front body has been repaired and/or the headlamp assembly has been replaced, check aiming.
Use the aiming chart shown in the figure.

Basic illuminating area for adjustment should be within the range shown on the aiming chart.
Adjust headlamps accordingly.

CAUTION:

Be sure aiming switch is set to “0” when performing aiming
adjustment.

PKIA7885E

PKIA2237E

HEADLAMP (FOR USA)

LT-41

C

D

E

F

G

H

I

J

L

M

A

B

LT

Bulb Replacement 

AKS002FD

HEADLAMP (OUTER SIDE), FOR LOW BEAM

1.

Remove headlamps. Refer to 

LT-42, "Removal and Installation"

 .

2.

Turn plastic cap counterclockwise and unlock it.

3.

Turn bulb socket counterclockwise and unlock it.

4.

Unlock retaining spring and remove bulb from headlamp.

HEADLAMP (INNER SIDE), FOR HIGH BEAM

1.

Turn lighting switch OFF.

2.

Disconnect negative battery cable or remove power fuse.

3.

Remove mass air flow sensor cover and air cleaner assembly (when replacing LH bulb). Refer to 

EM-16,

"AIR CLEANER AND AIR DUCT"

  in “ENGINE MECHANICAL (EM)” section.

4.

Remove battery cover and battery (when replacing RH bulb). Refer to 

SC-8, "Removal and Installation"

  in

“STARTING AND CHARGING SYSTEM (SC)” section.

5.

Disconnect headlamp connector.

6.

Turn bulb socket counterclockwise and unlock it.

7.

Remove bulb from headlamp.

FRONT TURN SIGNAL AND PARKING (CLEARANCE) LAMP

1.

Turn lighting switch OFF.

2.

Remove mass air flow sensor cover and air cleaner assembly (when replacing LH bulb). Refer to 

EM-16,

"AIR CLEANER AND AIR DUCT"

  in “ENGINE MECHANICAL (EM)” section.

3.

Remove battery cover and battery (when replacing RH bulb). Refer to 

SC-8, "Removal and Installation"

  in

“STARTING AND CHARGING SYSTEM (SC)” section.

4.

Turn bulb socket counterclockwise and unlock it.

5.

Remove bulb from its socket.

CAUTION:

After installing the bulb, be sure to install the plastic cap and the bulb socket securely to ensure water-
tightness.

PKIA2238E

Headlamp (outer side), for low beam

: 12V 35W (D2R)

Headlamp (inner side), for high beam

: 12V 60W (HB3) (#9005)

Front turn signal and parking lamp

: 12V 27/8W (amber)

LT-42

HEADLAMP (FOR USA)

Removal and Installation

AKS002FE

REMOVAL

1.

Disconnect negative battery cable or remove power fuse.

2.

Remove front grille. Refer to 

EI-19, "FRONT GRILLE"

  in “EXTERIOR & INTERIOR (EI)” section.

3.

Remove fender protector. Refer to 

EI-21, "FENDER PROTECTOR"

  in “EXTERIOR & INTERIOR (EI)”

section.

4.

Remove mounting screws on the side of front bumper. Refer to 

EI-15, "FRONT BUMPER"

  in “EXTERIOR

& INTERIOR (EI)” section.

5.

Pull the side of front bumper toward the front of the vehicle and
remove headlamp mounting bolt appeared.

6.

Remove headlamp mounting bolts inside headlamp.

7.

Pull headlamp toward the front of the vehicle, disconnect con-
nector, and remove from the vehicle.

CAUTION:

When removing the headlamp, place a rag between the head-
lamp and the bumper to protect the bumper.

INSTALLATION

Install in the reverse order of removal, taking care of the following points.

PKIA2240E

PKIA2239E

Headlamp mounting bolt

: 5.5 N·m (0.56 kg-m, 49 in-lb)


Content   ..  631  632  633  634   ..