Infiniti M45 (Y34). Manual - part 514


  Index      Infiniti     Infiniti M45 (Y34) - service repair manual 2004 year


Search            copyright infringement  


Content   ..  512  513  514  515   ..


Infiniti M45 (Y34). Manual - part 514


REAR PARCEL SHELF FINISHER

EI-37

C

D

E

F

G

H

J

K

L

M

A

B

EI

REAR PARCEL SHELF FINISHER

PFP:79910

Removal and Installation

AIS001IW

REMOVAL

1.

Remove rear seat. Refer to 

SE-133, "REAR SEAT"

 .

2.

Remove rear seat belt floor anchor bolts. Refer to 

SB-6, "Removal and Installation of Rear Seat Belt"

 .

3.

Remove rear pillar finisher. Refer to 

EI-34, "BODY SIDE TRIM"

 .

4.

Remove high-mounted stop lamp, and disconnect harness connectors. 

5.

Remove woofer grille and top tether strap child restraint. 

6.

Remove seat belt escutcheon. 

7.

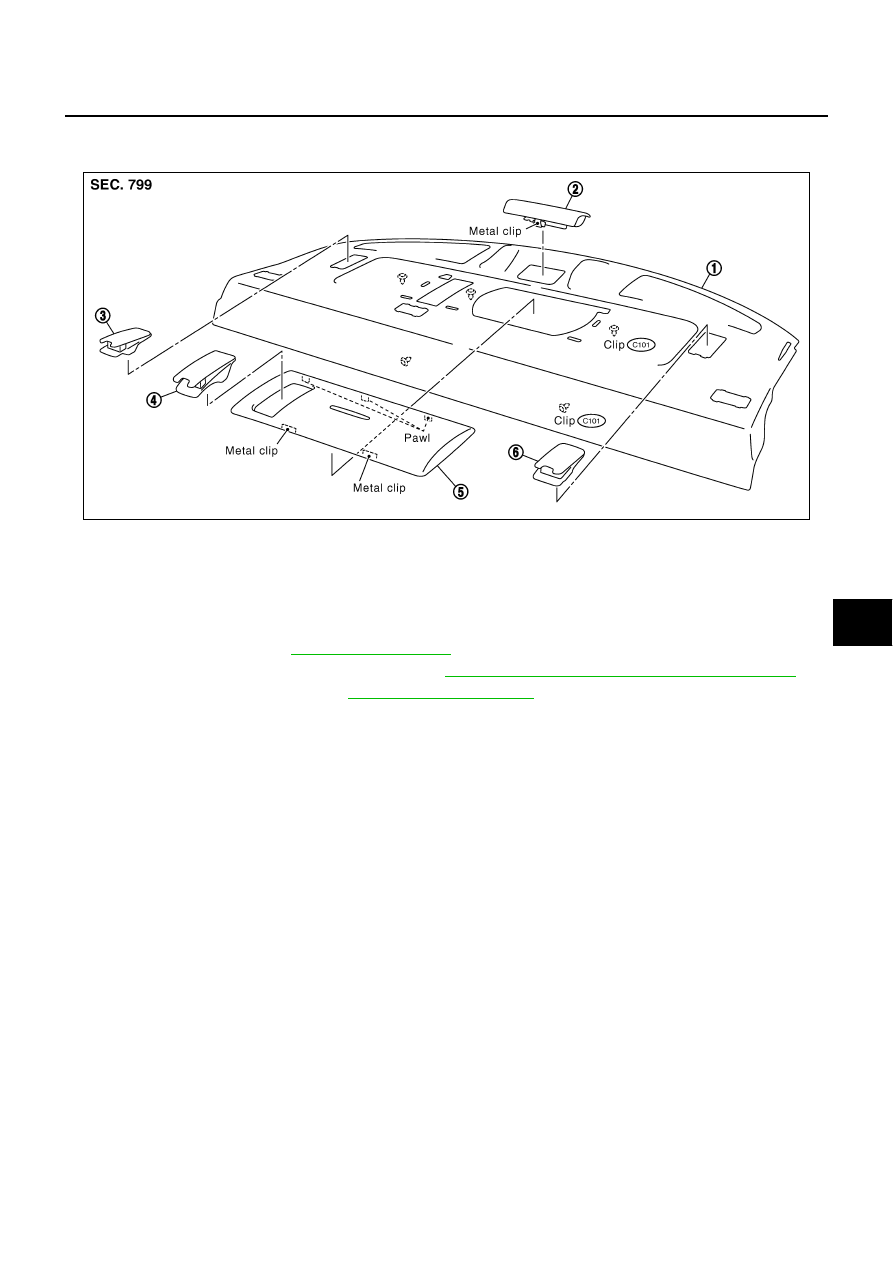
Remove clips, and remove rear parcel shelf finisher. 

INSTALLATION

Install in the reverse order of removal.

CAUTION:

Confirm hooks of rear parcel shelf finisher are completely inserted into holes on vehicle side. 

Confirm clips are matched over holes on vehicle side, then push in. 

PIIA2722E

1.

Rear parcel shelf finisher

2.

High-mounted stop lamp

3.

Top tether strap child restraint cover 
(right)

4.

Top tether strap child restraint cover 
(center)

5.

Woofer grille

6.

Top tether strap child restraint cover 
(left)

EI-38

FLOOR TRIM

FLOOR TRIM

PFP:74902

Removal and installation

AIS004VJ

REMOVAL

1.

Remove front seat and rear seat. Refer to 

SE-127, "FRONT SEAT"

  an

SE-133, "REAR SEAT"

 . 

2.

Remove center console and ashtray. Refer to 

IP-10, "INSTRUMENT PANEL ASSEMBLY"

 .

3.

Remove front and rear kicking plate. Refer to 

EI-34, "BODY SIDE TRIM"

 .

4.

Remove front and rear body side welt. Refer to 

EI-34, "BODY SIDE TRIM"

 .

5.

Remove center pillar finisher lower. Refer to 

EI-34, "BODY SIDE TRIM"

 .

6.

Remove dash side finisher. Refer to 

EI-34, "BODY SIDE TRIM"

 .

7.

Turn hexagon wrench in counterclockwise, and remove acceler-
ator pedal stopper from stud bolts on vehicle. 

NOTE:
To install, match holes of foot-rest over stud bolts on vehicle. 

SIIA0816E

1.

Floor carpet

2.

Foot-rest

3.

Carpet hook

4.

Accelerator pedal stopper

5.

Heater nozzle (left)

6.

Heater nozzle (right)

SIIA0817E

FLOOR TRIM

EI-39

C

D

E

F

G

H

J

K

L

M

A

B

EI

8.

Remove heater nozzle. 

9.

Remove wheel house garnish inner.

10. Remove front seat belt ancker. Refer to 

SB-4, "Removal and

Installation of Front Seat Belt"

 .

INSTALLATION

Install in the reverse order of removal.

FOOT-REST
Removal

1.

Remove front kicking plate inner. Refer to 

EI-34, "BODY SIDE TRIM"

 .

2.

Remove front body side welt. Refer to 

EI-34, "BODY SIDE TRIM"

 .

3.

Remove dash side finisher. Refer to 

EI-34, "BODY SIDE TRIM"

 .

4.

Turn up floor carpet on driver's seat. 

5.

Turn hexagon wrench to counterclockwise, and remove foot-rest
from stud bolts on vehicle. 

Installation

Install in the reverse order of removal.

SIIA0359E

SIIA0819E

EI-40

HEADLINING

HEADLINING

PFP:73910

Removal and Installation

AIS004VK

REMOVAL

1.

Remove front and rear kicking plate. Refer to 

EI-34, "BODY SIDE TRIM"

 .

2.

Remove body side welt. Refer to 

EI-34, "BODY SIDE TRIM"

 .

3.

Remove front pillar and center pillar finisher. Refer to 

EI-34, "BODY SIDE TRIM"

 .

4.

Remove assist grip. 

PIIA2723E

1.

Headlining (standard)

2.

Sun-visor (left)

3.

Sun-visor (right)

4.

Holder retainer

5.

Map lamp

6.

Assist grip (standard/left)

7.

Assist grip (standard/right)

8.

Personal lamp

9.

Headlining (sunroof)

10. Map lamp and sunroof switch

11. Assist grip (sunroof/right)

12. Assist grip (sunroof/left)

13. Cover sun-visor


Content   ..  512  513  514  515   ..