Infiniti M35/M45 Y50. Manual - part 86


  Index      Infiniti     Infiniti M35/M45 Y50 - service repair manual 2007 year


Search            copyright infringement  


Content   ..  84  85  86  87   ..


Infiniti M35/M45 Y50. Manual - part 86


ON-VEHICLE SERVICE

AT-267

D

E

F

G

H

I

J

K

L

M

A

B

AT

iii.

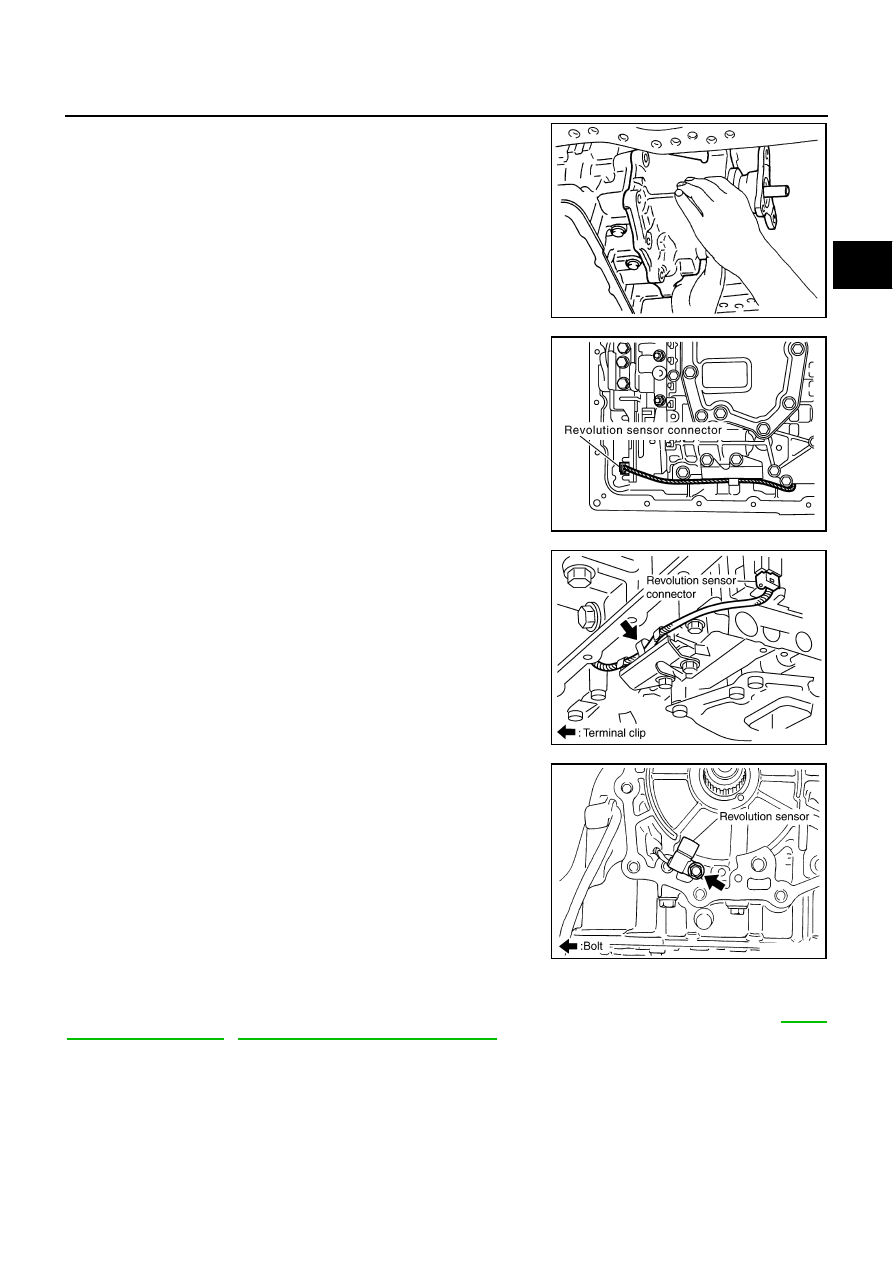
Remove output shaft & companion flange complement from
transmission case

11. Disconnect revolution sensor connector.

CAUTION:

Be careful not to damage connector

12. Straighten terminal clip to free revolution sensor harness.

13. Remove revolution sensor from transmission case.

CAUTION:

Do not subject it to impact by dropping or hitting it.

Do not disassemble.

Do not allow metal filings, etc., to get on the sensor's
front edge magnetic area.

Do not place in an area affected by magnetism.

Installation

CAUTION:

After completing installation, check A/T fluid leakage, A/T fluid level and A/T position. Refer to 

AT-13,

"Checking A/T Fluid"

 , 

AT-228, "Checking of A/T Position"

 .

SCIA5688E

SCIA7524E

SCIA7525E

SCIA3997E

AT-268

ON-VEHICLE SERVICE

1.

Install revolution sensor in transmission case. Tighten a neces-
sary bolt for revolution sensor with specified torque. Refer to 

AT-

263, "Components"

 .

CAUTION:

Do not subject it to impact by dropping or hitting it.

Do not disassemble.

Do not allow metal filings, etc., to get on the sensor's
front edge magnetic area.

Do not place in an area affected by magnetism.

2.

Connect revolution sensor connector.

3.

Securely fasten revolution sensor harness with clip.

4.

Install rear extension assembly (VQ35DE models) or output shaft & companion flange complement
(VK45DE models) according to the following procedures.

a.

VQ35DE models

i.

Apply recommended sealant (Genuine Anaerobic Liquid Gasket
or equivalent. Refer to 

GI-47, "Recommended Chemical Prod-

ucts and Sealants"

 .) to rear extension assembly as shown in

the figure.

CAUTION:

Completely remove all moisture, oil and old sealant, etc.
from transmission case and rear extension assembly
mounting surfaces.

SCIA3997E

SCIA7524E

SCIA7525E

SCIA5212E

ON-VEHICLE SERVICE

AT-269

D

E

F

G

H

I

J

K

L

M

A

B

AT

ii.

Install rear extension assembly to transmission case. (With nee-
dle bearing.)

CAUTION:

Insert the tip of parking rod between the parking pole and
the parking actuator support when assembling the rear
extension assembly. 

iii.

Tighten rear extension assembly bolts to the specified torque.
Refer to 

AT-263, "REMOVAL AND INSTALLATION"

 .

CAUTION:

Do not reuse self-sealing bolts.

b.

VK45DE models

i.

Apply recommended sealant (Genuine Anaerobic Liquid Gasket
or equivalent. Refer to 

GI-47, "Recommended Chemical Prod-

ucts and Sealants"

 .) to output shaft & companion flange com-

plement as shown in the figure.

CAUTION:

Completely remove all moisture, oil and old sealant, etc.
from the transmission case and output shaft & companion
flange complement mounting surfaces.

ii.

Install output shaft & companion flange complement to transmis-
sion case.

SCIA3431E

SCIA6941E

SCIA5212E

SCIA5688E

AT-270

ON-VEHICLE SERVICE

iii.

Tighten output shaft & companion flange complement bolts (1)
to the specified torque. Refer to 

AT-263, "REMOVAL AND

INSTALLATION"

 .

: Bolt (10)

CAUTION:

Do not reuse self-sealing bolts (2).
Refer to GI section to make sure icons (symbol marks) in the fig-
ure. Refer to 

GI-11, "Components"

 .

5.

Install rear engine mounting member. Refer to 

AT-274, "Removal and Installation (2WD Models)"

 .

6.

Install oil pan, oil pan gasket and clips (VQ35DE models) or oil pan, oil pan gasket, brackets and clips
(VK45DE models) according to the following procedures.

a.

VQ35DE models

i.

Install oil pan gasket to oil pan.

CAUTION:

Do not reuse oil pan gasket.

Install it in the direction to align hole positions.

Complete remove all moisture, oil and old gasket, etc. from oil pan gasket mounting surface.

ii.

Install oil pan (2) (with oil pan gasket) and clips (1) to transmis-
sion case.

: Front
: Bolt (22)

CAUTION:

Install it so that drain plug comes to the position as
shown in the figure.

Be careful not to pinch harnesses.

Completely remove all moisture, oil and old gasket, etc.
from oil pan mounting surface.

iii.

Tighten oil pan mounting bolts to the specified torque in numeri-
cal order shown in the figure after temporarily tightening them.
Tighten oil pan mounting bolts to the specified torque. Refer to

AT-263, "Components"

 .

CAUTION:

Do not reuse oil pan mounting bolts.

b.

VK45DE models

i.

Install oil pan gasket to oil pan.

CAUTION:

Do not reuse oil pan gasket.

Install it in the direction to align hole positions.

Complete remove all moisture, oil and old gasket, etc. from oil pan gasket mounting surface.

SCIA6943E

SCIA8039E

SCIA4113E


Content   ..  84  85  86  87   ..