Infiniti M35/M45 Y50. Manual - part 23
A/T FLUID
AT-15
D
E
F
G
H
I
J
K
L
M
A
B
AT
5.
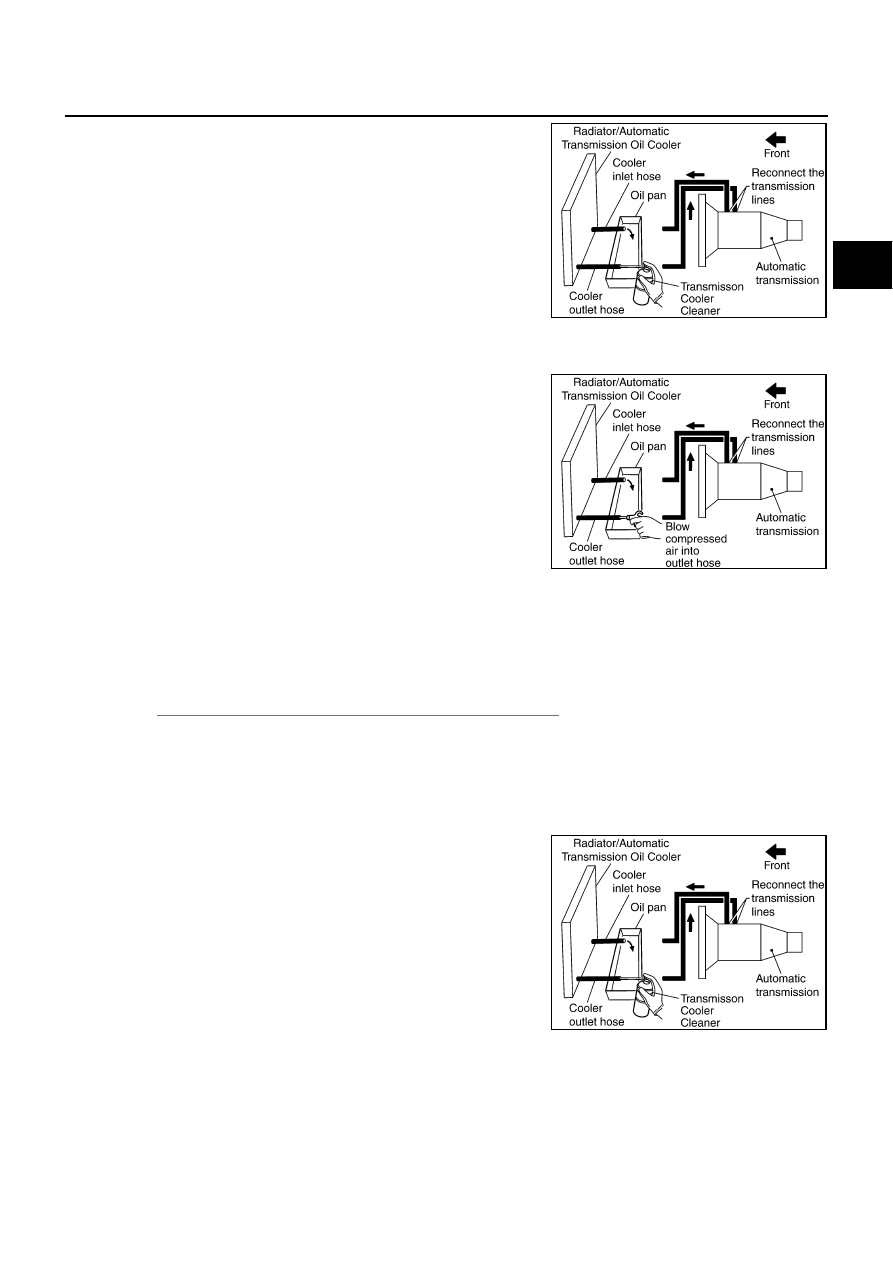
Insert the extension adapter hose of a can of Transmission
Cooler Cleaner (Nissan P/N 999MP-AM006) into the cooler out-
let hose.
CAUTION:
●
Wear safety glasses and rubber gloves when spraying
the Transmission Cooler Cleaner.
●
Spray Transmission Cooler Cleaner only with adequate
ventilation.
●
Avoid contact with eyes and skin.
●
Do not breath vapors or spray mist.
6.
Hold the hose and can as high as possible and spray Transmis-
sion Cooler Cleaner in a continuous stream into the cooler outlet hose until ATF flows out of the cooler
inlet hose for 5 seconds.
7.
Insert the tip of an air gun into the end of the cooler outlet hose.
8.
Wrap a shop rag around the air gun tip and of the cooler outlet
hose.
9.
Blow compressed air regulated to 5 to 9 kg/cm
2
(70 to 130 psi)
through the cooler outlet hose for 10 seconds to force out any
remaining ATF.
10. Repeat steps 5 through 9 three additional times.
11. Position an oil pan under the banjo bolts that connect the A/T
fluid cooler steel lines to the A/T.
12. Remove the banjo bolts.
13. Flush each steel line from the cooler side back toward the A/T
by spraying Transmission Cooler Cleaner in a continuous stream for 5 seconds.
14. Blow compressed air regulated to 5 to 9 kg/cm
2
(70 to 130 psi) through each steel line from the cooler
side back toward the A/T for 10 seconds to force out any remaining ATF.
15. Ensure all debris is removed from the steel cooler lines.
16. Ensure all debris is removed from the banjo bolts and fittings.
17. Perform
AT-15, "A/T FLUID COOLER DIAGNOSIS PROCEDURE"
A/T FLUID COOLER DIAGNOSIS PROCEDURE
NOTE:
Insufficient cleaning of the cooler inlet hose exterior may lead to inaccurate debris identification.
1.
Position an oil pan under the A/T inlet and outlet cooler hoses.
2.
Clean the exterior and tip of the cooler inlet hose.
3.
Insert the extension adapter hose of a can of Transmission
Cooler Cleaner (Nissan P/N 999MP-AM006) into the cooler out-
let hose.
CAUTION:
●
Wear safety glasses and rubber gloves when spraying
the Transmission Cooler Cleaner.
●
Spray Transmission Cooler Cleaner only with adequate
ventilation.
●
Avoid contact with eyes and skin.
●
Do not breath vapors or spray mist.
4.
Hold the hose and can as high as possible and spray Transmis-
sion Cooler Cleaner in a continuous stream into the cooler outlet hose until ATF flows out of the cooler
inlet hose for 5 seconds.
SCIA3831E
SCIA3832E
SCIA3831E