Infiniti F50. Manual - part 539


  Index      Infiniti     Infiniti F50 - service repair manual 2006 year


Search            


Content   ..  537  538  539  540   ..


Infiniti F50. Manual - part 539


TIMING CHAIN

EM-43

C

D

E

F

G

H

I

J

K

L

M

A

EM

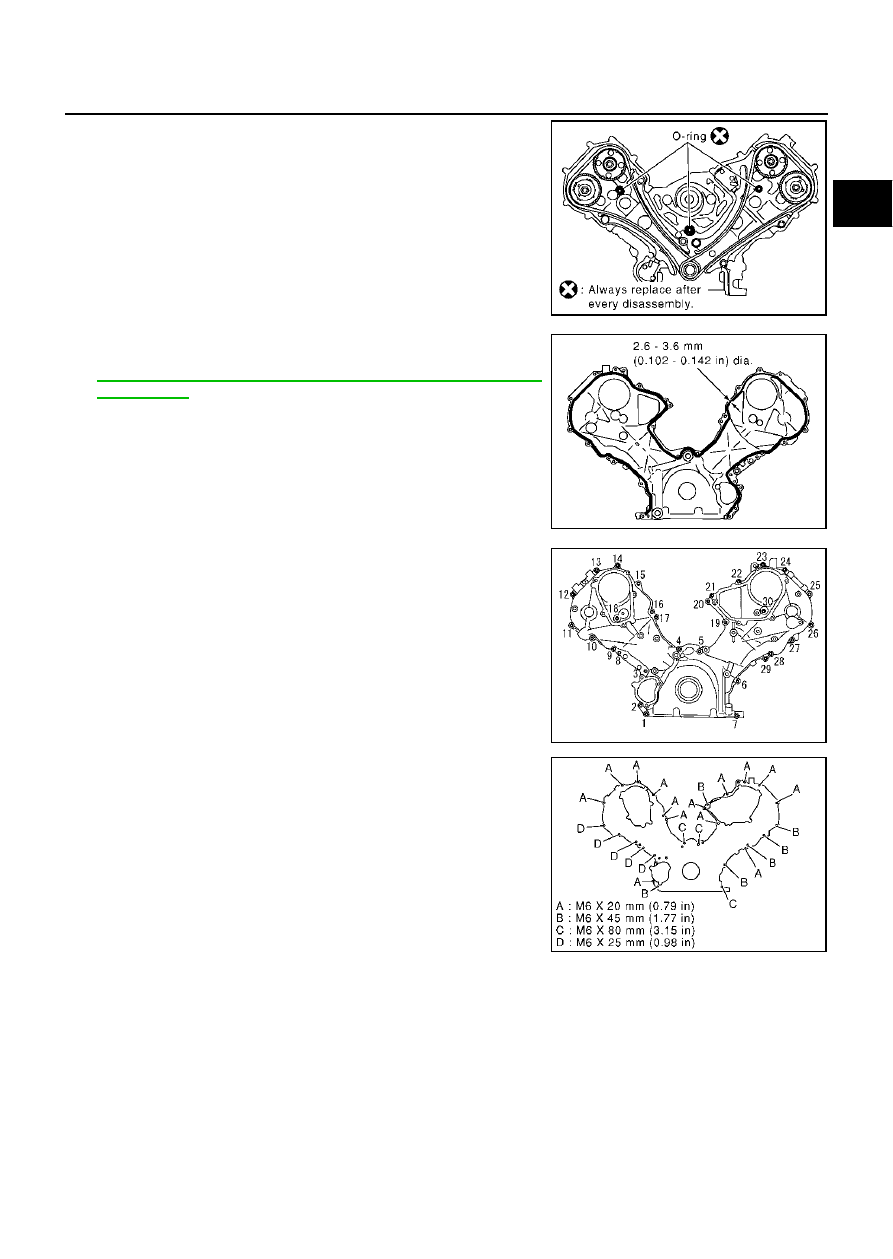
10. Install front cover as follows:

a.

Install new O-rings onto RH and LH cylinder heads and cylinder
block.

b.

Apply liquid gasket as shown in the figure.
Use Genuine RTV Silicone Sealant or equivalent. Refer to

GI-46, "RECOMMENDED CHEMICAL PRODUCTS AND
SEALANTS"

 .

c.

Check again that the timing mating mark on timing chain and
that on each sprocket are aligned. Then, install front cover.

CAUTION:

Be careful to avoid interference with the front end of oil
pump drive spacer. Such interference may damage front oil
seal.

d.

Tighten fixing bolts in the order shown in figure.

e.

After tightening, re-tighten to the specified torque.

CAUTION:

Be sure to wipe off any excessive liquid gasket leaking onto
surface mating with oil pan.

11. Install intake valve timing control cover as follows:

a.

At the back of intake valve timing control cover, install new seal rings (three for each) to the area to be
inserted into intake camshaft sprocket.

CAUTION:

Do not spread seal ring excessively to avoid breaks and deformation.

SBIA0373E

PBIC0062E

KBIA0354J

PBIC0063E

EM-44

TIMING CHAIN

b.

On the side of front cover, install new O-ring (one for each
bank).

c.

Apply liquid gasket as shown in the figure.
Use Genuine RTV Silicone Sealant or equivalent. Refer to

GI-46, "RECOMMENDED CHEMICAL PRODUCTS AND
SEALANTS"

 .

d.

Tighten fixing bolts in the order shown in figure.

12. Install intake valve timing control position sensor, intake valve timing control solenoid valve and camshaft

position sensor (PHASE) to intake valve timing control cover and front cover.

Be sure to tighten bolts with flanges completely seated.

13. Install crankshaft pulley.

Install according to the dowel pin of oil pump drive spacer.

Lightly tapping its center with plastic hammer, insert pulley.

CAUTION:

Do not tap pulley on the side surface where belt is installed (outer circumference).

14. Tighten fixing bolts of crankshaft pulley.

Lock crankshaft with a hammer handle or similar tool to tighten fixing bolts. 

Perform the following steps for angular tightening:

a.

Apply engine oil onto threaded parts of bolts and seating areas.

b.

Tighten bolt 88.2 to 98.0 N·m (9.0 to 9.9 kg-m, 65 to 72 ft-lb).

SBIA0374E

SBIA0375E

PBIC0051E

TIMING CHAIN

EM-45

C

D

E

F

G

H

I

J

K

L

M

A

EM

c.

Select one most visible notch of the four on bolt flange. Corre-
sponding to the selected notch, put a mating mark (such as
paint) on crankshaft pulley. 

d.

Tighten further by 90

°

 to 96

°

 [target: 90

°

].

Check the tightening angle by referencing to the notches. The
angle between two notches is 90

°

.

15. Rotate crankshaft pulley in normal direction (clockwise when viewed from FRONT) to check for interfer-

ence among parts.

16. For the following operations, perform steps in the reverse order of removal.

PBIC0065E

EM-46

CAMSHAFT

CAMSHAFT

PFP:13001

Removal and Installation

EBS001JZ

CAUTION:

Apply new engine oil to parts marked in illustration before installation.

REMOVAL

1.

Remove timing chain. Refer to 

EM-35, "Removal and Installation"

 .

2.

With hexagonal part of camshaft locked with wrench, loosen
bolts securing camshaft sprocket to remove camshaft sprocket. 

CAUTION:

To avoid interference between valves and pistons, do not
turn crankshaft or camshaft with timing chain discon-
nected.

SBIA0365E

1.

Cylinder head (right bank)

2.

Camshaft bracket (No.2, 3, 4, 5)

3.

Adjusting shim

4.

Valve lifter

5.

Camshaft bracket (No.1)

6.

Washer

7.

Camshaft (exhaust)

8.

Camshaft sprocket (exhaust)

9.

Camshaft sprocket (intake)

10.

Camshaft (intake)

11.

Cylinder head (left bank)

12.

Adjusting shim

13.

Valve lifter

14.

Camshaft (intake)

15.

Camshaft sprocket (intake)

16.

Camshaft sprocket (exhaust)

17.

Camshaft (exhaust)

18.

Camshaft bracket (No.1)

19.

Washer

20.

Camshaft bracket (No.2, 3, 4, 5)

21.

Camshaft bracket (intake, No.6)

PBIC0030E


Content   ..  537  538  539  540   ..