Infiniti F50. Manual - part 156
REFRIGERANT LINES
ATC-149
C
D
E
F
G
H
I
K
L
M
A
B
ATC
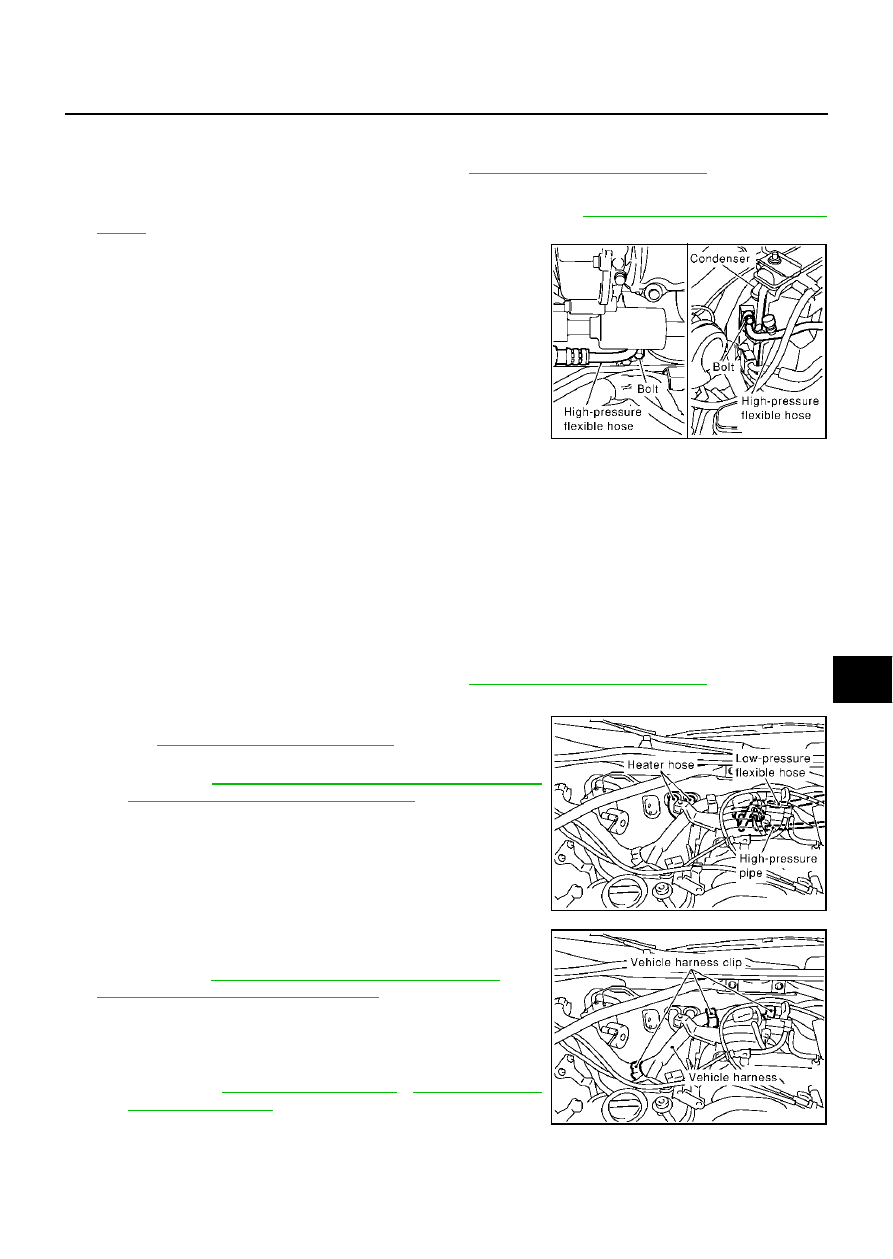
High-Pressure Flexible Hose
EJS000A8
REMOVAL
1.
Remove engine cover and air cleaner cover. Refer to
2.
Use a refrigerant collecting equipment (for HFC-134a) to discharge the refrigerant.
3.
Remove air cleaner assembly, air duct and air inlet pipe. Refer to
4.
Remove mounting bolt and nut from the high-pressure flexible
hose, then remove it.
CAUTION:
Cap or wrap the open ends of the pipe with a suitable material
such as vinyl tape to avoid the entry of air.
INSTALLATION
Installation is basically the reverse order of removal.
CAUTION:
●
Replace high-pressure flexible hose O-ring with a new one. Apply compressor oil prior to installa-
tion.
●
When pouring refrigerant, check for leaks.
High-Pressure Pipe
EJS000A9
REMOVAL
1.
Remove engine cover and air cleaner cover. Refer to
2.
Use a refrigerant collecting equipment (for HFC-134a) to discharge the refrigerant.
3.
Drain coolant from cooling system and disconnect heater hoses.
Refer to
CO-9, "Changing Engine Coolant"
.
4.
Remove tower bar, air cleaner assembly, air duct and air inlet
pipe. Refer to
FSU-5, "FRONT SUSPENSION ASSEMBLY"
and
EM-15, "AIR CLEANER AND AIR DUCT"
.
5.
Remove vehicle harness from the clip.
6.
Remove low-pressure flexible hose and high-pressure flexible
hose. Refer to
ATC-148, "Low-Pressure Flexible Hose"
ATC-149, "High-Pressure Flexible Hose"
.
CAUTION:
Cap or wrap the open ends of the pipe with a suitable mate-
rial such as vinyl tape to avoid the entry of air.
7.
Remove front grille, battery, battery tray and radiator mounting
bracket. Refer to
and
.
8.
Slide the radiator assembly to the right side of vehicle.
RJIA0138E
Bolt and nut mounting high-pressure flexible hose
Tightening torque
: 7.8 - 19.6 N·m (0.8 - 1.9 kg·m, 69 - 173 in-lb)
RJIA0318E
RJIA0328E