Infiniti G35 (V35) Sedan. Manual - part 912


  Index      Infiniti     Infiniti G35 (V35) Sedan - service repair manual 2007 year


Search            


Content   ..  910  911  912  913   ..


Infiniti G35 (V35) Sedan. Manual - part 912


ENGINE MAINTENANCE

MA-13

< ON-VEHICLE MAINTENANCE >

C

D

E

F

G

H

I

J

K

L

M

B

MA

N

O

A

4.

Remove air relief plug (2) on radiator left side. 

5.

Remove air relief plug (1) on heater hose.

6.

Fill radiator, and reservoir tank if removed, to specified level.
• Pour engine coolant through engine coolant filler neck

slowly of less than 2  (2-1/8 US qt, 1-3/4 lmp qt) a minute
to allow air in system to escape.

• Use Genuine NISSAN Long Life Antifreeze/Coolant or

equivalent mixed with water (distilled or demineralized).
Refer to 

MA-10, "Fluids and Lubricants"

.

7.

When engine coolant overflows air relief hole on radiator, install
air relief plug with new O-ring.

8.

Repeat step 6.

9.

When engine coolant overflows air relief hole on heater hose, install air relief plug with new O-ring. Then
refill radiator with engine coolant.

1

: Reservoir tank

3

: Engine cover

: Vehicle front

JPBIA0260ZZ

2

: Heater hose

: Vehicle front

JPBIA0104ZZ

Engine coolant capacity

: Refer to 

CO-26, 

"Periodical Maintenanc
e Specification"

.

(With reservoir tank at 
“MAX” level)

JPBIA0412ZZ

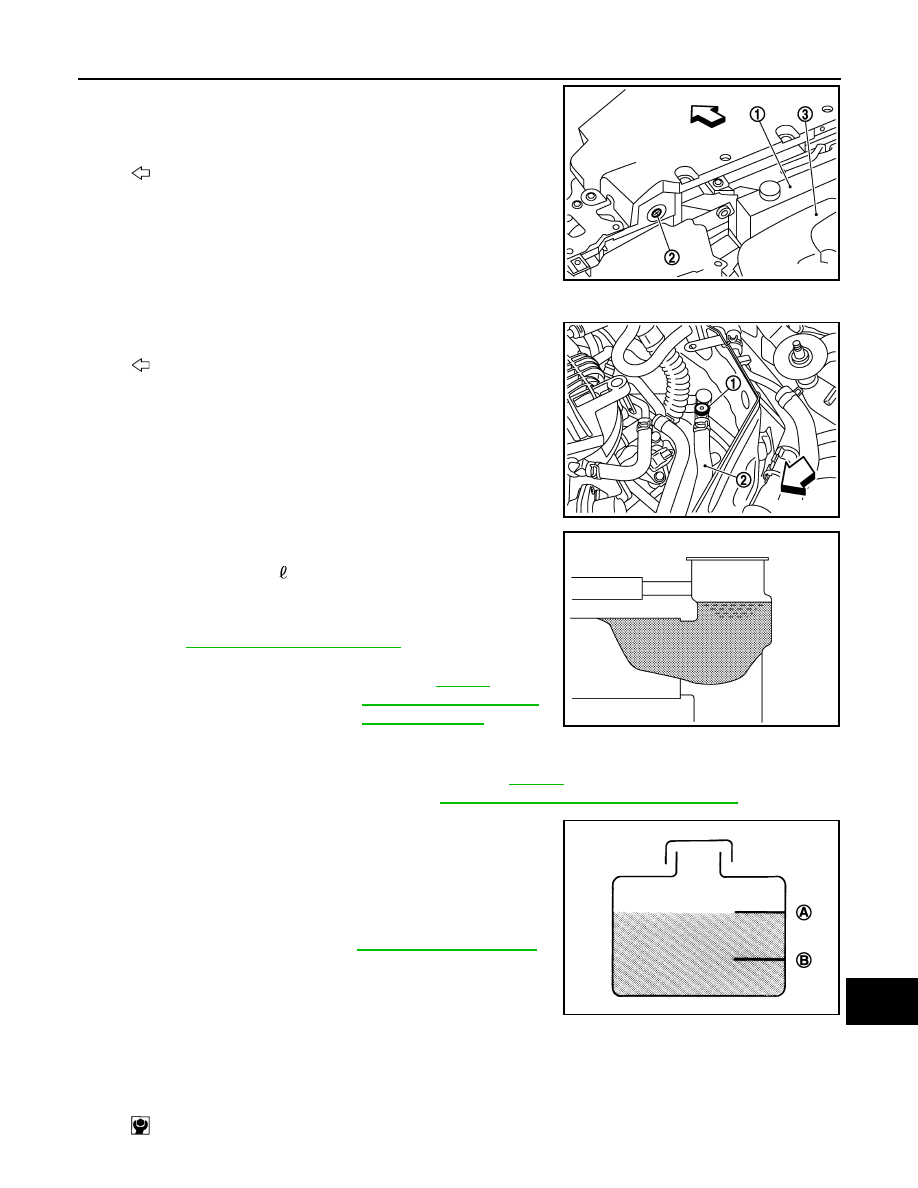
Reservoir tank engine coolant capacity

:Refer to 

CO-26, 

"Periodical Maintenance Specification"

(At “MAX” level)

A

: MAX 

B

:  MIN

Tightening torque

: Refer to 

CO-14, "Exploded View"

.

JPBIA0102ZZ

: 1.2 N·m (0.12 kg-m, 11 in-lb)

MA-14

< ON-VEHICLE MAINTENANCE >

ENGINE MAINTENANCE

10. Install air cleaner case (LH). Refer to 

EM-25, "Exploded View"

.

11. Install radiator cap.
12. Warm up engine until opening thermostat. Standard for warming-up time is approximately 10 minutes at

3,000 rpm.
• Make sure thermostat opening condition by touching radiator hose (lower) to see a flow of warm water.

CAUTION:

Watch water temperature gauge so as not to overheat engine.

13. Stop the engine and cool down to less than approximately 50

°

C (122

°

F).

• Cool down using fan to reduce the time.
• If necessary, refill radiator up to filler neck with engine coolant.

14. Refill reservoir tank to “MAX” level line with engine coolant.

15. Repeat steps 11 through 14 two or more times with radiator cap installed until engine coolant level no

longer drops. 

16. Check cooling system for leaks with engine running.

17. Warm up the engine, and check for sound of engine coolant flow while running engine from idle up to

3,000 rpm with heater temperature controller set at several position between “COOL” and “WARM”.
• Sound may be noticeable at heater unit.

18. Repeat step 17 three times.
19. If sound is heard, bleed air from cooling system by repeating step 6, and steps from 11 to 18 until engine

coolant level no longer drops. 

20. Check that the reservoir tank cap is tightened.

ENGINE COOLANT : Flushing

INFOID:0000000000967306

1.

Install reservoir tank if removed, and radiator drain plug.

CAUTION:

Be sure to clean drain plug and install with new O-ring.

If water drain plugs on cylinder block are removed, close and tighten them. Refer to 

EM-88, "Set-

ting"

.

2.

Remove air relief plug (1) on heater hose.

3.

Remove air relief plug (2) on radiator.

4.

Fill radiator with water until water spills from the air relief holes, then close air relief plugs. Fill radiator and
reservoir tank with water and reinstall radiator cap.

Tightening torque

: Refer to 

CO-14, "Exploded View"

.

2

: Heater hose

: Vehicle front

JPBIA0104ZZ

1

: Reservoir tank

3

: Engine cover

: Vehicle front

JPBIA0260ZZ

ENGINE MAINTENANCE

MA-15

< ON-VEHICLE MAINTENANCE >

C

D

E

F

G

H

I

J

K

L

M

B

MA

N

O

A

5.

Run the engine and warm it up to normal operating temperature.

6.

Rev the engine two or three times under no-load.

7.

Stop the engine and wait until it cools down.

8.

Drain water from the system. Refer to 

MA-12, "ENGINE COOLANT : Draining"

.

9.

Repeat steps 1 through 8 until clear water begins to drain from radiator.

10. Check that the reservoir tank cap is tightened.

FUEL LINES

FUEL LINES : Inspection

INFOID:0000000000967307

Inspect fuel lines, filler cap and tank for improper attachment, leaks,
cracks, damage, loose connections, chafing or deterioration.
If necessary, repair or replace damaged parts.

AIR CLEANER FILTER

AIR CLEANER FILTER : Removal and Installation

INFOID:0000000000967308

REMOVAL

1.

Unhook clips (1) and remove holder (3) from air cleaner case
(2).

2.

Remove air cleaner filter (1) from air cleaner case (2).

INSTALLATION

Note the following, and install in the reverse order of removal.
• Install the air cleaner filter by aligning the seal with the notch of air cleaner case.

ENGINE OIL

Tightening torque

Refer to 

CO-14, "Exploded View"

.

SMA803A

KBIA3584J

3

:  Holder

4

: Clip

JPBIA0005ZZ

MA-16

< ON-VEHICLE MAINTENANCE >

ENGINE MAINTENANCE

ENGINE OIL : Draining

INFOID:0000000000967309

WARNING:

• Be careful not to get burn yourself, as engine oil may be hot.
• Prolonged and repeated contact with used engine oil may cause skin cancer. Try to avoid direct skin

contact with used engine oil. If skin contact is made, wash thoroughly with soap or hand cleaner as
soon as possible. 

1.

Warm up the engine, and check for engine oil leakage from engine components. Refer to 

LU-7, "Inspec-

tion"

.

2.

Stop the engine and wait for 10 minutes.

3.

Loosen oil filler cap.

4.

Remove undercover with power tool. 

5.

Remove drain plug and then drain engine oil.

ENGINE OIL : Refilling

INFOID:0000000000967310

1.

Install drain plug with new washer. Refer to 

EM-41, "Exploded View (2WD)"

 or 

EM-41, "Exploded View

(AWD)"

.

CAUTION:

Be sure to clean drain plug and install with new washer.

2.

Refill with new engine oil.
Engine oil specification and viscosity: Refer to 

MA-16, "ENGINE OIL : Refilling"

CAUTION:

• When filling engine oil, do not pull out oil level gauge.
• The refill capacity depends on the engine oil temperature and drain time. Use these specifica-

tions for reference only.

• Always use oil level gauge to determine the proper amount of engine oil in engine.

3.

Warm up the engine and check area around drain plug and oil filter for engine oil leakage.

4.

Stop the engine and wait for 10 minutes.

5.

Check the engine oil level. Refer to 

LU-7, "Inspection"

.

OIL FILTER

OIL FILTER : Removal and Installation

INFOID:0000000000967311

REMOVAL

CAUTION:

• Oil filter is provided with relief valve. Use Genuine NISSAN Oil Filter or equivalent.
• Be careful not to get burned when engine and engine oil may be hot.
• When removing, prepare a shop cloth to absorb any engine oil leakage or spillage.
• Do not allow engine oil to adhere to drive belts.
• Completely wipe off any engine oil that adheres to engine and vehicle.

1.

Remove engine undercover with power tool.

Tightening torque

: Refer to 

EM-41, "Exploded View (2WD)"

.

Engine oil capacity

Refer to 

LU-19, "Periodical Maintenance Specification"

.


Content   ..  910  911  912  913   ..