Infiniti G35 (V35) Sedan. Manual - part 906


  Index      Infiniti     Infiniti G35 (V35) Sedan - service repair manual 2007 year


Search            


Content   ..  904  905  906  907   ..


Infiniti G35 (V35) Sedan. Manual - part 906


LU-8

< ON-VEHICLE MAINTENANCE >

ENGINE OIL

OIL PRESSURE CHECK

WARNING:

• Be careful not to get burn yourself, as engine oil may be hot.
• Oil pressure check should be done in “Neutral position” (M/T models) or “Parking position” (A/T

models).

1.

Check the engine oil level. Refer to 

LU-7, "Inspection"

.

2.

Remove engine undercover with power tool.

3.

Disconnect harness connector at oil pressure switch, and
remove oil pressure switch using deep socket (commercial ser-
vice tool).

CAUTION:

Do not drop or shock oil pressure switch.
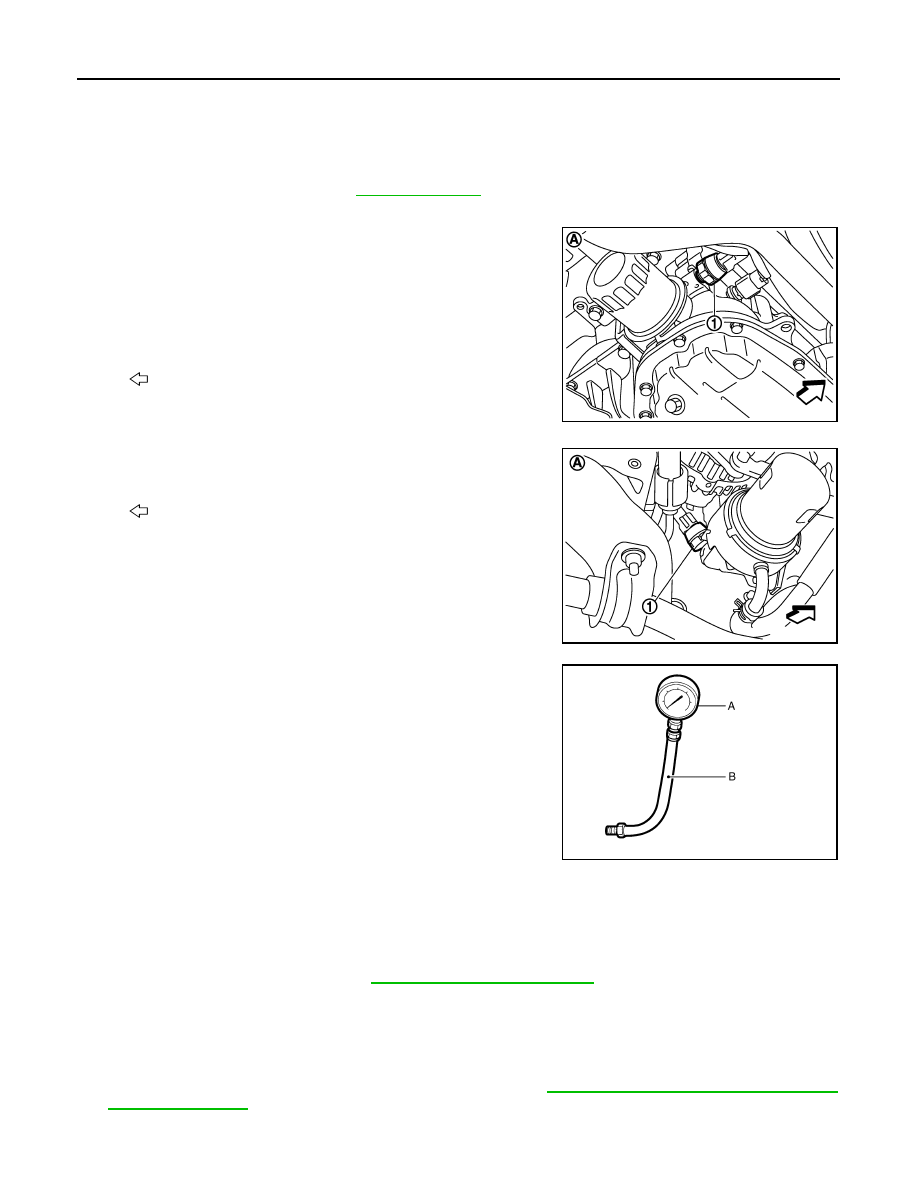
4.

Install the oil pressure gauge [SST: ST25051001 (J25695-1)] (A)
and hose [SST: ST25052000 (J25695-2)] (B).

5.

Start the engine and warm it up to normal operating temperature.

6.

Check the engine oil pressure with engine running under no-load.
NOTE:
When the engine oil temperature is low, the engine oil pressure becomes high.

If difference is extreme, check engine oil passage and oil pump for engine oil leaks.

7.

After the inspections, install oil pressure switch as follows:

a.

Remove old liquid gasket adhering to oil pressure switch and the mating surface.

b.

Apply liquid gasket and tighten oil pressure switch to the specification.
Use Genuine RTV Silicone Sealant or equivalent. Refer to 

GI-15, "Recommended Chemical Prod-

ucts and Sealants"

. 

1

: Oil pressure switch

A

:  2WD

: Engine front

JPBIA0251GB

1

: Oil pressure switch

A

:  AWD

: Engine front

JPBIA0073ZZ

JPBIA0074ZZ

Engine oil pressure

: Refer to 

LU-19, "Engine Oil Pressure"

.

ENGINE OIL

LU-9

< ON-VEHICLE MAINTENANCE >

C

D

E

F

G

H

I

J

K

L

M

A

LU

N

P

O

c.

After warming up engine, make sure there is no leakage of engine oil with running engine.

Draining

INFOID:0000000000956311

WARNING:

• Be careful not to get burn yourself, as engine oil may be hot.
• Prolonged and repeated contact with used engine oil may cause skin cancer. Try to avoid direct skin

contact with used engine oil. If skin contact is made, wash thoroughly with soap or hand cleaner as
soon as possible. 

1.

Warm up the engine, and check for engine oil leakage from engine components. Refer to 

LU-7, "Inspec-

tion"

.

2.

Stop the engine and wait for 10 minutes.

3.

Loosen oil filler cap.

4.

Remove undercover with power tool. 

5.

Remove drain plug and then drain engine oil.

Refilling

INFOID:0000000000956312

1.

Install drain plug with new washer. Refer to 

EM-41, "Exploded View (2WD)"

 or 

EM-41, "Exploded View

(AWD)"

.

CAUTION:

Be sure to clean drain plug and install with new washer.

2.

Refill with new engine oil.
Engine oil specification and viscosity: Refer to 

LU-9, "Refilling"

CAUTION:

• When filling engine oil, do not pull out oil level gauge.
• The refill capacity depends on the engine oil temperature and drain time. Use these specifica-

tions for reference only.

• Always use oil level gauge to determine the proper amount of engine oil in engine.

3.

Warm up the engine and check area around drain plug and oil filter for engine oil leakage.

4.

Stop the engine and wait for 10 minutes.

5.

Check the engine oil level. Refer to 

LU-7, "Inspection"

.

Tightening torque

Refer to 

LU-12, "AWD : Exploded View"

.

Tightening torque

: Refer to 

EM-41, "Exploded View (2WD)"

.

Engine oil capacity

Refer to 

LU-19, "Periodical Maintenance Specification"

.

LU-10

< ON-VEHICLE MAINTENANCE >

OIL FILTER

OIL FILTER

Removal and Installation

INFOID:0000000000956313

REMOVAL

CAUTION:

• Oil filter is provided with relief valve. Use Genuine NISSAN Oil Filter or equivalent.
• Be careful not to get burned when engine and engine oil may be hot.
• When removing, prepare a shop cloth to absorb any engine oil leakage or spillage.
• Do not allow engine oil to adhere to drive belts.
• Completely wipe off any engine oil that adheres to engine and vehicle.

1.

Remove engine undercover with power tool.

2.

Using oil filter wrench [SST: KV10115801 (J38956)] (B), remove
oil filter.

INSTALLATION

1.

Remove foreign materials adhering to oil filter installation surface.

2.

Apply engine oil to the oil seal contact surface of new oil filter.

A

:  2WD

: Engine front

JPBIA0252GB

A

:  AWD

: Engine front

JPBIA0076ZZ

SMA010

OIL FILTER

LU-11

< ON-VEHICLE MAINTENANCE >

C

D

E

F

G

H

I

J

K

L

M

A

LU

N

P

O

3.

Screw oil filter manually until it touches the installation surface,
then tighten it by 2/3 turn (A). Or tighten to the specification.

Inspection

INFOID:0000000000956314

INSPECTION AFTER INSTALLATION

1.

Check the engine oil level. Refer to 

LU-7, "Inspection"

.

2.

Start the engine, and check there is no leak of engine oil.

3.

Stop the engine and wait for 10 minutes.

4.

Check the engine oil level, and adjust the level. Refer to 

LU-7, "Inspection"

.

Oil filter:

: 17.7 N·m (1.8 kg-m, 13 ft-lb)

JPBIA0077ZZ


Content   ..  904  905  906  907   ..