Infiniti G35 (V35) Sedan. Manual - part 822


  Index      Infiniti     Infiniti G35 (V35) Sedan - service repair manual 2007 year


Search            


Content   ..  820  821  822  823   ..


Infiniti G35 (V35) Sedan. Manual - part 822


INT-12

< ON-VEHICLE REPAIR >

DOOR FINISHER

8.

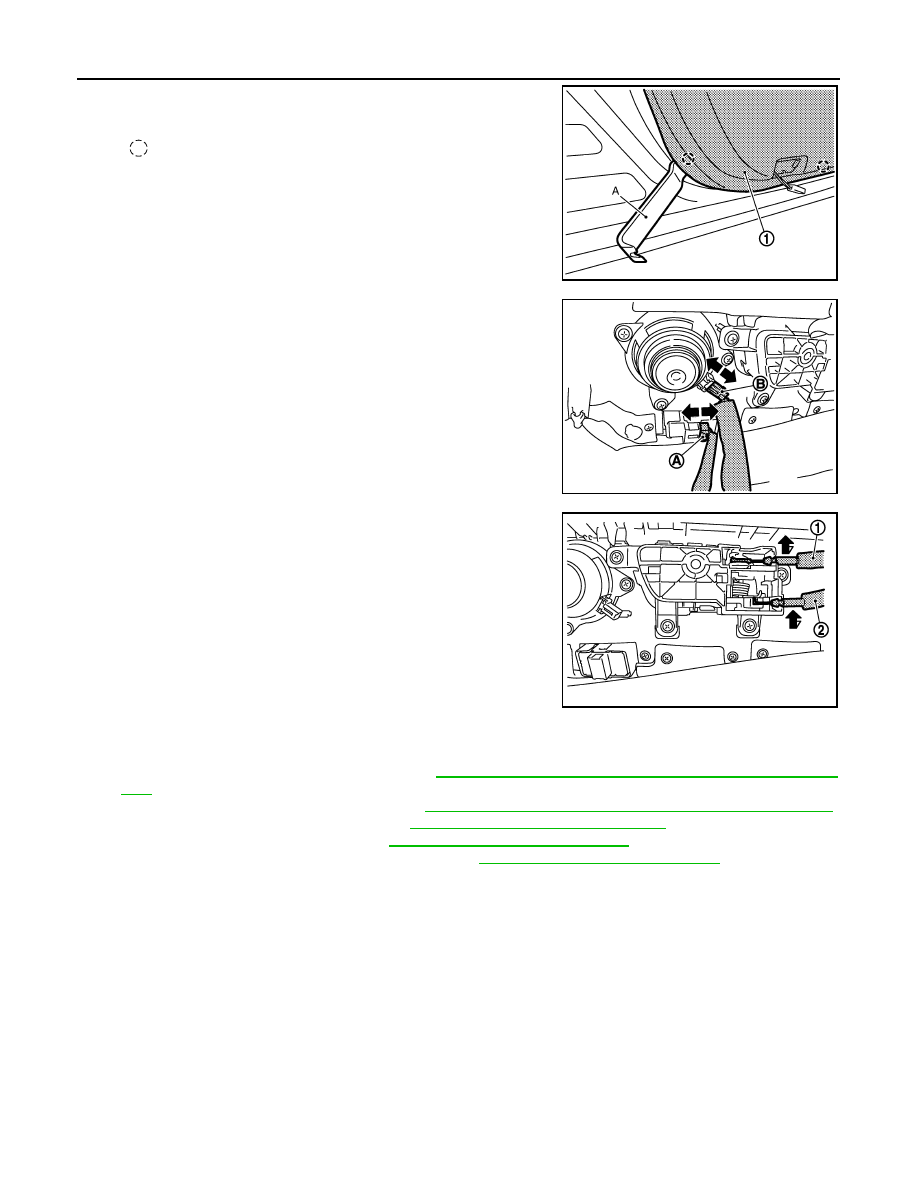
Insert a remover tool (A) into clips on door finisher (1), and dis-
engage clips.

CAUTION:

Insert a remover tool (A) into the part shown by the arrow
(between the clips and the body side panel).

9.

Pull up door finisher and pull out toward vehicle inside.
• Disconnect seat memory switch connector (A). (with ADP)
• Disconnect tweeter connector (B). (with BASE AUDIO)
• Disconnect front door squawker connector (B). (with BOSE

AUDIO)

10. Disconnect lock knob cable (1) and inside handle cable (2) from

door inside handle assembly.

11. Remove door finisher.

12. Remove the following parts after removing door finisher.

• Front door inside handle assembly. Refer to 

DLK-207, "FRONT DOOR LOCK : Removal and Installa-

tion"

.

• Rear door inside handle assembly. Refer to 

DLK-210, "REAR DOOR LOCK : Removal and Installation"

.

• Seat memory switch. (with ADP) Refer to 

ADP-219, "Removal and Installation"

.

• Tweeter (with BASE AUDIO). Refer to 

AV-115, "Removal and Installation"

.

• Front door squawker (with BOSE AUDIO). Refer to 

AV-294, "Removal and Installation"

.

INSTALLATION

Install in the reverse order of removal.

CAUTION:

When installing door finisher, check that clips are securely fitted in panel holes on body, and then
press them in.

: Clip

JMJIA0078GB

JMJIA0080GB

JMJIA0079GB

BODY SIDE TRIM

INT-13

< ON-VEHICLE REPAIR >

C

D

E

F

G

H

I

K

L

M

A

B

INT

N

O

P

BODY SIDE TRIM

Exploded View

INFOID:0000000000960436

Removal and Installation

INFOID:0000000000960437

CAUTION:

• Wrap the tip of flat-bladed screwdriver with a cloth when removing metal clips from garnishes.
• Do not damage the body.

REMOVAL

FRONT PILLAR GARNISH

1.

Release front pillar portion of front body side welt.

1.

Front pillar garnish

2.

Front body side welt

3.

Front kicking plate inner

4.

Front kicking plate outer

5.

Dash side finisher

6.

Center pillar upper garnish

7.

Center pillar lower garnish

8.

Rear body side welt

9.

Rear kicking plate inner

10. Rear kicking plate outer

11. Rear wheel house garnish

12. Rear pillar finisher

Clip

Pawl

Metal clip

JMJIA0067GB

INT-14

< ON-VEHICLE REPAIR >

BODY SIDE TRIM

2.

Remove pillar garnish mounting metal clips with a remover tool
(A), and then remove pillar garnish (1).

DASH SIDE FINISHER

1.

Remove instrument passenger lower cover. (Passenger side only) Refer to 

IP-12, "Removal and Installa-

tion"

.

2.

Remove kicking plate inner.

3.

Remove clip (A).

4.

Remove dash side finisher mounting clips with a remover tool
(B), and then remove dash side finisher (1).

FRONT KICKING PLATE OUTER

Remove front kicking plate outer mounting clips with a remover tool
(A), and then remove kicking plate outer (1).

FRONT KICKING PLATE INNER

1.

Pull up front kicking plate inner, and disconnect pawls.   

2.

Remove front kicking plate inner (1).

REAR KICKING PLATE OUTER

: Metal clip

JMJIA0081GB

JMJIA0106GB

: Clip

JMJIA0082GB

: Pawl

JMJIA0083GB

BODY SIDE TRIM

INT-15

< ON-VEHICLE REPAIR >

C

D

E

F

G

H

I

K

L

M

A

B

INT

N

O

P

Remove rear kicking plate outer mounting clips with a remover tool
(A), and then remove kicking plate outer (1).

REAR KICKING PLATE INNER

1.

Pull up rear kicking plate inner, and disconnect pawls.   

2.

Remove rear kicking plate inner (1).

FRONT BODY SIDE WELT

1.

Remove front kicking plate inner.

2.

Remove front body side welt.

REAR BODY SIDE WELT

1.

Remove rear kicking plate inner.

2.

Remove rear body side welt.

CENTER PILLAR LOWER GARNISH

1.

Remove front kicking plate inner.

2.

Remove rear kicking plate inner.

3.

Remove front body side welt. 

4.

Remove rear body side welt. 

5.

Remove center pillar lower garnish mounting metal clips with a
screwdriver (A), and then remove center pillar lower garnish (1).

CENTER PILLAR UPPER GARNISH

1.

Remove center pillar lower garnish.

2.

Remove front seat belt floor anchor bolt and front seat belt shoulder anchor bolt. Refer to 

SB-5, "SEAT

BELT RETRACTOR : Removal and Installation"

: Clip

JMJIA0084GB

: Pawl

JMJIA0085GB

: Metal clip

JMJIA0086GB


Content   ..  820  821  822  823   ..