Infiniti G20 (P11). Manual - part 435


  Index      Infiniti     Infiniti G20 (P11) - service repair manual 1999-2002 year


Search            


Content   ..  433  434  435  436   ..


Infiniti G20 (P11). Manual - part 435


9

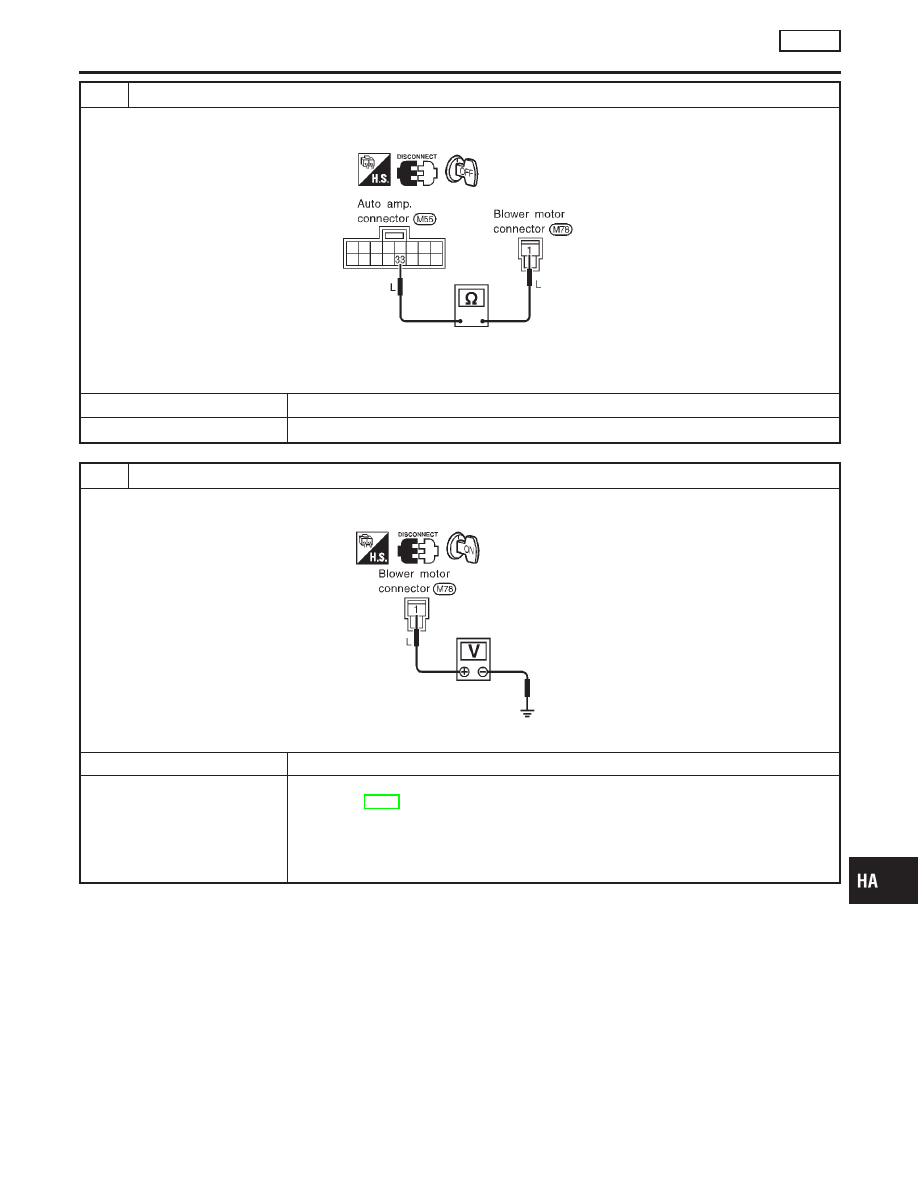
CHECK CIRCUIT CONTINUITY BETWEEN AUTO AMP. AND BLOWER MOTOR

Check circuit continuity between auto amp. harness terminal No. 33 and blower motor harness terminal No. 1.

Continuity should exist.

RHA058H

If OK, check harness for short.

OK or NG

OK

©

Replace auto amp.

NG

©

Repair harness or connector.

10

CHECK POWER SUPPLY FOR BLOWER MOTOR

Disconnect blower motor connector connector.
Do approx. 12 volts exist between blower motor harness terminal No. 1 and body ground?

RHA091GB

Yes or No

Yes

©

GO TO 11.

No

©

1. Check power supply circuit and 15A fuses (Nos. 1 and 2, located in the fuse block).

Refer to EL-14, “Wiring Diagram — POWER —”.

2. If OK, check for open circuit in wiring harness.

Repair or replace as necessary.

3. If NG, Replace fuse and check wiring harness for short circuit.

Repair or replace as necessary.

GI

MA

EM

LC

EC

FE

CL

MT

AT

AX

SU

BR

ST

RS

BT

SC

EL

IDX

TROUBLE DIAGNOSES

AUTO

Blower Motor (Cont’d)

HA-71

11

CHECK CIRCUIT CONTINUITY BETWEEN BLOWER MOTOR AND FAN CONTROL AMP.

Check circuit continuity between blower motor harness terminal No. 2 and fan control amp. harness terminal No. 3.

Continuity should exist.

RHA472GA

If OK, check harness for short.

OK or NG

OK

©

GO TO 12.

NG

©

Repair harness or connector.

12

CHECK BLOWER MOTOR

Refer to “COMPONENT INSPECTION” (HA-72).

NG

©

Replace blower motor.

RHA059H

COMPONENT INSPECTION

NCHA0065

Blower Motor

NCHA0065S01

Confirm smooth rotation of the blower motor.

I

Ensure that there are no foreign particles inside the intake unit.

RHA828HB

Fan Control Amp.

NCHA0065S02

Check continuity between terminals.

Terminal Nos.

Continuity

1 - 2

Yes

TROUBLE DIAGNOSES

AUTO

Blower Motor (Cont’d)

HA-72

Magnet Clutch

TROUBLE DIAGNOSIS PROCEDURE FOR MAGNET CLUTCH

=NCHA0095

SYMPTOM:

I

Magnet clutch does not engage.

INSPECTION FLOW

SHA177F

*1: STEP-BY-STEP PROCEDURE

(HA-32)

*2: HA-92
*3: HA-95
*4: HA-99
*5: HA-104

*6: STEP-BY-STEP PROCEDURE

(HA-32), see No. 12.

*7: HA-74
*9: HA-83
*10: HA-42

*11: STEP-BY-STEP PROCEDURE

(HA-32), see No. 5, 8.

*12: HA-42
*13: HA-41
*14: HA-102

GI

MA

EM

LC

EC

FE

CL

MT

AT

AX

SU

BR

ST

RS

BT

SC

EL

IDX

TROUBLE DIAGNOSES

AUTO

Magnet Clutch

HA-73

RHA094GA

SYSTEM DESCRIPTION

=NCHA0066

Auto amplifier controls compressor operation by ambient tempera-
ture and signal from ECM.

Low Temperature Protection Control

NCHA0066S01

Auto amplifier will turn the compressor “ON” or “OFF” as deter-
mined by a signal detected by ambient sensor.
When ambient temperatures are greater than 1°C (34°F), the com-
pressor turns “ON”. The compressor turns “OFF” when ambient
temperatures are less than −2°C (28°F).

DIAGNOSTIC PROCEDURE

NCHA0067

SYMPTOM: Magnet clutch does not engage when AUTO
switch is ON.

RHA525H

1

CHECK POWER SUPPLY FOR COMPRESSOR

Disconnect compressor harness connector. Do approx. 12 volts exist between compressor harness terminal No. 1 and
body ground?

RHA096GB

Yes or No

Yes

©

Check magnet clutch coil.
1. If NG, replace magnet clutch. Refer to HA-111.
2. Go to self-diagnosis step-by-step procedure (HA-32) and perform self-diagnosis

STEP-4.
Confirm that magnet clutch operation is normal.

No

©

Disconnect A/C relay. And GO TO 2.

TROUBLE DIAGNOSES

AUTO

Magnet Clutch (Cont’d)

HA-74


Content   ..  433  434  435  436   ..