Infiniti FX35 / FX45. Manual - part 885


  Index      Infiniti     Infiniti FX35 / FX45 (S50) - service repair manual 2008 year


Search            


Content   ..  883  884  885  886   ..


Infiniti FX35 / FX45. Manual - part 885


RF-22

< SERVICE INFORMATION >

SUNROOF

2.

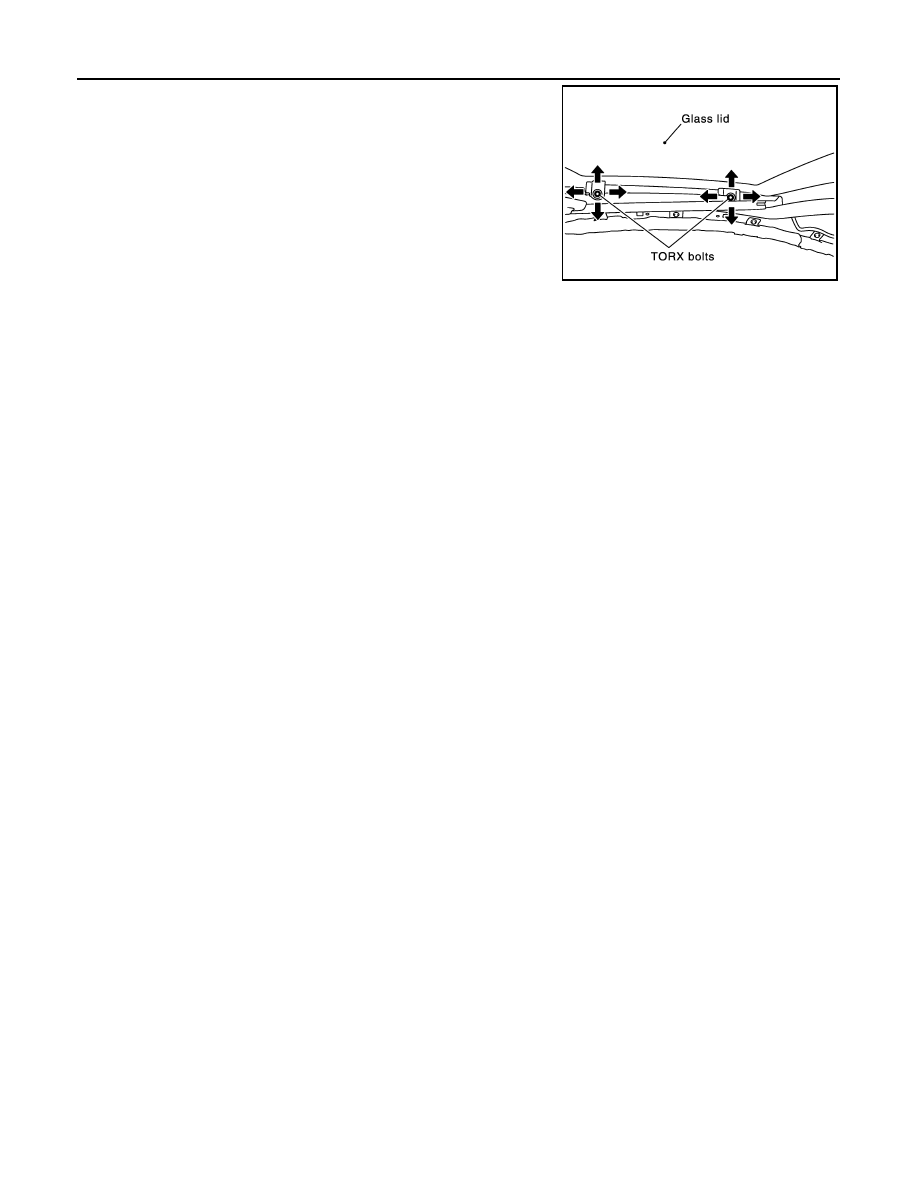
After loosening glass lid TORX bolts (left and right), tilt down
glass lid.

3.

Adjust glass lid from outside of vehicle so it resembles “A–A” “B–
B” “C–C” as shown in the figure to the right.

4.

To prevent glass lid from moving after adjustment, first tighten
the TORX bolts of front left, and then tighten the TORX bolts of
rear right.

5.

Tighten remaining TORX bolts, being careful to prevent glass lid
from moving.

6.

Tilt glass lid up and down several times to make sure it moves
smoothly.

Removal and Installation

INFOID:0000000001328050

• After any adjustment, check sunroof operation and glass lid alignment.
• Handle finisher plate and glass lid with care so as not to cause damage.
• It is desirable for easy installation to mark each point before removal.

CAUTION:

• Always work with a helper.
• Fully close the glass lid assembly, before removal, then do not operate motor assembly after

removal.

PIIA3501E

SUNROOF

RF-23

< SERVICE INFORMATION >

C

D

E

F

G

H

J

K

L

M

A

B

RF

N

O

P

PIIA6190E

  1. Glass lid

  2. TORX bolt

  3. Washer

  4. Rear sunroof bracket

  5. Front sunroof bracket

  6. Wind deflector

  7. Sunroof unit assembly

  8. Noise cover

  9. Sunroof motor assembly

10. Screw

11.

Sunshade

12. Nut

13. Bolt

14. Drain plate

15. Sunshade stopper

16. Drain hose

RF-24

< SERVICE INFORMATION >

SUNROOF

SUNROOF UNIT ASSEMBLY

Removal

CAUTION:

• Always work with a helper.
• When taking sunroof unit out, use clothes to protect the seats and trim from damage.
• After installing the sunroof unit and glass lid, be sure to perform the leakage test and make sure

there is no malfunction.

1.

Tilt up glass lid.

2.

Remove the headlining. Refer to 

EI-43, "Component Parts Location"

.

3.

Disconnect drain hoses.

4.

Remove glass lid. Refer to 

RF-22, "Removal and Installation"

.

5.

Remove motor mounting screws. Remove sunroof motor
assembly and disconnect harness connector.

CAUTION:

• Before removing sunroof motor assembly, make sure that

sunroof is fully closed.

• After removing sunroof motor assembly, do not attempt to

rotate sunroof motor as a single unit.

6.

Remove nuts on the front end and side rail.

7.

Remove curtain air bag bracket bolts, then remove curtain air
bag bracket from the rail side. Refer to 

SRS-40, "Removal and

Installation"

.

8.

Remove front/rear sunroof bracket bolts, then remove sunroof
unit assembly from roof panel.

9.

Remove sunroof unit assembly through the passenger room while being careful not to damage the seats
and trim.

Installation

PIIA6189E

PIIA6191E

PIIA6193E

SUNROOF

RF-25

< SERVICE INFORMATION >

C

D

E

F

G

H

J

K

L

M

A

B

RF

N

O

P

1.

Temporarily tighten the mounting bolts on the front/rear sunroof
brackets (RH/LH).

2.

Bring sunroof unit assembly into passenger room and place the
rear end of the rail onto the sunroof brackets.

3.

Tighten the mounting nuts on the front end.

4.

Tighten the installation points diagonally excluding the installation point of the sunroof bracket around the
roof opening.

5.

Tighten the bolts on the sunroof bracket to the vehicle side and
then tighten the bolt to the rail side.

6.

Tighten the bolts on the curtain air bag bracket to the rail side.
Refer to 

SRS-40, "Removal and Installation"

.

GLASS LID

Removal

1.

Tilt up glass lid.

2.

Remove TORX bolts from remove glass lid.

Installation

1.

Tighten bolts diagonally on the glass lid.

2.

After installation, carry out fitting adjustment.

SUNSHADE

PIIA6193E

PIIA6191E

PIIA6193E

PIIA6192E


Content   ..  883  884  885  886   ..