Infiniti FX35 / FX45. Manual - part 630


  Index      Infiniti     Infiniti FX35 / FX45 (S50) - service repair manual 2008 year


Search            


Content   ..  628  629  630  631   ..


Infiniti FX35 / FX45. Manual - part 630


OIL PAN AND OIL STRAINER

EM-37

< SERVICE INFORMATION >

[VQ35DE]

C

D

E

F

G

H

I

J

K

L

M

A

EM

N

P

O

23. Remove crankshaft position sensor (POS).

CAUTION:

• Handle carefully to avoid dropping and shocks.
• Do not disassemble.
• Do not allow metal powder to adhere to magnetic part at sensor tip.
• Do not place sensors in a location where they are exposed to magnetism.

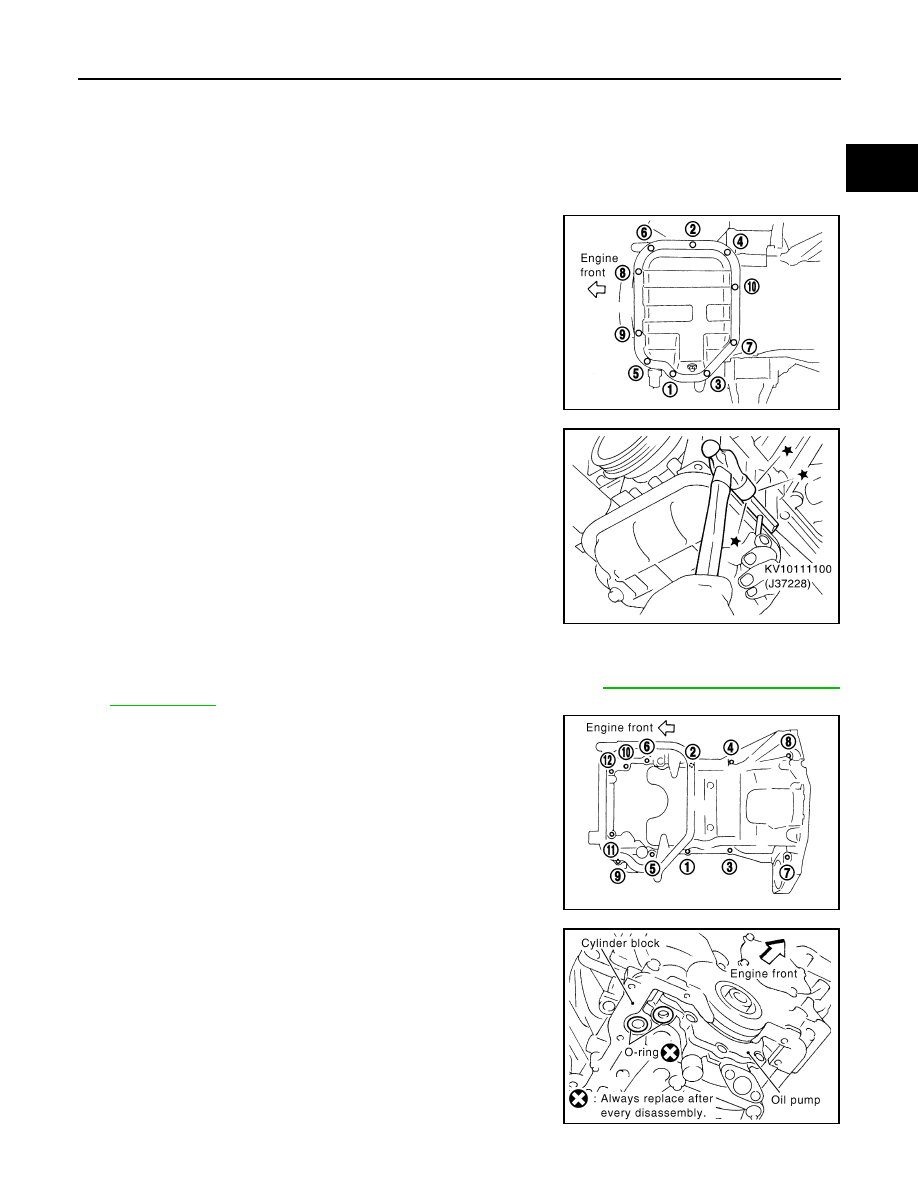
24. Remove oil pan (lower) as follows:

a.

Loosen mounting bolts in reverse order as shown in the figure to
remove.

b.

Insert the seal cutter (SST) between oil pan (upper) and oil pan
(lower).

c.

Slide the seal cutter by tapping on the side of tool with a ham-
mer. Remove oil pan (lower).

CAUTION:

• Be careful not to damage the mating surface.
• Do not insert flat-bladed screwdriver, this will damage the

mating surface.

25. Remove oil strainer.

26. Remove transmission joint bolts which pierce oil pan (upper). Refer to 

AT-241, "Removal and Installation

(2WD Models)"

.

27. Loosen mounting bolts in the reverse order as shown in the fig-

ure with power tool to remove.
• Insert the seal cutter [SST: KV10111100 (J37228)] between oil

pan (upper) and cylinder block. Slide seal cutter by tapping on
the side of tool with a hammer. Remove oil pan (upper).

CAUTION:

• Be careful not to damage the mating surfaces.
• Do not insert a screwdriver, this will damage the mating

surfaces.

28. Remove O-rings from bottom of cylinder block and oil pump.

PBIC0782E

SEM960F

PBIC0783E

PBIC1144E

EM-38

< SERVICE INFORMATION >

[VQ35DE]

OIL PAN AND OIL STRAINER

29. Remove oil pan gaskets.

30. Remove axle pipe, as necessary.

• Remove axle pipe from oil pan (upper) using a suitable drift

[outer diameter: 37 mm (1.46 in)].

INSPECTION AFTER REMOVAL

Clean oil strainer if any object attached.

INSTALLATION

1.

Install axle pipe to oil pan, if removed.
• Lubricate O-ring groove of axle pipe, O-ring, and O-ring joint of

oil pan with new engine oil.

Unit: mm (in)

• Install axle pipe to oil pan (upper) from axle pipe flange side

(left side) using a suitable drift [outer diameter: 43 to 57 mm
(1.69 to 2.24 in)].

CAUTION:

Insert it with care to prevent O-ring from sliding.

2.

Install oil pan (upper) as follows:

PBIC1145E

SBIA0469E

Items

O-ring inner diameter

Final drive side (right side)

32 (1.26)

Axle pipe flange side (left side)

34 (1.34)

SBIA0470E

SBIA0471E

OIL PAN AND OIL STRAINER

EM-39

< SERVICE INFORMATION >

[VQ35DE]

C

D

E

F

G

H

I

J

K

L

M

A

EM

N

P

O

a.

Use a scraper to remove old liquid gasket from mating surfaces.

CAUTION:

Do not scratch or damage the mating surfaces when clean-
ing off old liquid gasket.
• Also remove old liquid gasket from mating surface of cylinder

block.

• Remove old liquid gasket from the bolt holes and threads.

b.

Install new oil pan gaskets.
• Apply liquid gasket to oil pan gaskets as shown in the figure.

Use Genuine RTV Silicone Sealant or equivalent. Refer to

GI-44, "Recommended Chemical Product and Sealant"

.

• To install, align protrusion of oil pan gasket with notches of

front timing chain case and rear oil seal retainer.

• Install oil pan gasket with smaller arc to front timing chain case

side.

c.

Install new O-rings on the bottom of cylinder block and oil pump.

MEM108A

PBIC2630E

PBIC1145E

PBIC1144E

EM-40

< SERVICE INFORMATION >

[VQ35DE]

OIL PAN AND OIL STRAINER

d.

Apply a continuous bead of liquid gasket with the tube presser
(commercial service tool) to the cylinder block mating surface of
oil pan (upper) to a limited portion as shown in the figure.
Use Genuine RTV Silicone Sealant or equivalent. Refer to

GI-44, "Recommended Chemical Product and Sealant"

.

CAUTION:

• For bolt holes with   marks (5 locations), apply liquid

gasket outside the holes.

• Apply a bead of 4.5 to 5.5 mm (0.177 to 0.217 in) in diame-

ter to area “A”.

• Attaching should be done within 5 minutes after coating.

e.

Install oil pan (upper).

CAUTION:

Install avoiding misalignment of both oil pan gasket and O-rings.
• Tighten mounting bolts in numerical order as shown in the fig-

ure.

• There are two types of mounting bolts. Refer to the following

for locating bolts.

f.

Tighten transmission joint bolts. Refer to 

AT-241, "Removal and Installation (2WD Models)"

.

3.

Install oil strainer to oil pump.

4.

Install oil pan (lower) as follows:

a.

Use scraper to remove old liquid gasket from mating surfaces.
• Also remove old liquid gasket from mating surface of oil pan

(upper).

• Remove old liquid gasket from the bolt holes and thread.

CAUTION:

Do not scratch or damage the mating surfaces when clean-
ing off old liquid gasket.

M8 

×

 100 mm (3.94 in)

: 5, 7, 8, 11

M8 

×

 25 mm (0.98 in)

: Except the above

PBIC2300E

PBIC0783E

SEM958F


Content   ..  628  629  630  631   ..