Infiniti FX35, FX50 (S51). Manual - part 1121


  Index      Infiniti     Infiniti FX35, FX50 (S51) - service repair manual 2010 year


Search            


Content   ..  1119  1120  1121  1122   ..


Infiniti FX35, FX50 (S51). Manual - part 1121


REAR DOOR GLASS

GW-25

< REMOVAL AND INSTALLATION >

C

D

E

F

G

H

I

J

L

M

A

B

GW

N

O

P

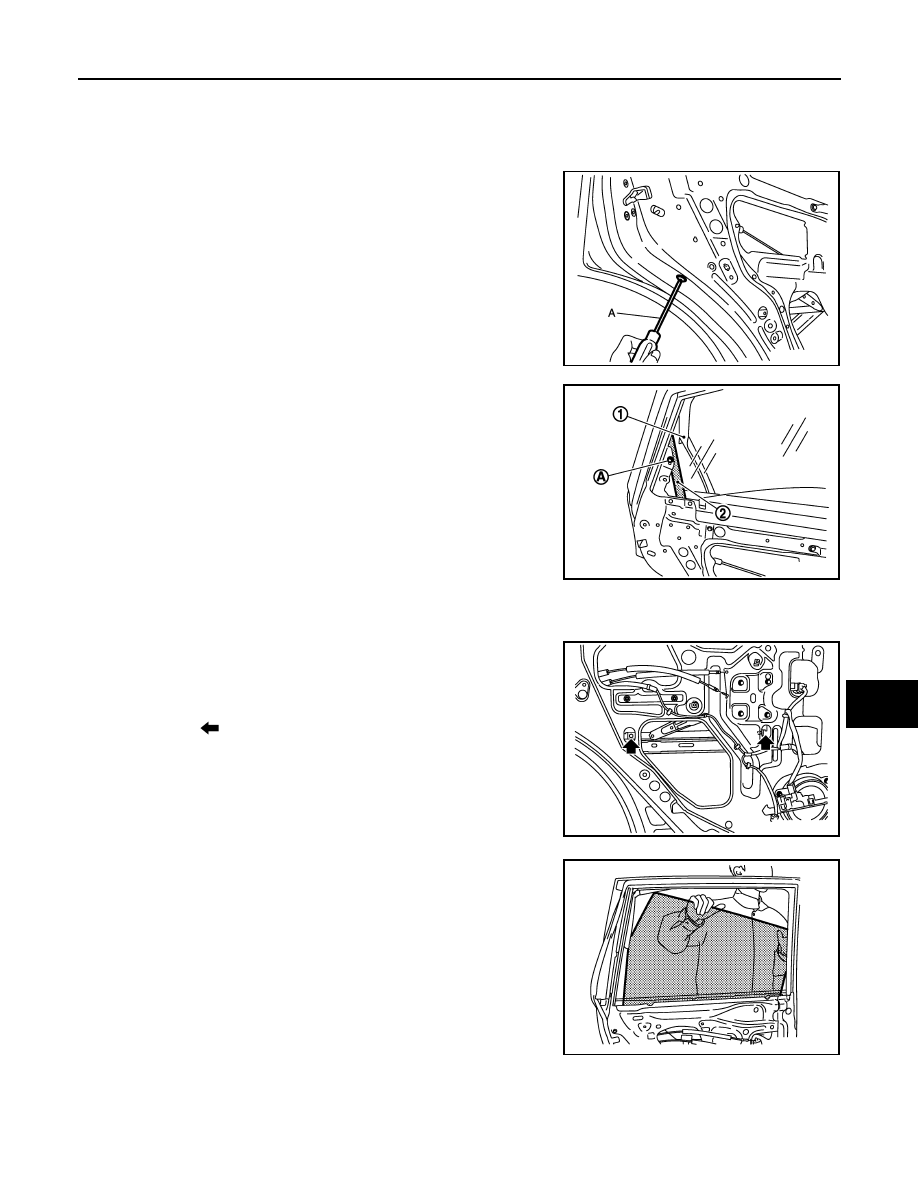
6.

Remove the sealing screen with a cutter tool.
NOTE:
Cut the butyl-tape so that some parts of the butyl-tape do not remain on the sealing screen, if the sealing
screen is reused.

7.

Remove the TORX bolt fixing the corner piece assembly lower
side to the door panel as shown in the figure with tool (A).

8.

Remove partially the door side glass run (1), then remove the
bolt (A) fixing the corner piece assembly (2) upper side to the
door panel as show in the figure with a tool.

9.

Remove the rear door lower sash from the glass upper side.

10. Reconnect the rear door power window switch.

11. Operate the power window switch to raise or lower the door win-

dow until the glass mounting bolts can be seen.

12. Remove the rear door glass mounting bolts.

13. Hold securely the rear door glass and pull it out of the sash to

remove the door glass.

INSTALLATION

Install in the reverse order of removal.

JMKIA2662ZZ

JMKIA2663ZZ

: Bolt

JMKIA1789ZZ

JMKIA0640ZZ

GW-26

< REMOVAL AND INSTALLATION >

REAR DOOR GLASS

Inspection and Adjustment

INFOID:0000000005235095

FITTING INSPECTION

• Check that the glass is fit securely into the sash groove.
• Lower the glass slightly [approximately 10 to 20 mm (0.394 to 0.787 in)], and check that the clearance to the

sash is parallel. Loosen the regulator mounting bolts, guide rail mounting bolts, and glass and carrier plate
mounting bolts to correct the glass position if the clearance between the glass and sash is not parallel.

REAR REGULATOR

GW-27

< REMOVAL AND INSTALLATION >

C

D

E

F

G

H

I

J

L

M

A

B

GW

N

O

P

REAR REGULATOR

Exploded View

INFOID:0000000005235096

Removal and Installation

INFOID:0000000005235097

REMOVAL

1.

Remove the rear door glass. Refer to 

GW-24, "Removal and Installation"

.

2.

Remove the regulator mounting bolts, disconnect the power win-
dow motor harness connector (A) and then remove the regulator
from the door panel.

INSTALLATION

Install in the reverse order of removal.

1.

Rear door sash inner cover

2.

Rear door inside seal

3.

Rear door glass run

4.

Rear door lower sash

5.

Regulator assembly

6.

Power window motor

7.

Rear door glass

8.

Sealing screen

9.

Rear door panel

: Vehicle front

Refer to 

GI-4, "Components"

 for the symbols in the figure.

JMKIA2660GB

: Bolt

: Nut

JMKIA2664ZZ

GW-28

< REMOVAL AND INSTALLATION >

REAR REGULATOR

Disassembly and Assembly

INFOID:0000000005235098

DISASSEMBLY

Remove power window motor from regulator assembly.

ASSEMBLY

Assemble in the reverse order of disassembly.

Inspection and Adjustment

INFOID:0000000005235099

Inspection after Removal

Check the regulator assembly for the following items. Replace or grease it if a malfunction is detected.
• Wire wear
• Regulator deformation
The arrows in the figure show the application points of the multi-purpose grease.

FITTING INSPECTION

• Check that the glass is fit securely into the sash groove.
• Lower the glass slightly [approximately 10 to 20 mm (0.394 to 0.787 in)], and check that the clearance to the

sash is parallel. Loosen the regulator mounting bolts, guide rail mounting bolts, and glass and carrier plate
mounting bolts to correct the glass position if the clearance between the glass and sash is not parallel.

 : Grease application point

JMKIA1791ZZ


Content   ..  1119  1120  1121  1122   ..