Infiniti EX35. Manual - part 1246


  Index      Infiniti     Infiniti EX35 - service repair manual 2008 year


Search            


Content   ..  1244  1245  1246  1247   ..


Infiniti EX35. Manual - part 1246


FRONT SEAT BELT

SB-7

< ON-VEHICLE REPAIR >

C

D

E

F

G

I

J

K

L

M

A

B

SB

N

O

P

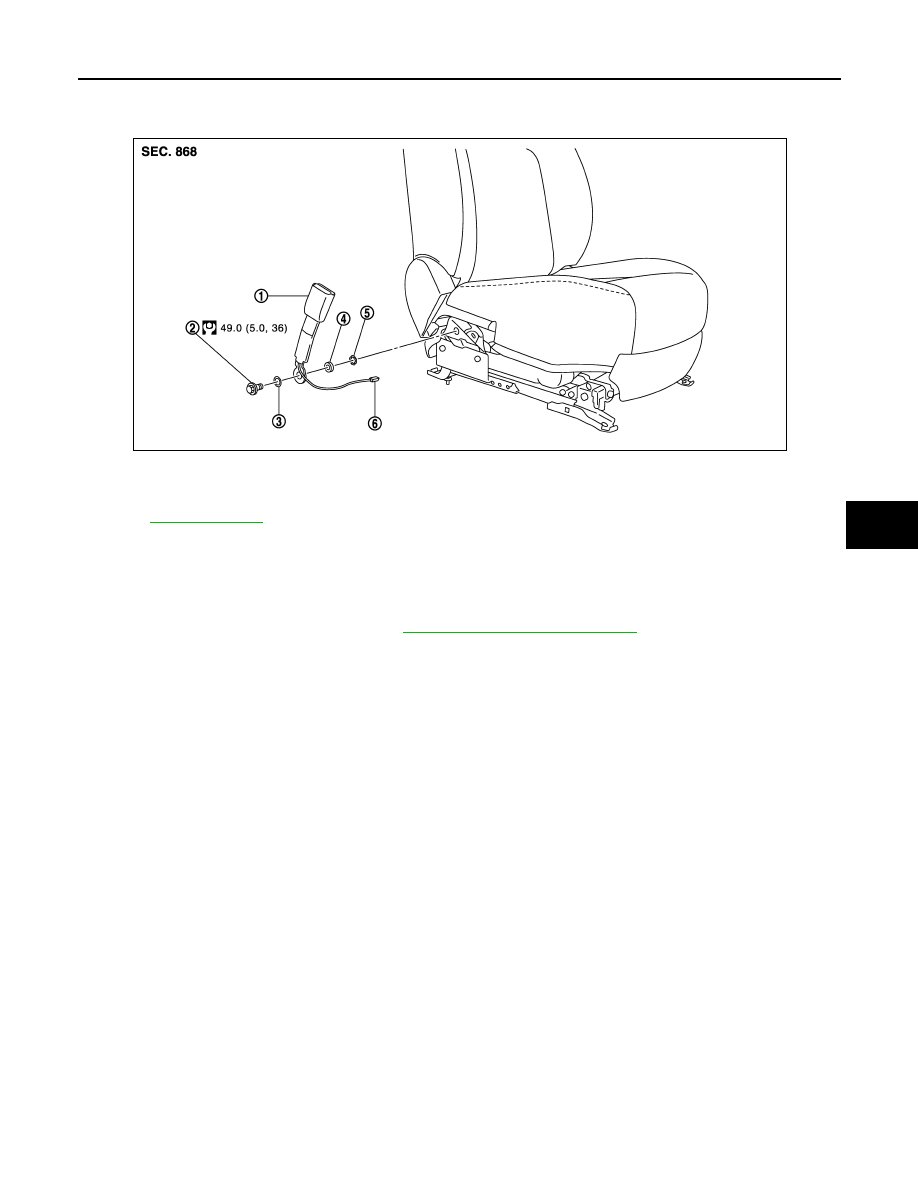
SEAT BELT BUCKLE : Exploded View

INFOID:0000000003514969

SEAT BELT BUCKLE : Removal and Installation

INFOID:0000000003514970

REMOVAL

Remove the seat belt buckle.
• Remove the front seat from vehicle. Refer to 

SE-90, "Removal and Installation"

. (for ease of tool operation in

narrow space.)

• Remove the seat belt buckle harness connector and harness clamp.
• Remove the fixing anchor bolt of the seat belt buckle.

INSTALLATION

Installation in the reverse order of removal.

1.

Seat belt buckle

2.

Anchor bolt

3.

Wave washer

4.

Plain washer

5.

Retaining washer

6.

Seat belt buckle harness connector

Refer to 

GI-4, "Components"

 for symbols in the figure.

JMHIA0559GB

SB-8

< ON-VEHICLE REPAIR >

REAR SEAT BELT

REAR SEAT BELT

SEAT BELT RETRACTOR

SEAT BELT RETRACTOR : Inspection

INFOID:0000000003514971

AFTER A COLLISION

WARNING:

Inspect all seat belt assemblies including retractors and attached hardware after any collision.
NISSAN/INFINITI recommends that all seat belt assemblies in use during a collision be replaced
unless the collision was minor and the belts show no damage and continue to operate properly. Fail-
ure to do so could result in serious personal injury in an accident. Seat belt assemblies not in use dur-
ing a collision should also be replaced if either damage or improper operation was noted. Seat belt
pre-tensioners should be replaced even if the seat belts were not in use during a frontal collision in
which the air bags were deployed.
Replace any seat belt assembly (including anchor bolts) if:
• The seat belt was in use at the time of a collision (except for minor collisions and the belts, retractors and

buckles show no damage and continue to operate properly).

• The seat belt was damaged in an accident (i.e. torn webbing, bent retractor or guide, etc.).
• The seat belt attaching point was damaged in an accident. Inspect the seat belt attaching area for damage

or distortion and repair if necessary before installing a new seat belt assembly.

• Anchor bolts are deformed or worn out.
• The seat belt pre-tensioners should be replaced even if the seat belts were not in use during the collision in

which the air bags were deployed.

PRELIMINARY CHECKS

1.

Check that the seat belt retractor, seat belt anchor and buckle bolts are tightened firmly.

2.

Check retractor operation:

a.

Fully extend the seat belt webbing and check for twists, tears or other damage.

b.

Allow the seat belt to retract. Check that webbing returns smoothly and completely into the retractor. If the
seat belt does not return smoothly, wipe the inside of the loops with a clean paper cloth. Dirt build-up in the
loops of that upper anchors can cause the seat belts to retract slowly.

c.

Fasten the seat belt. Check that seat belt returns smoothly and completely to the retractor. If the webbing
does not return smoothly, the cause may be an accumulation of dust or dirt. Use the “SEAT BELT TAPE
SET” and perform the following steps. 

3.

Repeat steps above if necessary to check the other seat belts.

SEAT BELT RETRACTOR ON-VEHICLE CHECK

Emergency Locking Retractors (ELR) and Automatic Locking Retractors (ALR)

NOTE:
All seat belt retractors are Emergency Locking Retractors (ELR) type. In an emergency (sudden stop) the
retractor will lock and prevent the webbing from extending any further. All 3-point type seat belt retractors
except the driver seat belt also have an Automatic Locking Retractors (ALR) mode. The ALR mode (also
called child restraint mode) is used when installing child seats. The ALR mode is activated when the seat belt
is fully extended. When the webbing is then retracted partially, the ALR mode automatically locks the seat belt
in a specific position so the webbing cannot be extended any further. To cancel the ALR mode, allow the seat
belt to fully wind back into the retractor. 
Check the seat belt retractors with the following test(s) to determine if a retractor assembly is operating prop-
erly.

ELR Function Stationary Check

Grasp the shoulder webbing and pull forward quickly. The retractor should lock and prevent the belt from
extending further.

ALR Function Stationary Check

1.

Pull out the entire length of seat belt from retractor until a click is heard.

2.

Retract the webbing partially. A clicking noise should be heard as the webbing retracts indicating that the
retractor is in the Automatic Locking Retractors (ALR) mode.

REAR SEAT BELT

SB-9

< ON-VEHICLE REPAIR >

C

D

E

F

G

I

J

K

L

M

A

B

SB

N

O

P

3.

Grasp the seat belt and try to pull out the retractor. The webbing must lock and not extend any further. If it
does not operate normally, replace the retractor assembly.

4.

Allow the entire length of the webbing to retract to cancel the automatic locking mode.

ELR Function Moving Check

WARNING:

Perform the following test in a safe, open area clear of other vehicles and obstructions (for example, a
large, empty parking lot). Road surface must be paved and dry. Never perform the following test on
wet or gravel roads or on public streets and highways. This could result in an accident and serious
personal injury. The driver and passenger must be prepared to brace themselves in the event that the
retractor does not lock.
1.

Fasten driver seat belt. Buckle a passenger into the seat for the belt that is to be tested.

2.

Proceed to the designated safe area.

3.

Drive the vehicle at approximately 16 km/h (10 MPH). Notify any passengers of a pending sudden stop
and the driver and passenger must be prepared to brace themselves in the event that the retractor does
not lock. Apply brakes firmly and make a very hard stop.

During stopping, seat belts should lock and not be extended. If the seat belt retractor assembly does not lock,
perform the retractor off-vehicle check.

SEAT BELT RETRACTOR OFF-VEHICLE CHECK

1.

Remove the rear seat belt retractor. Refer to 

SB-10, "SEAT BELT RETRACTOR : Removal and Installa-

tion"

.

2.

Slowly pull out webbing while tilting the retractor assembly forward from the mounted position without
twisting the retractor assembly as shown in the illustration.

a.

Outer seat belt retractor
A: The webbing can be pulled out when the retractor is tilted 42
degrees or less.
B: The webbing cannot be pulled out when the retractor is tilted
57 degrees or more.
• A and B show tilting angles.

: Vehicle front.

b.

Center seat belt retractor
A: The webbing can be pulled out when the retractor is tilted 27
degrees or less.
B: The webbing cannot be pulled out when the retractor is tilted
52 degrees or more.
• A and B show tilting angles.

: Vehicle front.

3.

Replace the seat belt assembly if it does not operate normally.

PHIA0997J

JMHIA0561ZZ

SB-10

< ON-VEHICLE REPAIR >

REAR SEAT BELT

SEAT BELT RETRACTOR : Exploded View

INFOID:0000000003514972

SEAT BELT RETRACTOR : Removal and Installation

INFOID:0000000003514973

REMOVAL

1.

Remove the outer anchor.
• Remove the rear seat cushion. Refer to 

SE-99, "Removal and Installation"

.

• Remove the outer anchor fixing anchor bolt and remove the outer anchor.

2.

Remove the inner anchor

1.

Retaining washer

2.

Spacer

3.

Shoulder anchor

4.

Anchor bolt

5.

Rear seat belt escutcheon

6.

Outer seat belt retractor

7.

Outer anchor

8.

Outer seat belt buckle

9.

Inner anchor bracket

10. Inner anchor

11.

Center seat belt buckle

12. Seat belt finisher

13. Seat belt guide (upper)

14. Seat belt guide (lower)

15. Center seat belt retractor cover

16. Anchor nut

17. Center seat belt retractor

18. Seat back frame

Refer to 

GI-4, "Components"

 for symbols in the figure.

JMHIA0560GB


Content   ..  1244  1245  1246  1247   ..