Hummer H1 (2002+). Manual - part 220


  Index      Hummer     Hummer H1 - service repair manual 2002 year


Search            


Content   ..  218  219  220  221   ..


Hummer H1 (2002+). Manual - part 220


_____________________________________________________

 Electrical System  12-105

®

05745159

KEYLESS ENTRY & THEFT DETERRENT SYSTEM 
OPERATING INSTRUCTIONS

Keyless Entry & Theft Deterrent System

The optional keyless entry system allows convenient operation
of the vehicle door locks from a distance. Equipped vehicles
are supplied with two, three button remote transmitters used to
operate the system. Two additional remote transmitters can be
added.

NOTE: Vehicles not equipped with keyless entry will have a
jumper harness installed in place of the receiver module.

LOCKING THE DOORS & ARMING THE THEFT 
DETERRENT SYSTEM

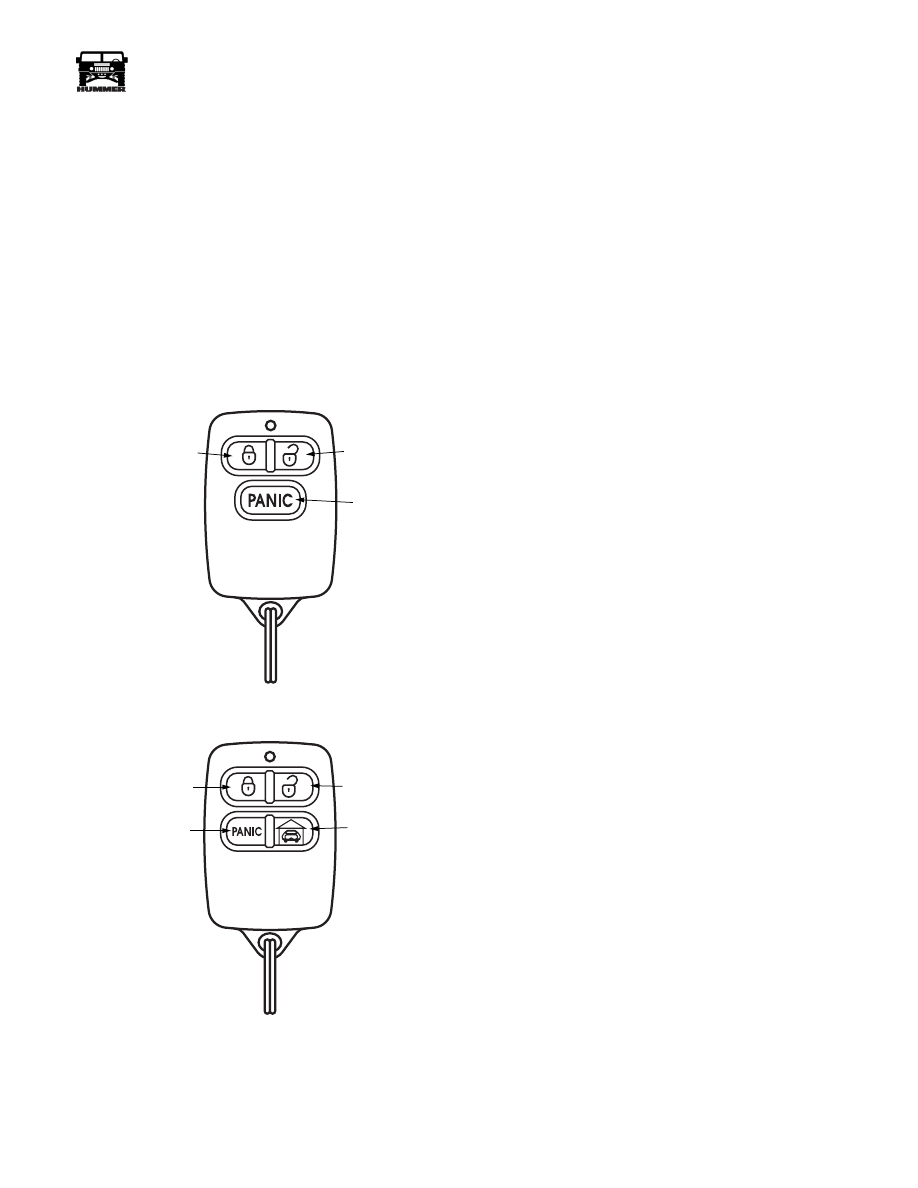
Figure 12-107:   3-Button Transmitter

Figure 12-108:   4-Button Transmitter

Locking the Doors

To lock the vehicle doors, press the lock button on the remote
transmitter once. A red L.E.D. on the remote transmitter will il-
luminate while the button is depressed, indicating that the re-
mote transmitter is functioning. The vehicle parking lights will
flash once, and the horn will beep softly to confirm that the
command was recieved.The theft deterrent system arms at this
time.

The theft deterrent system will beep the horn and flash the
lights if any door is opened before disarming with the remote
transmitter by unlocking the doors.

Unlocking the Doors

When approaching the vehicle press the unlock button on the
remote transmitter once. This will unlock the drivers door. The
vehicle lights will flash 2 times, and the horn will beep twice
softly to confirm that the command was received. The interior
lights will turn on and remain activated for approximately 30
seconds, and the theft deterrent system will disarm. To unlock
the remaining doors, press the unlock button on the remote
transmitter a second time.

Theft Deterrent System Override

If the battery in the remote transmitter is dead, or the remote
transmitter is not operating, the theft deterrent system will need
to be overridden once the door is opened. The alarm will start
as soon as a door is opened.To override the alarm, place the
key in the ignition, and turn it to the “on” then “off” position 3
times. The system will remain in override until the doors are
locked again with the remote transmitter.

Panic Activation

The panic feature can be used to activate the vehicle audio and
visual theft deterrent features to draw attention to yourself dur-
ing an emergency situation. Simply press and hold the PANIC
button for 3 seconds. This will cause the vehicle horn and
lights to pulse on and off for approximately 30 seconds. To de-
activate the panic feature before the time period expires, press
and release the panic button.

9-OM2-005

LOCK BUTTON

UNLOCK BUTTON

PANIC BUTTON

9-OM2-004

UNLOCK BUTTON

LOCK BUTTON

PANIC BUTTON

GARAGE DOOR
OPERATION

4-1-00

12-106

Electrical System

______________________________________________________

®

SYSTEM FEATURES

System features can be activated or deactivated as required by
the owner. Some system features are active when the vehicle is
purchased.

Passive Theft Deterrent Arming

This feature will automatically arm the theft deterrent system
30 seconds after you depart the vehicle. The arming will take
place even if the lock button isn’t pushed on the remote trans-
mitter. Passive locking can also be activated with this feature.

Passive Locking

This feature will lock the doors 30 seconds after the vehicle is
departed. The doors will lock automatically even if the lock but-
ton is not pushed on the remote transmitter. When this feature is
active, the ignition keys should never be left in the vehicle be-
cause the system will still lock the doors. This feature requires
that the theft deterrent system also be set to passive arming.

Automatic Door Lock*

This feature will lock the doors 3 seconds after the ignition key
is turned to the on position. The system will not lock the doors
if a door is ajar when the key is turned on.

Automatic Door Unlock*

This feature will automatically unlock the driver’s door when
the ignition key is turned off. The system can be programmed
by an authorized HUMMER dealer to unlock all the doors.

Horn Chirp*

This feature chirps the horn when the doors are locked and un-
locked. 

Disarming the Horn Chirp

The horn chirp feature can be disabled so that only the parking
lights will flash during lock and unlock.To disable the horn
chirp:

1.

Press and release the unlock button on the remote trans-
mitter button once.

2.

Open the drivers door and leave it open

3.

Turn the ignition “on” then “off” 5 times within 5 seconds.
Do not start the vehicle.

4.

When the key is turned on for the fifth time, the horn will
chirp twice to indicate that the feature has been disabled. If
it does not, the key cycles were not within the 5 second
time frame, and the procedure must be started over.

5.

Turn the ignition key “off”, and test the system with the
remote transmitter.

6.

To reactivate, repeat the procedure

NOTE: * Indicates features which are active when the vehicle
is manufactured

OPTIONAL GARAGE DOOR ACCESSORY 
PACKAGE

The Garage Door Accessory Package provides the owner with
the ability to operate their existing garage door opener with the
same keyless entry remote transmitter used to open and lock
your HUMMER. This system includes two 4-button remote
transmitters and a garage door receiver that must be installed in
your existing garage door system. The package must be pur-
chased from a HUMMER dealership and the remote transmit-
ters programmed to the HUMMER. Installation of the garage
door receiver is the responsibility of the Hummer Owner.

Synchronizing the Remote Transmitters

If the keyless entry remote transmitter is operated 50 times or
more outside the range of the vehicle, the remote transmitter
codes will not match the code that the receiver expects. If the
remote transmitter does not activate the lock system, and the
batteries are not dead, the remote transmitter may need to be
synchronized with the receiver. Stand close to the vehicle and
press the lock button twice within one second. If there is no re-
sponse, try pressing the button twice faster, then slower. If
there is still no response, the system must be checked. 

Battery Replacement

It is suggested that the batteries in your remote transmitters be
replaced every 12 months to maintain optimum performance.
Should the remote transmitter range begin to decrease or the
red L.E.D. on the remote transmitter stop functioning, the bat-
tery will need to be replaced.To replace the batteries:

1.

Remove the phillips screw from the back of the remote 
transmitter

2.

Carefully pry the top of the remote transmitter away from
the bottom part.

3.

Remove the old battery making note of battery polarity.

4.

Replace the old battery with a new GP27A type. 

5.

Assemble the remote transmitter.

Batteries can be obtained where small camera and watch bat-
teries are sold.

4-1-00 

_____________________________________________________

 Electrical System  12-107

®

05745159

REMOTE ENTRY SYSTEM

Remote Entry Receiver Replacement

Removal

1.

Remove front console enough to gain access to receiver  
(Section 10).

2.

Disconnect two receiver harness connectors from receiver
(Figure 12-109).

3.

Remove receiver from two velcro strips.

Installation

4.

Install receiver on two velcro strips.

5.

Connect receiver harness connectors to receiver.

6.

Program receiver to accept remotes. 

7.

Check remote entry system for proper operation.

8.

Install front console (Section 10).

Figure 12-109:   Remote Entry Receiver 

9-S12-085

REMOTE ENTRY MODULE

CROSS BODY HARNESS

ENGINE COVER

PCM

CONSOLE CONNECTOR

~

4-1-00

12-108

Electrical System

______________________________________________________

®

REMOTE ENTRY RECEIVER/TRANSMITTER 
REPLACEMENT

Removal

1.

Remove center console.

2.

Disconnect wire connection at receiver and remove
reciever from engine cover (Figure 12-109).

3.

Installation

1.

Place hook and loop on back of receiver and place reciever 
on engine cover.

2.

Connect wire harness and reprogram system.

PROGRAMMING NEW OR REPLACEMENT 
REMOTE TRANSMITTERS

Keyless Entry Remote Transmitter Trouble-
shooting

1.

If the customer's complaint indicates a gradual decrease in 
range of the remote transmitter, or intermittent operation 
of the remote transmitter, the battery may need replace-
ment. The red Light Emitting Diode on the keyless entry 
remote transmitter should illuminate brightly when a 
remote transmitter button is pressed.

2.

The remote transmitter may operate when the battery
voltage drops below 4.0V DC, however range and
reliability will be sacrificed at this level. When this same
battery is measured under load, the voltage will drop close
to or below the 3.0 VDC level. Battery replacement is
usually recommended when the voltage drops to or below
5.0 VDC with no load.

3.

If the battery voltage is at an acceptable level, but the
remote transmitter will not activate the system, it may
need to be synchronized. To re-synchronize the remote
transmitter to the receiver, stand close to the vehicle and
press and release the LOCK button 2 times within one
second. The vehicle's horn should chirp one time
indicating that you have locked the doors and armed the
system. If re-synchronizing does not work on your first
attempt, try again slower, then again faster. 

Programming The Keyless Entry Remote 
Transmitters

You should have access to all keyless entry remote transmitters
that will ultimately operate the unit, even if they are currently
programmed to do so.

Each keyless entry receiver module will learn and store up to
four different remote transmitter codes. When a fifth remote
transmitters programmed, the first remote transmitter that was
originally programmed to the unit will be bumped out of the
system memory.

1.

To start programming, make sure that the Theft Deterrent 
System is disarmed, either by using a remote transmitter 
that is currently programmed, or by using the The Deter-

rent System Override procedure explained in the operating 
instructions.

2.

Gain access to the programming push-button switch
located on the keyless entry control module, which is
mounted under the center console of the vehicle.

3.

Turn the ignition key to the ON position.

4.

Within 15 seconds, press and release the programming
switch 3 times. The vehicle horn will sound one time
indicating that the system is in program mode

5.

Press and hold the LOCK button on the remote transmitter
until the vehicle horn sounds one long chirp.

6.

Repeat step 5 for all remote transmitters that you wish to
program (up to four).

7.

Turn the ignition key to the OFF position, or wait 15
seconds, and the system will automatically terminate the
programming mode. This is indicated by a 3 chirp signal
from the vehicle horn.

Remote Transmitter Programming Hints 

1. If you wait more than 15 seconds between steps In the pro-
gramming mode, the system will automatically terminate the
programming mode. This is indicated by the 3 chirp signal
from the vehicles horn. Simply start over to complete program-
ming of all remote transmitters, 

2 Test all programmed remote transmitters to be sure that all
buttons are operating, Remember the system will not remotely
lock the doors while the ignition key is in the ON position.

CHANGING THE SELECTABLE FEATURES

Some of the features of the keyless entry and theft deterrent
system Can be changed or tailored to the needs of the
owner.The following is a list of alterable features included in
the HUMMER remote entry system

1.

Auto Door Lock

2.

Auto Driver’s Door Unlock

3.

Auto passenger doors unlock

4.

Active theft deterrent

5.

Active door locking

Programming the Selectable Features

1.

To start programming, make sure that the Theft Deterrent 
System is disarmed, either by using a remote transmitter 
that is currently programmed, or by using the Theft Deter-
rent System Override procedure.

2.

Gain access to the programming pushbutton Switch
located on the keyless entry control module, which is
mounted in the center console of the vehicle.

3.

Turn the ignition key to the “ON” position.

4.

Within 15 seconds, press and release the programming
Switch 3 times. The vehicle's horn will sound one time
indicating that the system is in remote transmitter program
mode.

4-1-00 


Content   ..  218  219  220  221   ..