Honda Ridgeline. Manual - part 524


  Index      Honda     Honda Ridgeline - service repair manual 2006-2008 year


Search            


Content   ..  522  523  524  525   ..


Honda Ridgeline. Manual - part 524


01

02

SJC8A00J10311113145FEAT00

01

SJC8A00J1031101293EKBAT00

Position

Resistance

23-62

23-62

Audio System

Audio Remote Switch Test

AM/FM Antenna Amplifier
Replacement

Terminal

4

7

A

B

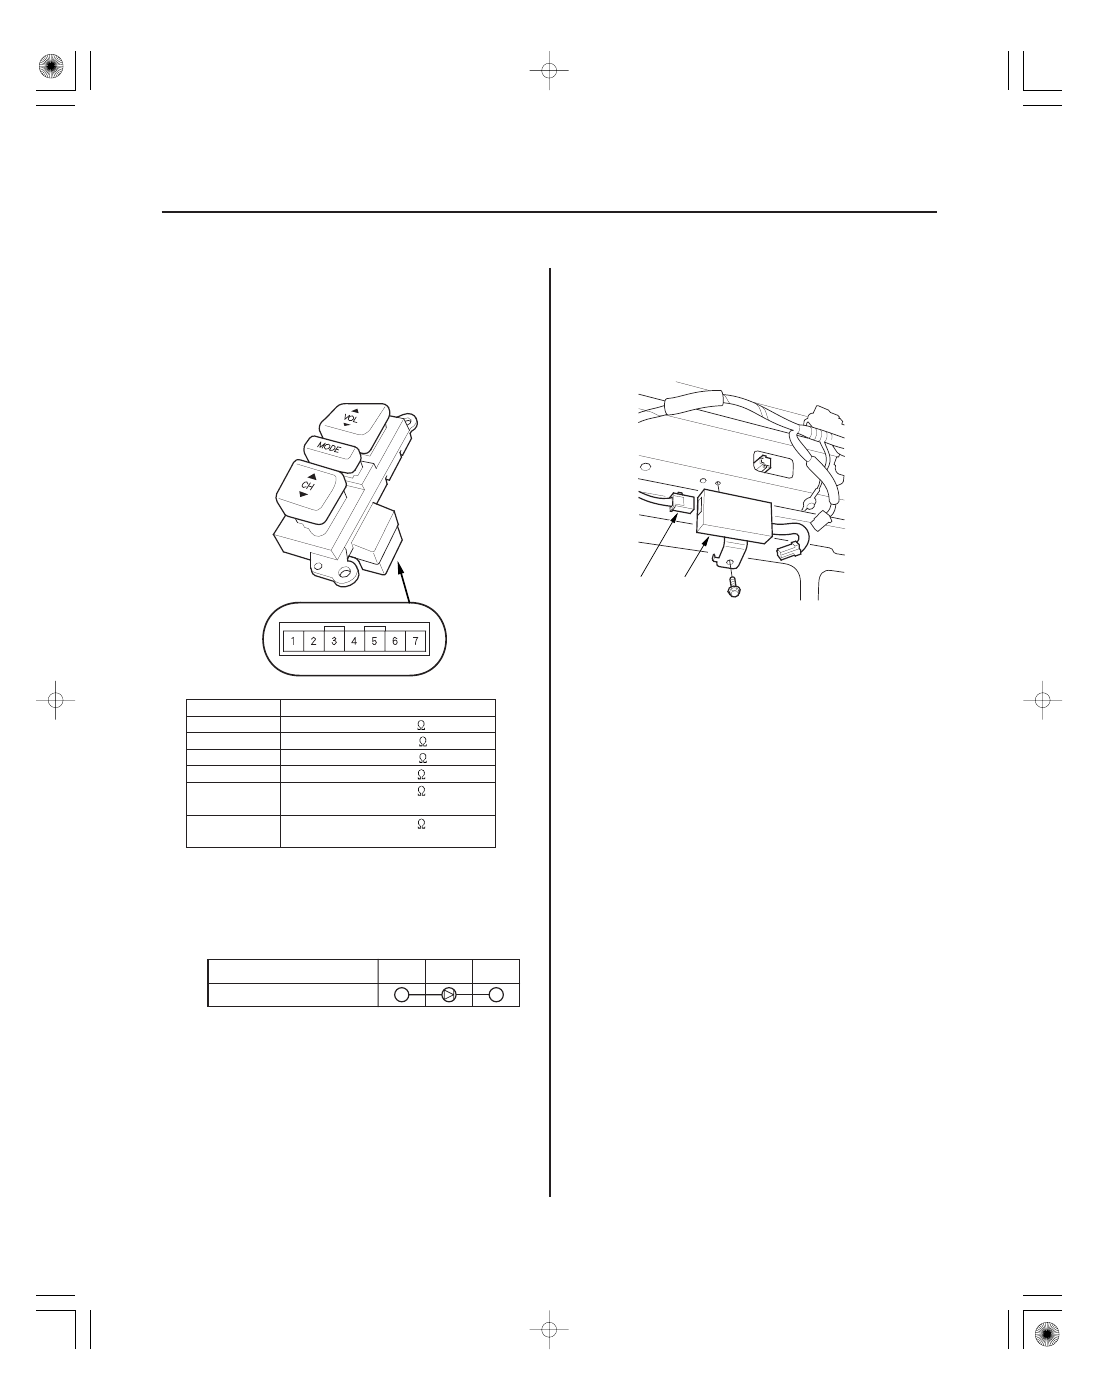
1. Remove the steering wheel (see page 17-21).

2. Remove the audio remote switch (see page 17-22).

3. Measure the resistance between the No. 1 and

No. 3 terminals in each switch position according
to the table.

OFF

About 10 k

MODE

About 3.7 k

CH (

)

About 1.7 k

CH (

)

About 775
About 357

About 100

4. If the resistance is not as specified, replace the

audio remote switch.

5. Use a diode tester between the terminals in each

switch position according to the table.

6. If the diode test is bad, replace the switch.

1. Remove the headliner (see page 20-70).

2. Disconnect the 3P connector (A) from the AM/FM

antenna amplifier (B).

3. Disconnect the connector, then remove the bolt and

AM/FM antenna amplifier.

4. Install the AM/FM antenna amplifier in the reverse

order of removal.

(VOL. UP)

(VOL. DOWN)

01

SJC8AN3J10311067401KBAT00

23-63

XM Antenna Replacement

A

B

C

1. Remove the headliner (see page 20-70).

2. Remove the nut (A) from the XM antenna (B).

3. Disconnect the connector (C) and remove the XM

antenna.

4. Install the XM antenna in the reverse order of

removal.

*01

SJC8AN1J36100000000DAAT00

23-64

Navigation System

Component Location Index

PCM
(Vehicle Speed Pulse)

MICROPHONE (Inside the map light)

NAVIGATION DISPLAY

AUDIO UNIT

VOICE CONTROL SWITCH

GPS ANTENNA

NAVIGATION UNIT

NAVIGATION SERVICE CHECK
CONNECTOR

XM RECEIVER

CD CHANGER
(With navigation)

REARVIEW CAMERA
(Optional)

07PAZ-0010100

Removal/Installation, page 22-194

Removal/Installation, page 23-141

Connector Inputs

and Outputs,
page 23-11

Removal/Installation,

page 23-57

Removal/Installation, page 23-141
Test, page 23-141

Removal/Installation,

page 23-140

Removal/Installation,

page 23-139

Forced starting of display, page 23-138

Connector Inputs and Outputs,

page 23-16

Removal/Installation,

page 23-61

Connector Inputs and Outputs,

page 23-15

Removal/Installation,

page 23-58

SJC8AN1J36100000000BBAT00

General Operation

Anti-theft Feature

Symptom Diagnosis

Self-Inertial Navigation Limitations

Global Positioning System (GPS) Limitations

23-65

General Troubleshooting Information

Refer to the Navigation System Manual, for the
navigation system operating procedures.

The navigation system and audio unit have a coded
theft protection circuit. Make sure you have the anti-
theft security codes before;

• Disconnecting the battery
• Disconnecting the navigation unit 8P connector
• Removing the No. 7 (7.5 A) fuse from the under-dash

fuse/relay box

After service, reconnect power to the navigation unit,
and turn the ignition switch ON (II). Enter the 4-digit
anti-theft security codes, then select ‘‘Done’’.

If the code cannot be found, use the interactive Network
( N) to look it up. You can view the serial number in one
of the Navi ECU diagnostic screen (see page 23-124).
Altematively, you will need the serial number from the
navigation unit under the driver’s sea

When replacing the navigation unit, be sure to give the
customer the new anti-theft security code.

Certain circumstances and system limitations will result
in occasional vehicle positioning errors. Some
customers may think this indicates a problem with the
navigation system when, in fact, the system is normal.
Keep the following items in mind when interviewing
customers about symptoms of the navigation system.

The limitations of the self-inertial portion of the
navigation system (the yaw rate sensor and the vehicle
speed signal) can cause some discrepancies between
the vehicle’s actual position and the indicated vehicle
position (GPS vehicle position).

The following circumstances may cause vehicle
positioning errors:

• Moving the vehicle with the engine stopped and the

vehicle stopped, such as by ferry or tow truck, or if
the vehicle is spun on a turn table.

• Tire slippage, changes in tire rolling diameters, and

some driving situations may cause discrepancies in
travel distances. Examples of this include:
– Continuous tire slippage on a slippery surface.
– Driving with snow chains mounted.
– Abnormal tire pressure.
– Incorrect tire size.
– Frequent lane changes across a wide highway.
– Continuous driving on a straight or gently curving

highway.

– Very bumpy roods.

• Tolerances in the system and map inaccuracies

sometimes limit how precisely the vehicle position is
indicated. Examples of this include:
– Driving on roads not shown on the map (map

matching is not possible).

– Driving on a road that winds in one direction, such

as a loop bridge, an interchange, or a spiral parking
garage.

– Driving on a road with a series of sharp hair-pin

turns.

– Driving near a gradual highway exit or transition.
– Driving on one of two close parallel roads.
– Making many 90 degree turns.
– The direction to destination icon or ‘‘Destination

icon’’ shown or the map may be up to several
hundred feet away from the actual location.

The GPS cannot detect the vehicle’s position during the
following instances:

• For the first 5 to 10 minutes after reconnecting the

battery (This can take as long as 45 minutes).

• When the satellite signals are blocked by tall

buildings, mountains, tunnels, large trees, or large
trucks.

• When the GPS antenna is blocked by an object placed

above it in the vehicle. The GPS antenna requires a
clear unobstructed view of the sky.

• When there is no satellite signal output (signal output

is sometimes stopped for satellite servicing).

• When the satellite signals are blocked by the

operation of some electronic aftermarket accessories
including, but not limited to non-OEM in-dash
entertainment units (radio, CD players/changers, and
Lo Jack), cell phones placed near navigation system
and window tinting above the GPS antenna.

(cont’d)

i


Content   ..  522  523  524  525   ..