Honda Ridgeline. Manual - part 379


  Index      Honda     Honda Ridgeline - service repair manual 2006-2008 year


Search            


Content   ..  377  378  379  380   ..


Honda Ridgeline. Manual - part 379


12

13

14

15

+ −

20-154

Tailgate

Tailgate Installation/Adjustment (cont’d)

A

B

B

8 x 1.25 mm
40 N·m
(4.1 kgf·m,
30 lbf·ft)

8 x 1.25 mm
40 N·m
(4.1 kgf·m, 30 lbf·ft)

7

1/

0 mm

(0.35

0.04/

0 in.)

70 mm
(2.75 in.)

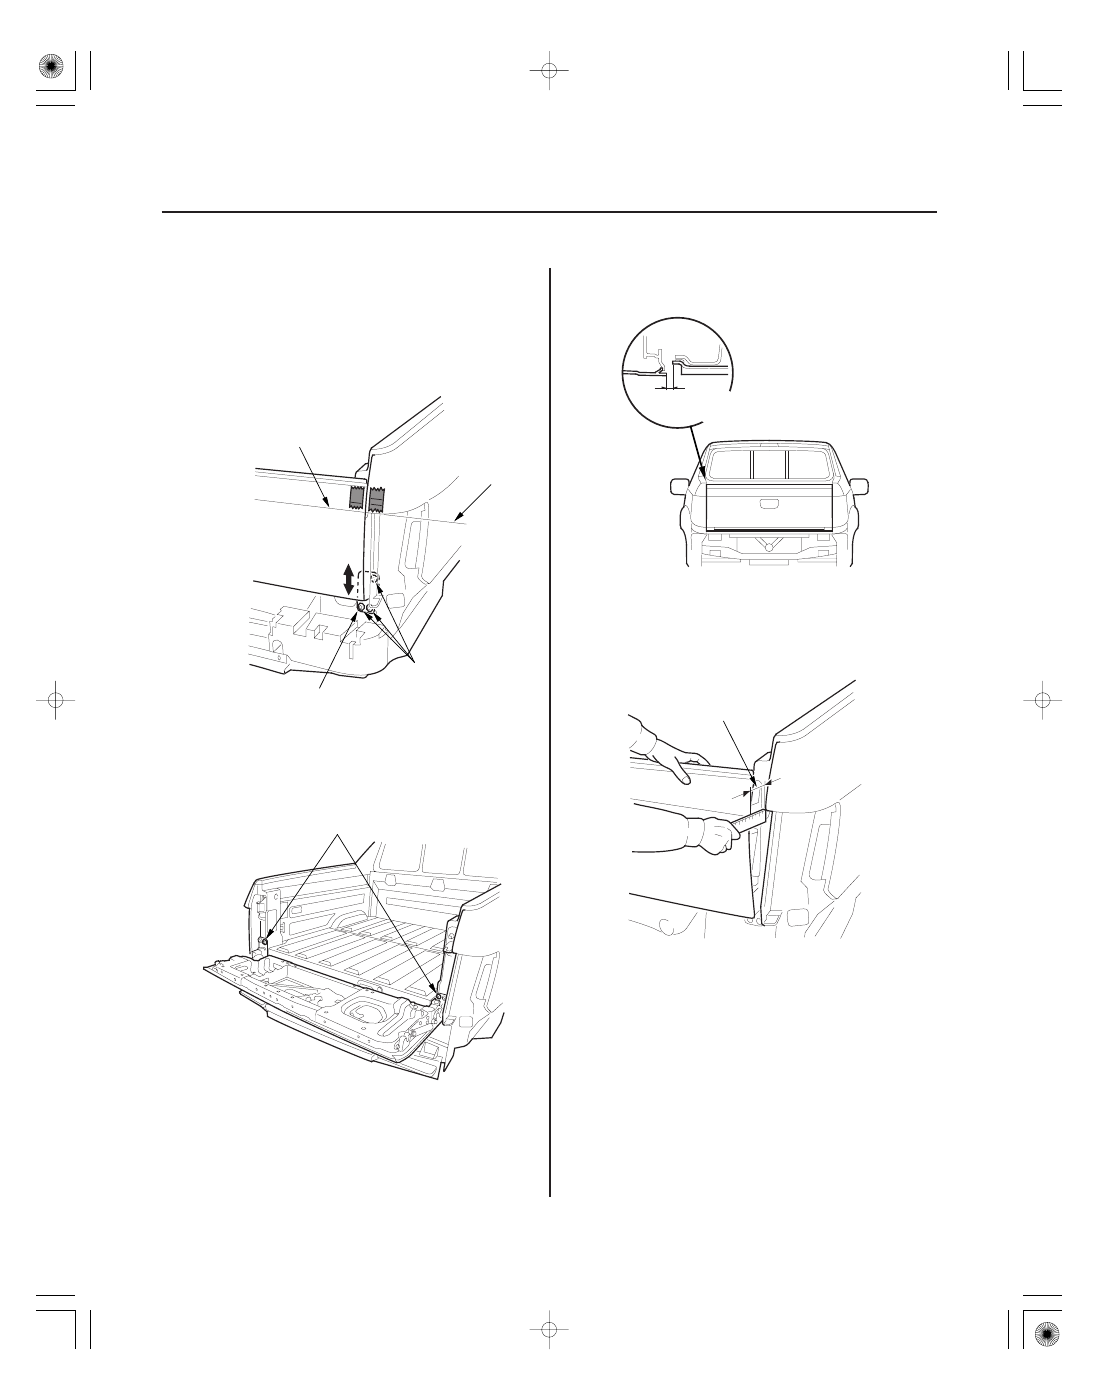
17. Still holding the tailgate in the upward position,

latch the right tailgate lower latch. Continue to hold
the tailgate upward.

18. Move the right tailgate lower striker (A) to align the

body lines (B), then torque the three lower striker
bolts.

19. Lower the tailgate, and torque the one remaining

left tailgate lower hinge bolts and the one right
tailgate lower striker bolts.

20. Raise the tailgate. Inspect the gap between the left

upper tailgate and the body.

21. Open the tailgate about 70 mm (2.75 in.), and then

let go of the tailgate. The tailgate should begin to
fall open on its own, if does not, repeat steps 12
through 15 and use the next step lower on the
height gauge.

22. Pull the tailgate upper handle to release the left

tailgate upper latch, and then lower the tailgate.

23. Install the left body-side striker/hinge with the bolts

hand tight, allowing some movement of the striker/
hinge.

16

17

18

19

20-155

A

B

8 x 1.25 mm
40 N·m
(4.1 kgf·m,
30 lbf·ft)

8 x 1.25 mm
22 N·m
(2.2 kgf·m, 16 lbf·ft)

8 x 1.25 mm
40 N·m
(4.1 kgf·m,
30 lbf·ft)

24. Raise and close the tailgate firmly. The left body-

side striker/hinge and the tailgate latch/hinge align
themselves. Push in on the upper left of the tailgate
and hold it, and then use a TORX T50 bit and
extension, tighten the center bolt (A) hand tight on
the left tailgate upper striker (B).

25. Torque the three left tailgate upper latch bolts.

26. Lower the tailgate. Remove the from the left upper

tailgate latch, and apply liquid thread lock to the nut.
Reinstall the nut and tighten it to the specified
torque.

27. Torque the left tailgate upper striker bolts, starting

with the center bolt first.

28. Install and torque the tailgate support cable

(see page 20-149).

(cont’d)

20

21

22

23

+ −

+ −

20-156

Tailgate

Tailgate Installation/Adjustment (cont’d)

1

1/

0 mm

(0.04

0.04/

0 in.)

1

1/

0 mm

(0.04

0.04/

0 in.)

A

B

29. Close the tailgate. Check the flushness of the

tailgate to the body at the top of the tailgate. If the
left side is out of specification, install or remove
shims between the left striker/hinge and the body
as needed (go to step 24). If the right side is out
specification, install or remove shims between the
right tailgate lower hinge and the body as needed
(go to step 18).

30. Lower the tailgate, and install the right tailgate

upper striker with the two screws hand tight. Make
sure the striker is positioned horizontally.

31. With the right upper tailgate latch bolts hand tight,

position the latch in the upward position.

32. Close the tailgate, making sure both latches are

latched. Make sure the right striker (A) is in the
lower range of adjustment within the tailgate latch
(B). Grab the top, center of the tailgate, and push
and pull it inward and outward a few times to
center the right upper tailgate latch.

24

20-157

8 x 1.25 mm
22 N·m (2.2 kgf·m, 16 lbf·ft)

6 x 1.0 mm
18 N·m (1.8 kgf·m, 13 lbf·ft)

A

A

33. Lower the tailgate. Make sure the right tailgate

upper latch alignment marks (A) are at equal
positions, and torque the right tailgate upper latch
bolts and the right tailgate upper striker screws.

34. Loosely install the tailgate trim panel, and check

the dual-mode tailgate operation.

35. Install the tailgate trim panel (see page 20-140).

36. Check the dual-mode tailgate operation.

NOTE: When closing the tailgate from the lowered
position, apply a slow steady pressure to the top,
center of the tailgate. Be sure that both the left and
right latches close simultaneously. If they latch
independently, and the tailgate is not fully latched,
the tailgate may not open in swing mode.

37. Check tailgate switch operation (see page 22-182).

38. Reinstall the taillights (see page 22-178).

39. Reinstall the rear bumper (see page 20-133).


Content   ..  377  378  379  380   ..