Honda Ridgeline. Manual - part 373
 

  Index      Honda     Honda Ridgeline - service repair manual 2006-2008 year


Search            


Content   ..  371  372  373  374   ..


Honda Ridgeline. Manual - part 373


01

02

03

SJC8A00J46166453502KBAT00

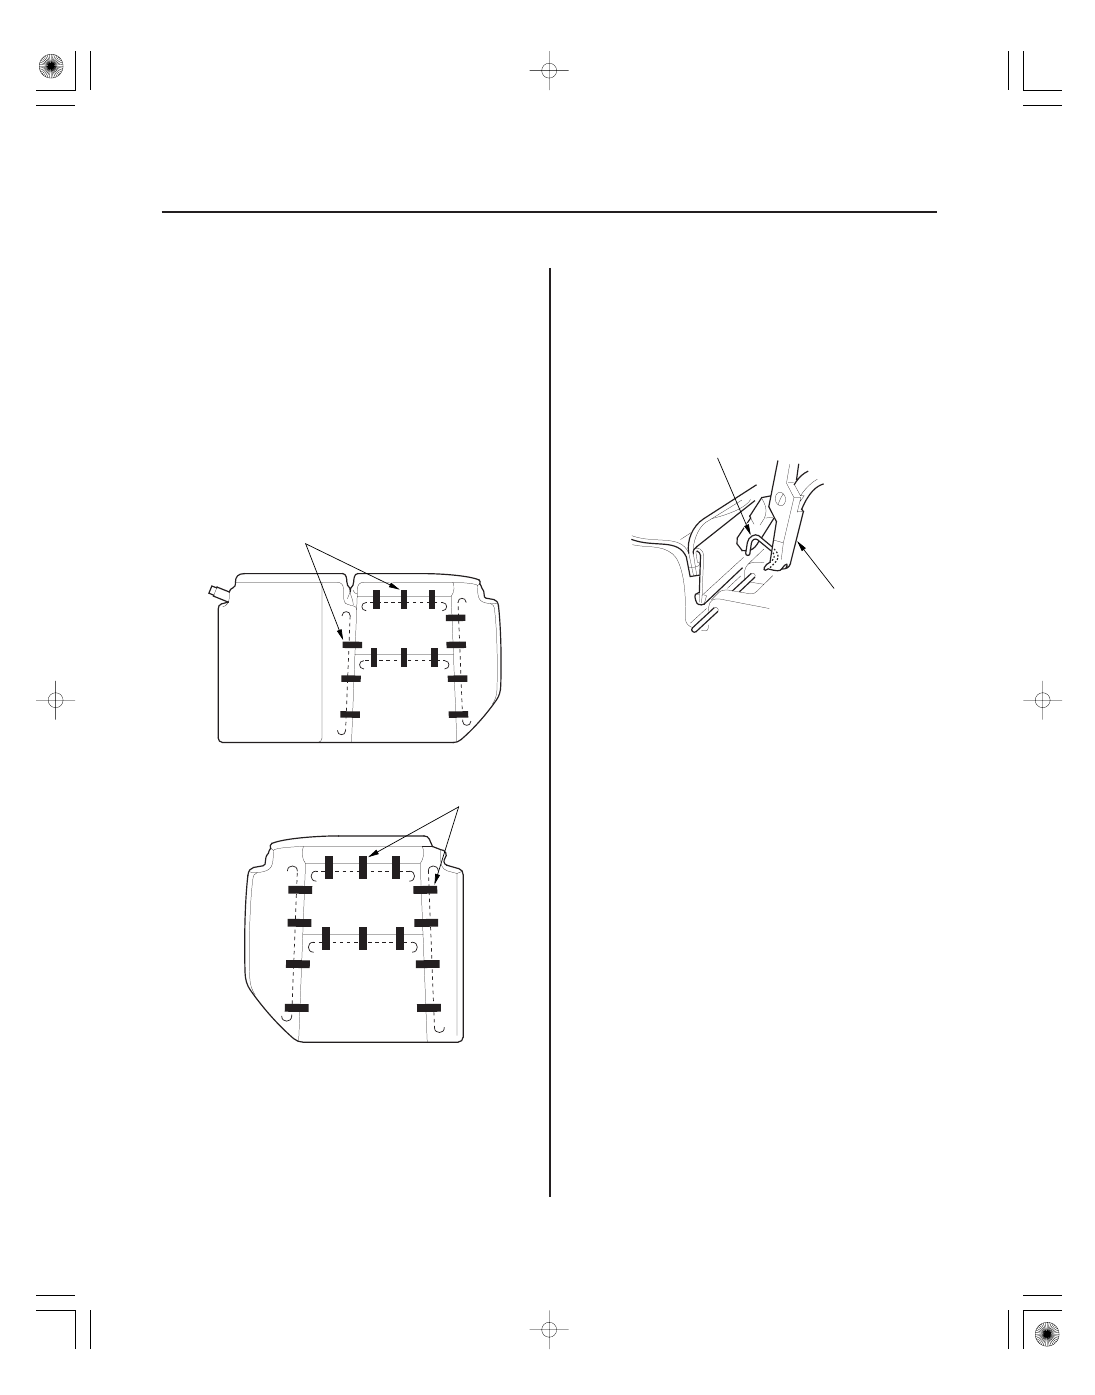
Left seat cushion cover

Right seat cushion cover

20-130

Seats

Rear Seat Cushion Cover Replacement

A

A

A

B

NOTE:

• Take care not to tear the seams or damage the seat

covers.

• Put on gloves to protect your hands.

1. Remove the rear seat assembly (see page 20-117).

2. Remove the seat cushion cover/pad from the seat

cushion frame (see page 20-123).

3. Pull back the edge of the seat cushion cover all the

way around, and release the clips (A), then remove
the seat cushion cover.

4. Install the cover in the reverse order of removal,

and note these items:

• To prevent wrinkles, make sure the material is

stretched evenly over the pad before securing
the clips.

• Replace any clips (A) you removed with new

ones. Install them with commercially available
upholstery ring pliers (B).

01

02

SJC8A00J46166453071KBAT00

20-131

Rear Seat Armrest Cover Replacement

Fastener Locations

: Pivot bolt, 2

6 x 1.0 mm
9.8 N·m
(1.0 kgf·m, 7.2 lbf·ft)

E

A

B

C

D

A

A

A

A

C

B

C

E

D

NOTE: Take care not to tear the seams or damage the
seat covers.

1. Remove the armrest from the seat-back (see page

20-121).

2. Remove the armrest beverage holder from the

armrest (see page 20-122).

3. Using a 17 mm socket wrench, remove the pivot

bolts, then remove the wave washers (A), washer
(B), and pivot brackets (C) from both sides of the
armrest (D).

4. If necessary, remove the collars (E) from the pivot

brackets.

5. Release the hooks (A) and hook strip (B), and pull

back the armrest cover (C) all the way around.

6. Release the armrest cover from the armrest pivot

portions (D), then remove it from the pad (E).

7. Install the cover in the reverse order of removal,

and to prevent wrinkles, make sure the material is
stretched evenly over the pad before securing the
hooks and hook strips.

01

SJC8A00J18513415011KDAT00

20-132

Bumpers

Front Bumper Removal/Installation

Fastener Locations

: Clip, 1

: Bolt, 4

: Bolt, 2

: Screw, 2

: Clip, 2

B

C

G

L

D

6 x 1.0 mm
9.8 N·m (1.0 kgf·m, 7.2 lbf·ft)

A

B

C

D

E

I

J

K

L

M

F

G

H

G

D

C

C

L

C

NOTE:

• Have an assistant help you when removing and installing the front bumper.
• Take care not to scratch the front bumper and body.
• Put on gloves to protect your hands.

1. Remove the front bulkhead cover (see page 20-171).

2. Remove the front bumper (A).

–1 Remove the clip (B).
–2 Remove the bolts (C, D) securing the front bumper, front inner fender (E), and splash shield (F).
–3 Remove the screws (G), then pull the wheel arch portions of the bumper outward to release the bumper from

the hooks (H) on the side spacers (I).

–4 With the help of an assistant, pull the bumper forward to release the hooks (J) from both upper corner beams

(K).

–5 Remove the clips (L), then remove the front bumper absorber (M).

3. Install the bumper in the reverse order of removal, and note these items:

• Make sure the front bumper engages the hooks (on both corner upper beams and side spacers) on each side

securely.

• Check if the clips are damaged or stress-whitened, and if necessary, replace them with new ones.
• Push the clips and hooks into place securely.

01

SJC8A00J18513415012KDAT00

20-133

Rear Bumper Removal/Installation

Fastener Locations

: Bolt, 2

B

: Screw, 8

C, F

: Clip, 6

D, E

: Screw, 2

G

A

B

C

D

E

I

J

K

L

M

F G

H

M

J

G

F

D

C

E

E

E

B

6 x 1.0 mm
9.8 N·m
(1.0 kgf·m, 7.2 lbf·ft)

F

F

L

F

F

NOTE:

• Have an assistant help you when removing and installing the rear bumper.
• Take care not to scratch the rear bumper and body.
• Put on gloves to protect your hands.

1. Remove these items:

• Taillight, both sides (see page 22-178)
• Rear license plate

2. Remove the rear bumper (A).

–1 Remove the bolts (B).
–2 From the taillight areas, remove the screws (C) and clips (D).
–3 From under the bumper, remove the clips (E).
–4 Remove the screws (F, G), then pull the wheel arch portions of the bumper outward to release the bumper

from the hooks (H) on the side spacers (I).

–5 With the help of an assistant, pull the bumper rearward to release the hooks (J) from the upper beams (K).
–6 Disconnect the rear license light connectors (L).
–7 Remove the rear bumper absorbers (M).

3. Install the bumper in the reverse order of removal, and note these items:

• Make sure the rear license light connectors are plugged in properly.
• Make sure the rear bumper engages the hooks (on the upper beams and both side spacers) on each side

securely.

• Check if the clips are damaged or stress-whitened, if necessary, replace them with new ones.
• Push the clips and hooks into place securely.


Content   ..  371  372  373  374   ..