Honda Ridgeline. Manual - part 360


  Index      Honda     Honda Ridgeline - service repair manual 2006-2008 year


Search            


Content   ..  358  359  360  361   ..


Honda Ridgeline. Manual - part 360


04

01

SJC8A00J26216517211KDAT00

Special Tools Required

20-78

20-78

Consoles

Center Console Disassembly/
Reassembly (cont’d)

Console Armrest Removal/
Installation

Fastener Locations

: Screw, 8

A

B

C

D

E

F

G

H

Fastener Locations

: Screw, 3

A

B

C

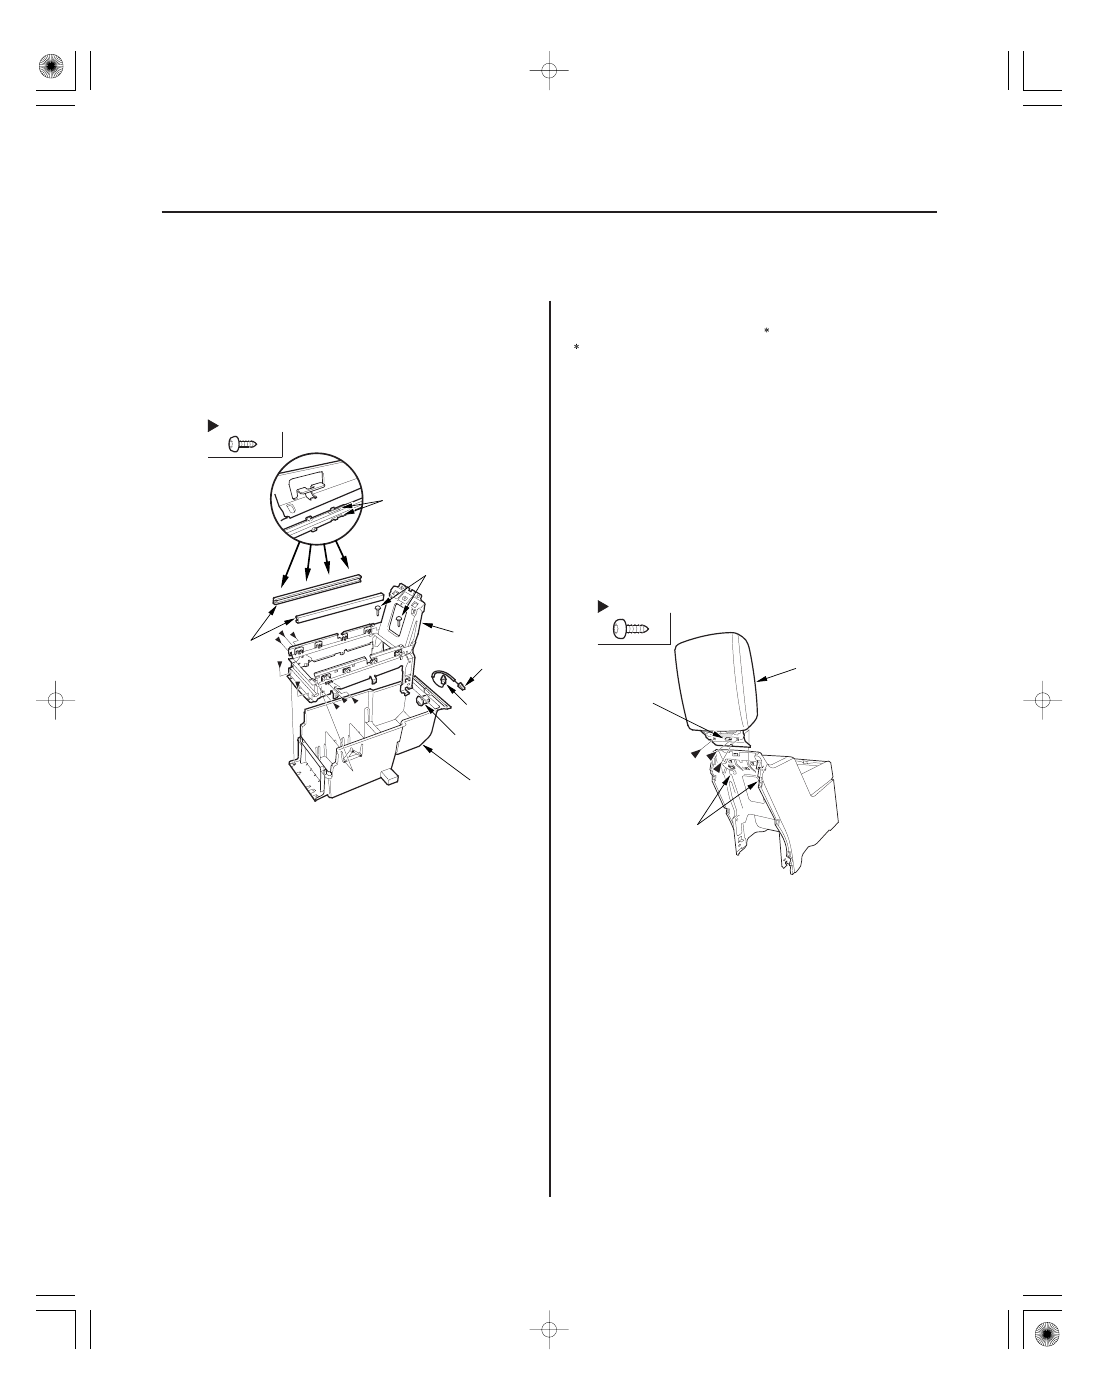
6. Using a TORX T20 bit, remove the screws, then

separate the console box (A) and the console frame
(B). Disconnect the light bulb socket (C), and detach
the connector clip (D), then remove the light (E)
from the console box.

7. Remove the console lid bumpers (F). Release the

hooks (G), then remove the console lid guides (H)
from the console frame.

8. Reassemble the console in the reverse order of

disassembly, and make sure the light bulb socket is
plugged in properly.

KTC trim tool set SOJATP2014

Available through the American Honda Tool and
Equipment Program; call 888-424-6857

NOTE:

• Take care not to scratch the console.
• Use the appropriate tool from the KTC trim tool set to

avoid damage when prying components.

1. Remove the center console trim (see step 2 on page

20-76).

2. Using a TORX T20 bit, remove the screws and

release the hooks (A, B), then remove the armrest
(C).

3. Install the armrest in the reverse order of removal.

01

02

03

SJC8A00J26216517211MFAT10

20-79

Console Armrest Disassembly/Reassembly

A

B

C

D

E

E

C

A

B

Fastener Locations

: Screw, 6

A

B

C

D

E

NOTE:

• When prying with a flat-tip screwdriver, wrap it with

protective tape to prevent damage.

• Take care not to scratch the armrest.

1. Remove these items.

• Center console trim (see step 2 on page 20-76)
• Console armrest (see page 20-78)

2. Insert a flat-tip screwdriver wrapped with

protective tape into a gap between the console
armrest (A) and the console armrest base (B), and
gently push it straight down until one of the inside
hooks (C) of the console armrest come off the stop
portion (D) of the console base.

NOTE: Apply protective tape (E) to the projection in
the back surface of the console armrest to prevent
damage.

3. Slightly slide console armrest forward to get the

inside hooks over the stop portions, then remove
the flat-tip screwdriver from the gap.

4. Remove the console armrest (A) from the guide

rails of the console armrest base (B).

5. Using a TORX T20 bit, remove the screws, then

separate the slide bracket (A), upper base (B),
armrest lock (C), armrest hinge (D) and the lower
base (E).

6. Reassemble the console armrest in the reverse

order of disassembly.

01

SJC8A00J26216516415MFAT00

20-80

Consoles

Center Console Trim Disassembly/Reassembly

Fastener Locations

: Screw, 9

D, G

A

B

C

D

E

F

G

H

D

D

D

D

D

D

G

NOTE: Take care not to scratch the armrest.

1. Remove the center console trim (see step 2 on page

20-76).

2. Disassemble the center console trim.

–1 Disconnect the accessory socket connector (A)

and light bulb socket (B), and detach the
harness clips (C).

–2 Using a TORX T20 bit, remove the screws (D),

then remove the console vent (E) and console
duct (F).

–3 Using a TORX T20 bit, remove the screws (G),

then remove the hooks (H).

3. Reassemble the console in the reverse order of

disassemble, and make sure the accessory socket
connector the and light bulb socket are plugged in
properly.

01

02

SJC8A00J26220234701KDAT00

Special Tools Required

20-81

Dashboard

Instrument Panel Removal/Installation

Fastener Locations

: Clip, 2

A

B

B

Fastener Locations

: Clip, 16

A

: Clip, 2

C

A

D

E

A

A

A

A

A

E

A

B

A

A

A

A

A

A

A

A

B

C

C

A

D

A

KTC trim tool set SOJATP2014

Available through the American Honda Tool and
Equipment Program; call 888-424-6857

NOTE:

• Take care not to scratch the dashboard and related

parts.

• Use the appropriate tool from the KTC trim tool set to

avoid damage when prying components.

1. Tilt the steering column down.

2. Lower the shift lever knob.

3. Pry up on the lower edge of the instrument panel

(A) at the notches (B) to detach the clips.

4. Detach the clips (A) along the edge of the

instrument panel (B). Gently pull out the instrument
panel to detach the clips (C), and release the hooks
(D), then release the instrument panel from the
guide hooks (E) of the gauge control module.

(cont’d)


Content   ..  358  359  360  361   ..