Honda Ridgeline. Manual - part 322
 

  Index      Honda     Honda Ridgeline - service repair manual 2006-2008 year


Search            


Content   ..  320  321  322  323   ..


Honda Ridgeline. Manual - part 322


02

SJC8A00D14300014711LAAT20

19-25

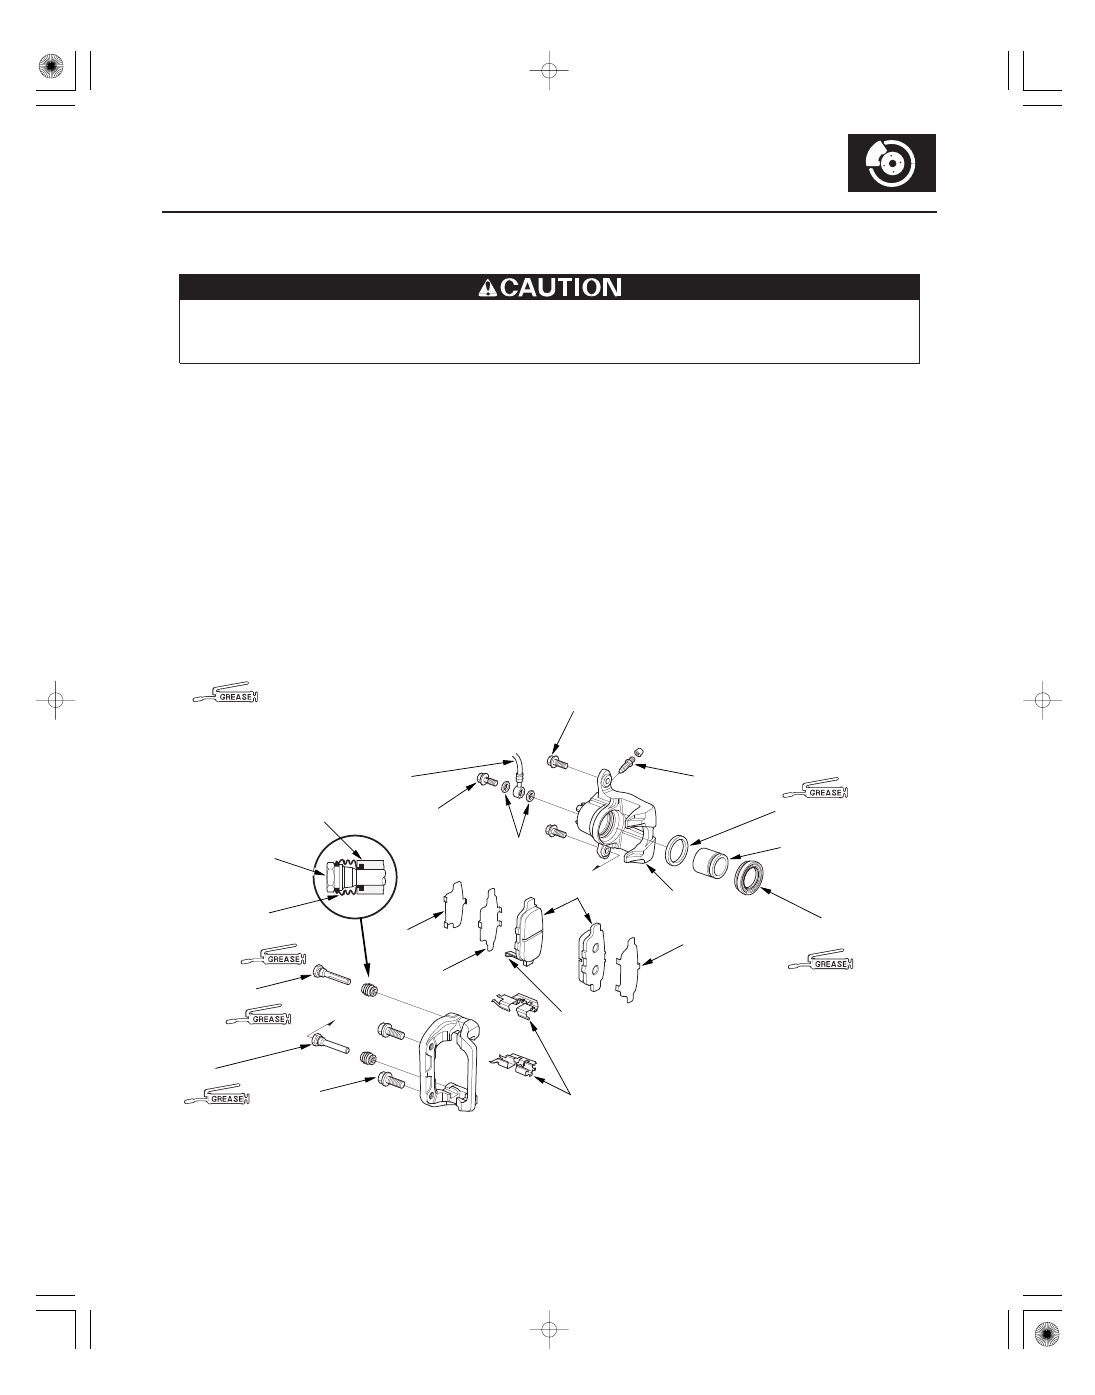
Rear Brake Caliper Overhaul

PISTON BOOT

PISTON

8 x 1.25 mm
22 N·m
(2.2 kgf·m, 16 lbf·ft)

BRAKE HOSE

BANJO BOLT
34 N·m
(3.5 kgf·m,
25 lbf·ft)

INNER PAD
SHIM B

INNER PAD
SHIM A

CALIPER
BRACKET

PIN

PIN BOOT

CALIPER PIN A

12 x 1.25 mm
108 N·m
(11 kgf·m, 80 lbf·ft)

SEALING
WASHERS

PAD
RETAINERS

WEAR INDICATOR

BRAKE PADS

OUTER PAD
SHIM B

PISTON SEAL

BLEED SCREW
9.0 N·m
(0.9. kgf·m,
7 lbf·ft)

CALIPER
BODY

: Honda silicone grease (P/N 08C30-B0234M)

CALIPER PIN B

Frequent inhalation of brake pad dust, regardless of material composition, could be hazardous to your health.

• Avoid breathing dust particles.
• Never use an air hose or brush to clean brake assemblies. Use an OSHA-approved vacuum cleaner.

Remove, disassemble, inspect, reassemble, and install the caliper, and note these items:

• Do not spill brake fluid on the vehicle; it may damage the paint; if brake fluid gets on the paint, wash it off

immediately with water.

• To prevent dripping brake fluid, cover disconnected hose joints with rags or shop towels.
• Clean all parts in brake fluid and air dry; blow out all passages with compressed air.
• Before reassembling, check that all parts are free of dirt and other foreign particles.
• Replace parts with new ones as specified in the illustration.
• Make sure no dirt or other foreign matter gets into the brake fluid.
• Make sure no grease or oil gets on the brake discs or pads.
• When reusing brake pads, always reinstall them in their original positions to prevent loss of braking efficiency.
• Do not reuse drained brake fluid. Use only clean Honda DOT 3 Brake Fluid from an unopened container. Using a

non-Honda brake fluid can cause corrosion and shorten the life of the system.

• Do not mix different brands of brake fluid as they may not be compatible.
• Coat the piston, piston seal groove, and caliper bore with clean brake fluid.
• Replace all rubber parts with new ones whenever disassembled.
• After installing the caliper, check the brake hose and line for leaks, interference, and twisting.

Replace.

Replace.

Replace.

Install inner pad
with its wear
indicator downward.

Replace.

01

SJC8A00D00060800000MAAT00

19-26

Conventional Brake Components

Parking Brake Inspection

TENSION PIN

BACKING PLATE

UPPER RETURN SPRING

FLANGE NUT
12 x 1.25 mm
74 N·m
(7.5 kgf·m,
54 lbf·ft)

WAVE WASHER

ADJUSTER ASSEMBLY

PARKING BRAKE LEVER

U-CLIP

LOWER RETURN SPRING

RETAINER

BRAKE SHOE

CONNECTING ROD

ROD SPRING

SHOE GUIDE PLATE

RETAINER
SPRING

BRAKE SHOE BOSSES

BRAKE SHOE BOSSES

Frequent inhalation of brake pad dust, regardless of material composition, could be hazardous to your health.

• Avoid breathing dust particles.
• Never use an air hose or brush to clean brake assemblies. Use an OSHA-approved vacuum cleaner.

1. Raise the rear of the vehicle, and support it with safety stands in the proper locations (see page 1-10).

2. Remove the rear wheels.

3. Release the parking brake, and remove the rear caliper and brake disc/drum (see page 18-28).

Marked left and right.

Check for weakness
and damage.

Check ratchet teeth
for wear and damage.

Marked left and right.

Replace.

Check for weakness
and damage.

Install securely on
tension pin.

If brake shoes are to be
reused, mark and reassemble
in their original position.

Check for weakness
and damage.

Check for deep grooves
and rust.

Check for deep grooves
and rust.

02

03

Parking brake lining thickness:

Standard:

3.6

4.3 mm (0.14

0.17 in.)

Service limit: 1.0 mm (0.04 in.)

Parking brake drum inside diameter:

Standard:

209.9

210.0 mm

(8.264

8.268 in.)

Service limit: 211.0 mm (8.307 in.)

19-27

A

B

B

B

B

4. Check the parking brake linings (A) for cracking,

glazing, wear, and contamination.

5. Measure the parking brake lining thickness (B).

Measurement does not include brake shoe
thickness.

6. If the parking brake lining thickness is less than the

service limit, replace all the parking brake shoes as
a set (see page 19-28).

7. Check the bearings in the hub unit for smooth

operation.

8. Measure the inside diameter of the parking brake

disc/drum with inside vernier calipers.

9. If the inside diameter of the parking brake disc/

drum is more than the service limit, replace the
brake disc/drum.

10. Check the parking brake disc/drum for scoring,

grooves, and cracks.

11. Clean the mating surface of the brake disc/drum

and the inside of the wheel, then install the rear
wheels.

01

02

03

04

SJC8A00D00060845161KBAT00

Disassembly

19-28

Conventional Brake Components

Parking Brake Shoe Replacement

A

B

B

A

A

B

A

Frequent inhalation of brake pad dust, regardless of
material composition, could be hazardous to your
health.

• Avoid breathing dust particles.
• Never use an air hose or brush to clean brake

assemblies. Use an OSHA-approved vacuum
cleaner.

1. Raise the rear of the vehicle, and support it with

safety stands in the proper locations (see page
1-10).

2. Remove the rear wheels.

3. Release the parking brake, and remove the rear

brake caliper and brake disc/drum (see page 18-28).

4. Disconnect and remove the upper return

springs (A).

5. Remove the tension pins (A) by pushing and

turning the retainers (B).

6. Remove the connecting rod (A).

7. Lower the parking brake shoe assembly.

8. Remove the forward brake shoe by removing the

lower return spring (A) and adjuster assembly (B).


Content   ..  320  321  322  323   ..