Honda Ridgeline. Manual - part 56
 

  Index      Honda     Honda Ridgeline - service repair manual 2006-2008 year


Search            


Content   ..  54  55  56  57   ..


Honda Ridgeline. Manual - part 56


01

SJC8A00A14400017301MAAT01

01

02

SJC8A00A14400017301KBAT02

10-6

10-6

Cooling System

Coolant Check

Coolant Replacement

B

A

A

B
9.8 N·m
(1.0 kgf·m, 7.2 lbf·ft)

A

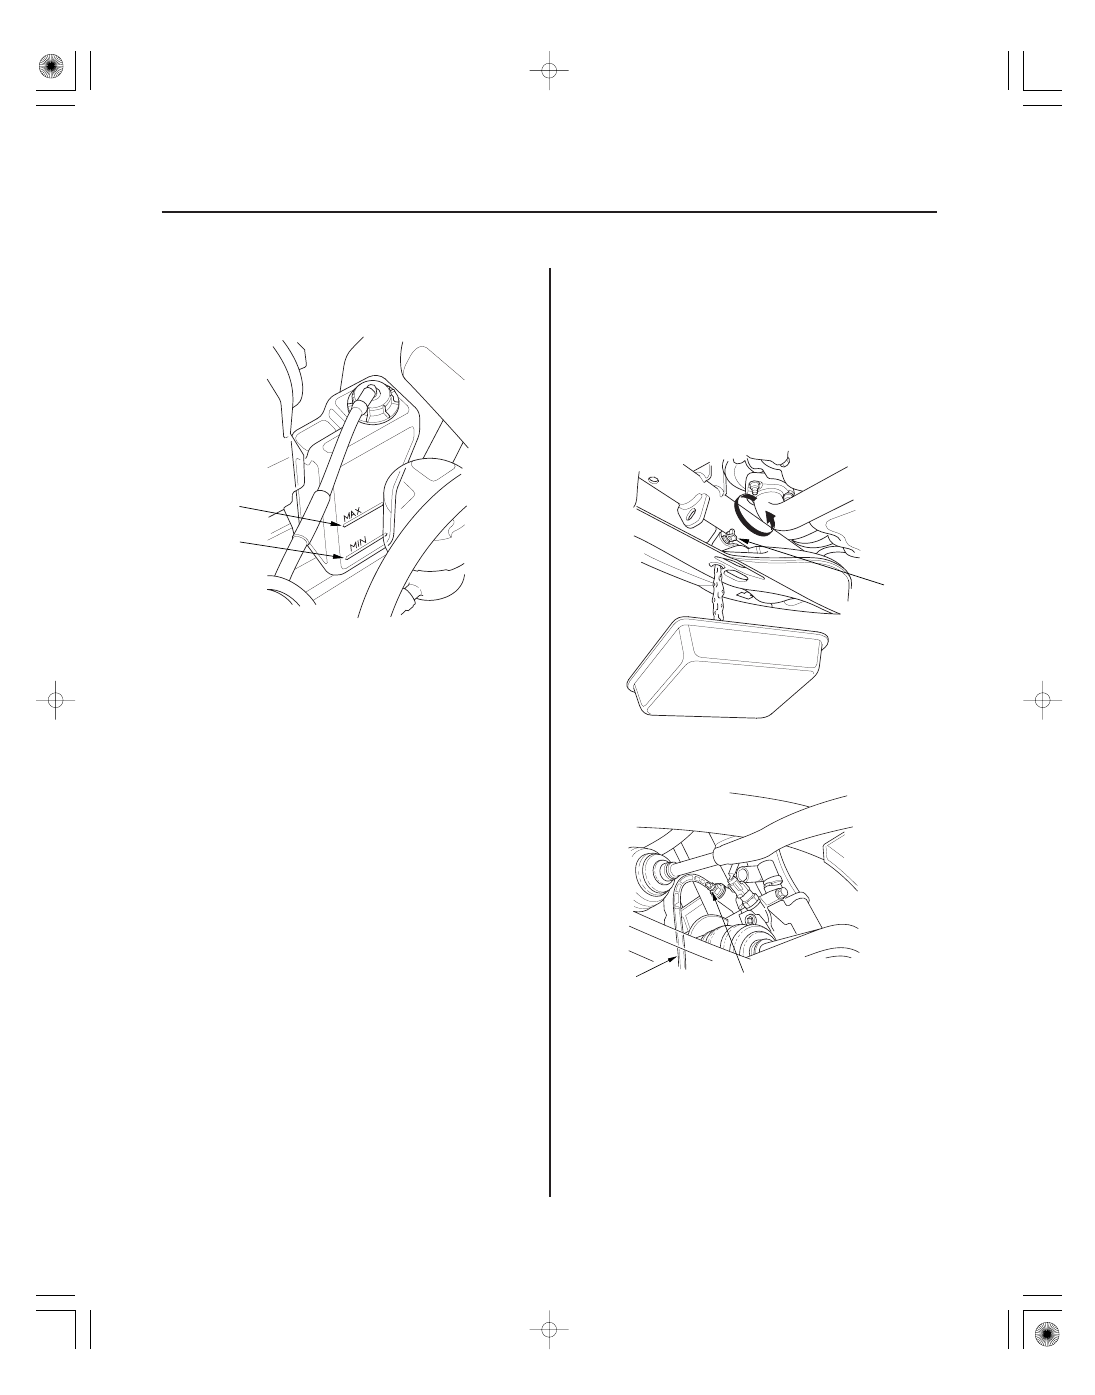
1. Look at the coolant level in the coolant reservoir.

Make sure it is between the MAX mark (A) and MIN
mark (B).

2. If the coolant level in the coolant reservoir is at or

below the MIN mark, add coolant to bring it
between the MIN and MAX marks, then inspect the
cooling system for leaks.

1. Start the engine. Set the heater temperature control

dial to maximum heat, then turn off the ignition
switch. Make sure the engine and radiator are cool
to the touch.

2. Remove the radiator cap.

3. Remove the splash shield (see step 30 on page 5-5).

4. Loosen the drain plug (A), and drain the coolant.

5. Install a rubber hose (A) on the drain bolt (B)

located at the rear of the engine block, then loosen
the drain bolt.

6. When the coolant stops draining, tighten the drain

bolt. Remove the rubber hose.

7. Tighten the radiator drain plug securely.

8. Install the splash shield (see step 31 on page 5-17).

03

04

Engine Coolant Capacities (Including the reserve
tank capacity of 0.6 L (0.16 US gal)):
After Coolant Change:

6.2 L (1.64 US gal)

After Engine Overhaul:

8.1 L (2.14 US gal)

10-7

A

9. Remove, drain, and reinstall the reserve tank.

10. Fill the reserve tank to the MAX mark (A) with

Honda Long Life Antifreeze/Coolant Type 2 (P/N
OL999-9001).

11. Pour Honda Long Life Antifreeze/Coolant Type 2

into the radiator up to the base of the filler neck.

NOTE:

• Always use Honda Long Life Antifreeze/Coolant

Type 2 (P/N OL999-9001). Using a non-Honda
coolant can result in corrosion, causing the
cooling system to malfunction or fail.

• Honda Long Life Antifreeze/Coolant Type 2 is a

mixture of 50 % antifreeze and 50 % water. Do
not add water.

12. Install the radiator cap loosely.

13. Start the engine and let it run until it warms up (the

radiator fan comes on at least twice).

14. Turn off the engine. Check the level in the radiator

and add Honda Long Life Antifreeze/Coolant Type 2,
if needed.

15. Put the radiator cap on tightly, then run the engine

again, and check for leaks.

16. Clean up any spilled engine coolant.

01

SJC8A00A14400059301KBAT00

10-8

Cooling System

Thermostat Replacement

PIN

THERMOSTAT COVER

GROUND CABLE

RUBBER SEAL

THERMOSTAT

6 x 1.0 mm
12 N·m
(1.2 kgf·m, 8.7 lbf·ft)

1.

2. Drain the engine coolant (see page 10-6).

3. Remove the ground cable and thermostat cover, then remove the thermostat.

4. Install the new thermostat with a new rubber seal.

5. Refill the radiator with engine coolant, then bleed air from the cooling system (see step 9 on page 10-7).

6. Clean up any spilled engine coolant.

Replace.

Install with pin up.

Disconnect the breather pipe, then remove the air intake duct (see step 9 on page 5-2).

01

02

03

04

SJC8A00A14400065091KBAT00

10-9

Water Passage Replacement

A

B

A

B

C

D

A

B

1. Drain the engine coolant (see page 10-6).

2. Remove the intake manifold (see page 9-3).

3. Remove the upper radiator hose (A) and lower

radiator hose (B).

4. Remove the water bypass hose (A) and ground

cable (B).

5. Remove the harness holder mounting bolt (C), then

remove the harness holder (D) from the bracket.

6. Remove the heater hoses.

7. Remove the engine wire harness connectors from

the water passage.

• Engine coolant temperature (ECT) sensor 1

connector

• Engine coolant temperature (ECT) sensor 2

connector

• Exhaust gas recirculation (EGR) valve connector

8. Remove the water passage (A) and connecting pipe

(B).

(cont’d)


Content   ..  54  55  56  57   ..