Honda Odyssey 2004. Manual - part 401
−
−
−
−
−
−
*01
01
02
S0X4A10K71100087010FAAT00
−
DTC indicator A:
YES
NO
YES
NO
YES
NO
21-80
Climate Control
DTC Troubleshooting
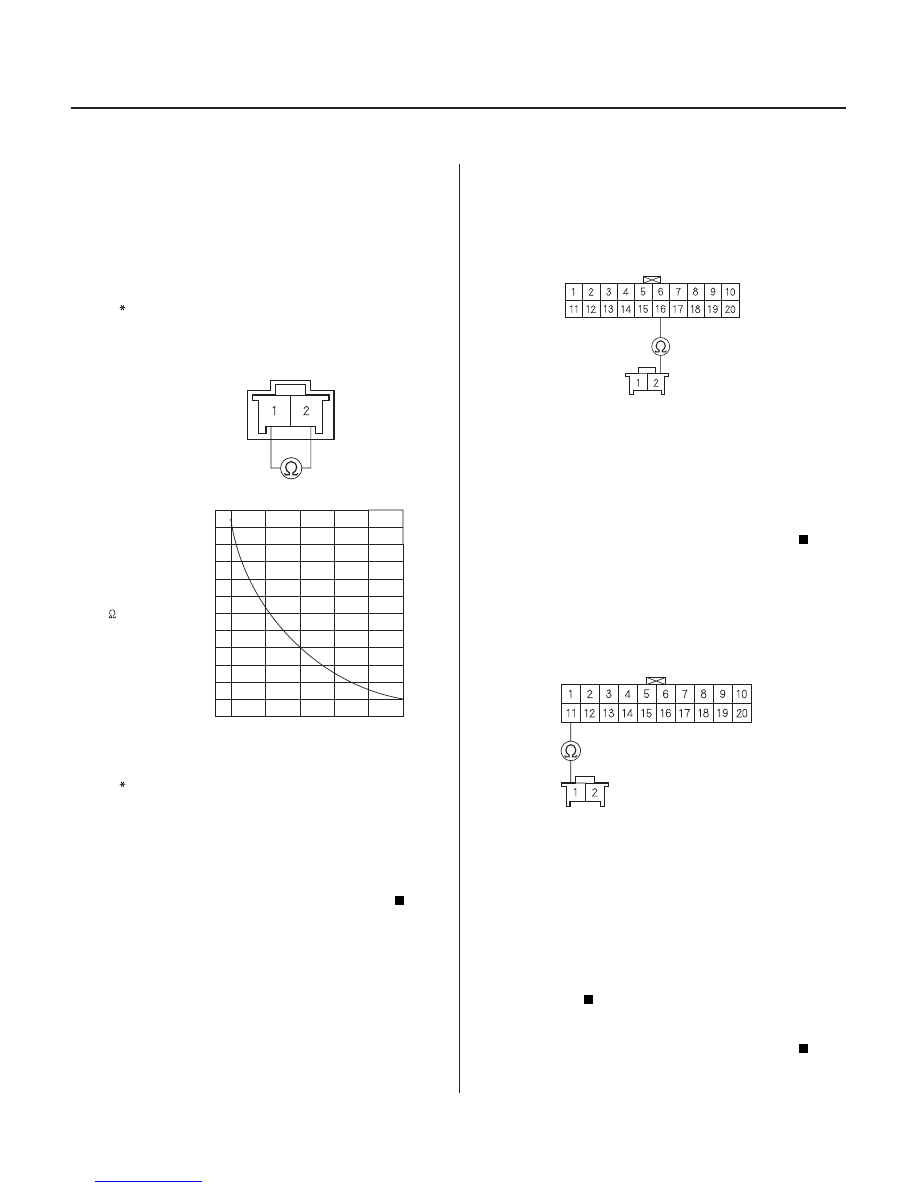
IN-CAR TEMPERATURE SENSOR
14
10
32
0
50
10
68
20
86
30
104 °F
40 °C
TEMPERATURE
RESISTANCE
k
12
11
10
9
8
7
6
5
4
3
2
1
CLIMATE CONTROL UNIT CONNECTOR B (20P)
IN-CAR TEMPERATURE SENSOR 2P CONNECTOR
YEL/RED
YEL/RED
CLIMATE CONTROL UNIT CONNECTOR B (20P)
YEL/GRN
YEL/GRN
IN-CAR TEMPERATURE SENSOR 2P CONNECTOR
An Open in the In-car
Temperature Sensor Circuit
1. Remove the in-car temperature sensor (see page
21-117).
2. Measure the resistance between the No. 1 and
No. 2 terminals of the in-car temperature sensor.
Check for a change in resistance by heating or
cooling the sensor with a hair drier.
• Without Navigation System: Go to step 3.
• With Navigation System: Go to step 6.
Replace the in-car temperature sensor.
3. Disconnect climate control unit connector B (20P).
4. Check for continuity between the No. 16 terminal of
climate control unit connector B (20P) and the No.
2 terminal of the in-car temperature sensor 2P
connector.
Go to step 5.
Repair open in the wire between the climate
control unit and the in-car temperature sensor.
5. Check for continuity between the No. 11 terminal of
climate control unit connector B (20P) and the No. 1
terminal of the in-car temperature sensor 2P
connector.
Check for loose wires or poor connections at
climate control unit connector B (20P) and at the in-
car temperature sensor 2P connector. If the
connections are good, substitute a known-good
climate control unit, and recheck. If the symptom/
indication goes away, replace the original climate
control unit.
Repair open in the wire between the climate
control unit and the in-car temperature sensor.
Wire side of female terminals
Wire side of female terminals
Wire side of female terminals
Wire side of female terminals
Is the r esistance within the specif ications shown
on the gr aph?
Is ther e continuity?
Is ther e continuity?
03/07/29 10:12:49 61S0X050_210_0081