Honda Odyssey 2004. Manual - part 354
 

  Index      Honda     Honda Odyssey 2004 - service repair manual 2004 year


Search            


Content   ..  352  353  354  355   ..


Honda Odyssey 2004. Manual - part 354


*01

S0X4A00J26273400000KDAT11

[ ]

[ ]

[ ]

[ ]

[ ]

Sealant: Cemedine P/N 08712-0004, or equivalent

20-58

Interior Trim

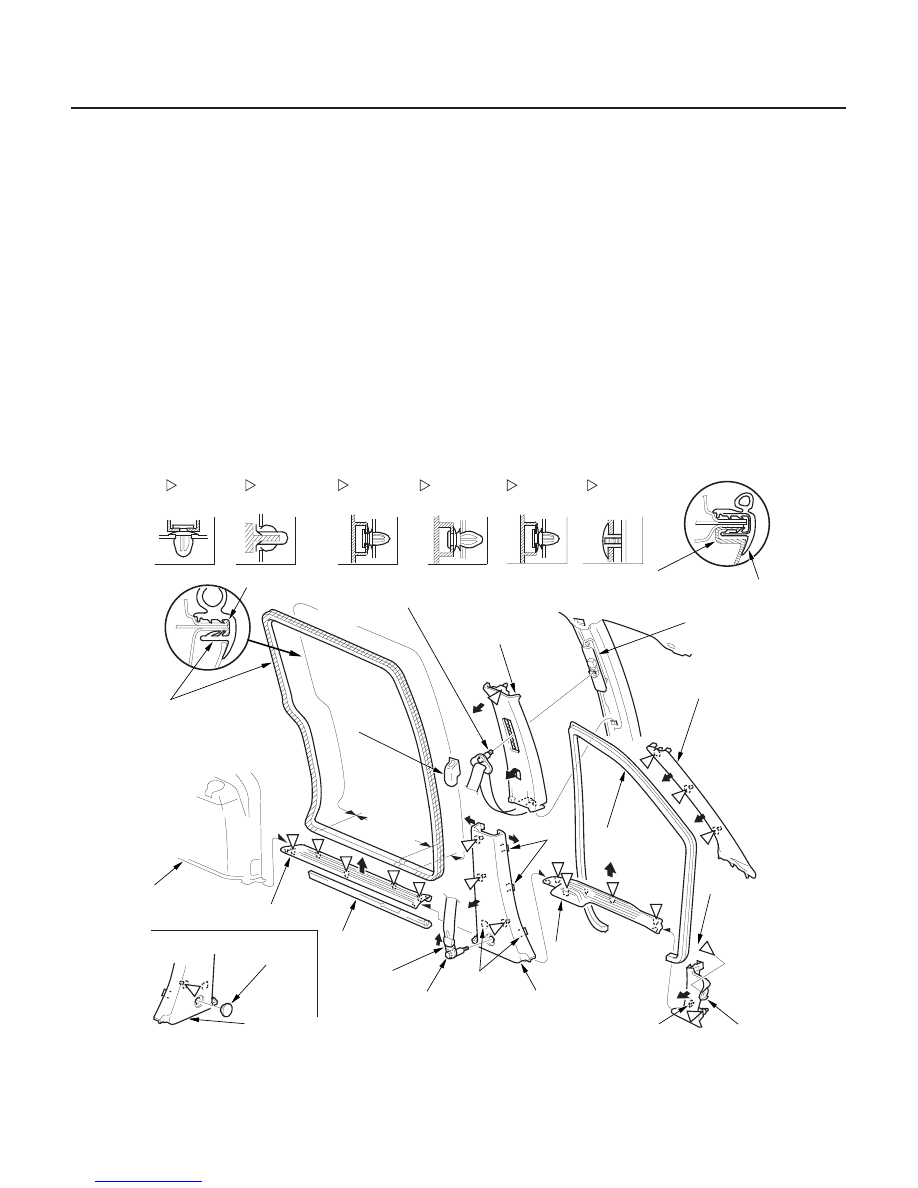
Trim Removal/Installation - Door Area

A

: Clip, 3

B

: Clip, 1

C

: CIip, 1

(White)

D

: Clip, 9

(White)

E

: Clip, 3

(Black)

UPPER
ANCHOR
COVER

SLIDING DOOR
OPENING TRIM

SLIDING DOOR
SILL TRIM

CENTER PILLAR
UPPER TRIM

FRONT SEAT BELT
SHOULDER ANCHOR
ADJUSTER

FRONT DOOR
OPENING TRIM

FRONT PILLAR TRIM

FRONT DOOR
SILL TRIM

CENTER PILLAR
LOWER TRIM PANEL

A

Portions

FRONT SEAT BELT UPPER ANCHOR BOLT
7/16-20 UNF
32 N·m (3.3 kgf·m, 24 lbf·ft)

Fastener Locations

FRONT SEAT BELT
LOWER ANCHOR BOLT
7/16-20 UNF
32 N·m (3.3 kgf·m, 24 lbf·ft)

SLIDING DOOR
LOWER
WEATHERSTRIP

REAR SIDE
TRIM PANEL

D

D

A

B

A

A

A

A

A

A

SEALANT

3600 mm
(141.7 in.)

D

D

D

LOWER ANCHOR
COVER

F

: Clip, 1

D

D

D

C

700 mm
(27.6 in.)

’03-04 models

GROMMET

RIGHT CENTER PILLAR
LOWER TRIM PANEL

HOOK

DOOR OPENING
TRIM

KICK PANEL

E

E

E

D

F

NOTE:

• Put on gloves to protect your hands.
• When prying with a flat-tip screwdriver, wrap it with protective tape to prevent damage.
• Take care not to bend or scratch the trim and panels.

1. Remove the trim as shown.

2. Install the trim in the reverse order of removal, and note these items:

• Replace any damaged clips.
• Push the clips into place securely.
• Apply liquid thread lock to the anchor bolts before reinstallation.
• Before installing the anchor bolts, make sure there are no twists or kinks in the seat belts.
• Before installing the sliding door opening trim, fill the bottom of the channel with clear sealant in the area

indicated by the arrow.

Remove the sliding door
lower roller.

Remove the fuel fill
door opener knob.

03/07/29 10:01:42 61S0X050_200_0060

*02

S0X4A00J26273400000KDAT14

[ ]

[ ]

[ ]

[ ]

Sealant: Cemedine P/N 08712-0004, or equivalent

20-59

Trim Removal/Installation - Rear Side Upper Area

Fastener Locations

: Clip, 1

(White)

QUARTER GLASS
OPENING TRIM

SEALANT

TAILGATE
WEATHERSTRIP

HOOKS

HOOKS

RIGHT REAR PILLAR TRIM

LEFT REAR PILLAR TRIM

A

A

A

Portions

HOOK

QUARTER GLASS
OPENING TRIM

QUARTER GLASS
OPENING TRIM

UPPER ANCHOR
COVER

SECOND ROW SEAT BELT
UPPER ANCHOR BOLT
7/16-UNF
32 N·m (3.3 kgf·m, 24 lbf·ft)

REAR SIDE
TRIM PANEL

SLIDING DOOR
OPENING TRIM

A

SECOND ROW SEAT
BELT SHOULDER
ANCHOR ADJUSTER

QUARTER PILLAR TRIM

1193 mm
(46.97 in.)

20 mm
(0.8 in.)

: Clip, 6

(Black)

A

B

B

B

B

B

B

B

A

NOTE:

• Put on gloves to protect your hands.
• When prying with a flat-tip screwdriver, wrap it with protective tape to prevent damage.
• Take care not to bend or scratch the trim and panels.

1. Remove the trim as shown.

2. Install the trim in the reverse order of removal, and note these items:

• Replace any damaged clips.
• Push the clips into place securely.
• Apply liquid thread lock to the anchor bolt before reinstallation.
• Before installing the anchor bolt, make sure there are no twists or kinks in the seat belt.
• Before installing the quarter glass opening trim, fill the bottom of the channel with clear sealant in the area

indicated by the arrows.

Pull the upper portion of
rear side trim panel back,
as necessary.

Pull the upper portion of
rear side trim panel back,
as necessary.

Remove the quarter glass
attachment pin.

Pull the upper portion of
rear side trim panel back,
as necessary.

03/07/29 10:01:43 61S0X050_200_0061

*03

S0X4A00J26273400000KDAT15

[ ]

[ ]

[ ]

20-60

Interior Trim

Trim Removal/Installation - Rear Side Lower Area

TAILGATE
WEATHERSTRIP

THIRD ROW SEAT BELT

LEFT REAR SIDE TRIM PANEL

CARGO NET HOOKS

REAR TRIM PANEL

B

B

B

QUARTER GLASS
OPENING TRIM

A

SLIDING DOOR
OPENING TRIM

LOWER ANCHOR
COVER

SLIDING DOOR
SILL TRIM

C

B
(Except Van)

CARGO NET
HOOK

BRAKE LIGHT
FAILURE SENSOR
CONNECTOR

RIGHT REAR SIDE
TRIM PANEL

LOWER
ANCHOR
COVER

THIRD ROW SEAT BELT
LOWER ANCHOR BOLT
7/16-20 UNF
32 N·m (3.3 kgf·m,
24 lbf·ft)

THIRD ROW SEAT
STRIKER COVER

REAR ACCESORY
SOCKET CONNECTOR

A

Portions

SECOND ROW SEAT BELT
LOWER ANCHOR BOLT
7/16-20 UNF
32 N·m (3.3 kgf·m,
24 lbf·ft)

SCREW
6 x 1.0 mm

A

A

A

A

A

A

A

A

A

A

A

Fastener Locations

A

: Clip (Black)

Left side, 8
Right side, 9

B

: Clip (White)

Except Van, 8
Van, 6

C

: Clip

Except Van, 2

B

B

B

C

A

HOOK

OPENING TRIM

SCREW

SCREW

NOTE:

• Put on gloves to protect your hands.
• When prying with a flat-tip screwdriver, wrap it with protective tape to prevent damage.
• Take care not to bend or scratch the trim and panels.

1. Remove the trim as shown.

• To remove the rear side trim panel, remove the speaker grille and rear speaker (see page 22-161).
• When removing the side trim panels, be sure to remove the mounting screws behind the rear speakers.
• Be sure to disconnect the rear accessory socket and brake light failure sensor connectors when removing the

left rear trim panel.

2. Install the trim in the reverse order of removal, and note these items:

• Replace any damaged clips.
• Push the clips into place securely.
• Apply liquid thread lock to the anchor bolts before reinstallation.
• Before installing the anchor bolts, make sure there are no twists or kinks in the seat belts.

Remove third seat belt through the
slit in the side trim panel.

Remove the jack cover.

For ’01-04 models except Van:
Remove the third row
child seat tether anchor.

03/07/29 10:01:44 61S0X050_200_0062

03

S0X4A00J26273400000KDAT16

20-61

Trim Removal/Installation - Tailgate

Fastener Locations

: Screw, 2

A

A

A

A

A

TAILGATE UPPER TRIM

LEFT TAILGATE SIDE TRIM

RIGHT TAILGATE SIDE TRIM

LOCK ROD

ACCESS CAPS

GRAB HANDLE

A

A

A

A

A

A

A

A

A

A

A

A

B

B

ROD HOLDER

TAILGATE TRIM PANEL

A

B

: Clip, 2

: Clip, 22

A

A

A

A

A

NOTE:

• Put on gloves to protect your hands.
• When prying with a flat-tip screwdriver, wrap it with protective tape to prevent damage.
• Take care not to bend or scratch the trim and panels.
• Take care not to bend the lock rod.

1. Remove the trim in the sequence shown.

• Tailgate upper trim
• Left tailgate side trim
• Right tailgate side trim
• Grab handle
• Tailgate trim panel

2. Install the trim in the reverse order of removal, and note these items:

• Make sure the top of the lock rod passes through the hole in the trim panel.
• Replace any damaged clips.
• Push the clips into place securely.

03/07/29 10:01:45 61S0X050_200_0063


Content   ..  352  353  354  355   ..