Honda Odyssey 2004. Manual - part 300


  Index      Honda     Honda Odyssey 2004 - service repair manual 2004 year


Search            


Content   ..  298  299  300  301   ..


Honda Odyssey 2004. Manual - part 300


01

13

12

S0X4A00D14300014801MCAT00
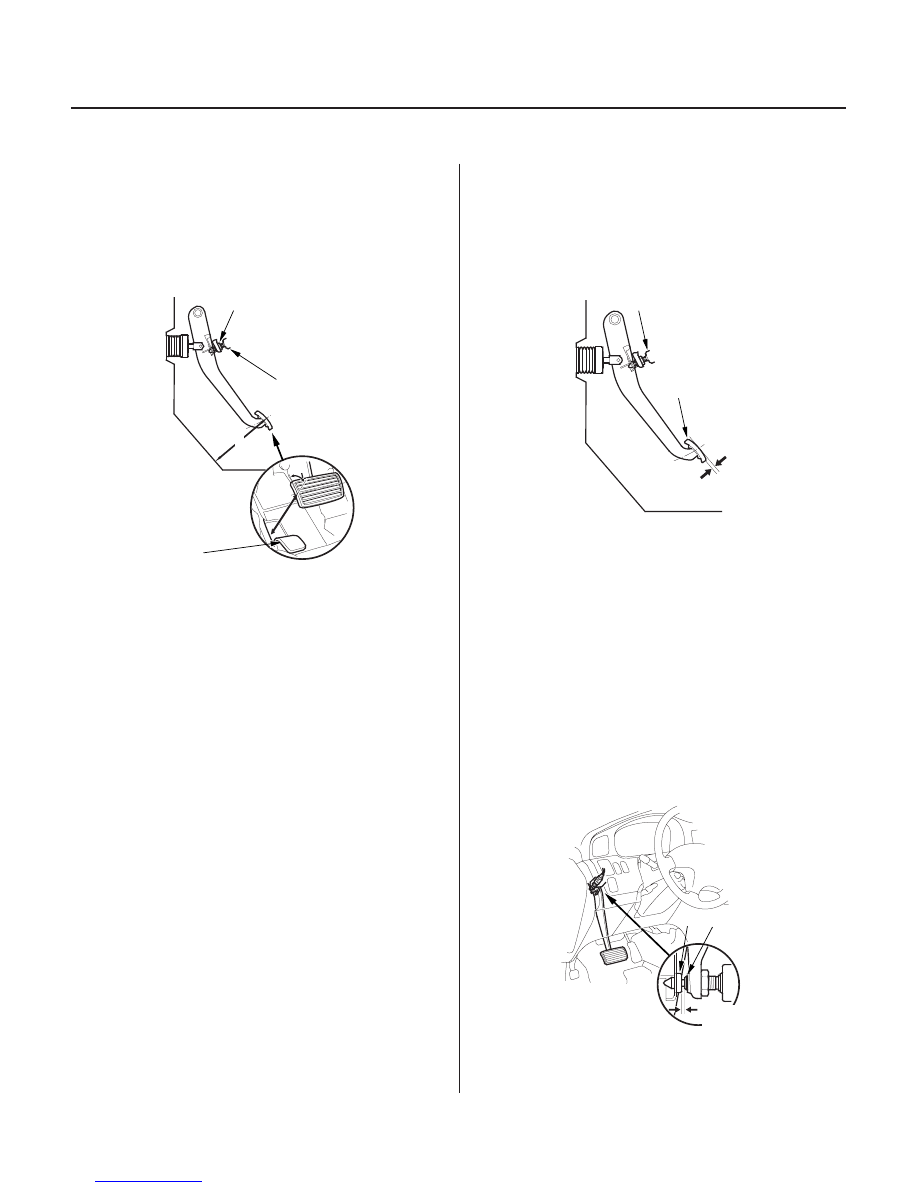
Pedal Height

Standard Pedal Height (with carpet removed):

164 mm (6 7/16 in.)

Pedal Free Play

Free Play: 1

5 mm (0.04

0.20 in.)

Brake Pedal Position Switch Clearance

19-6

Conventional Brake Components

Brake Pedal Height Check and Brake Pedal Position Switch Adjustment

A

B

E

D

C

C

B

A

B

A

0.3 mm
(0.01 in.)

1. Disconnect the brake pedal position switch

connector, loosen the brake pedal position switch
locknut (A), and back off the brake pedal position
switch (B) until it is no longer touching the brake
pedal.

2. Pull back the carpet and the insulator cutout (C).

Measure the pedal height (D) from the middle of
the left side of the pedal pad (E).

3. With the engine off, inspect the pedal free play (A)

on the pedal pad (B) by pushing the brake pedal by
hand.

4. If the pedal free play is out of specification, adjust

the brake pedal position switch (C). If the pedal free
play is insufficient, it may result in excessive brake
drag.

5. Screw in the brake pedal position switch until its

plunger is fully pressed (threaded end (A) touching
the pad (B) on the pedal arm). Then back off the
switch 3/4 turn to make 0.3 mm (0.01 in.) of
clearance between the threaded end and pad.
Tighten the locknut firmly.
Connect the brake pedal position switch connector.
Make sure that the brake lights go off when the
pedal is released.

03/07/29 09:53:48 61S0X050_190_0006

01

03

S0X4A00D00060800000MCAT00

Check

Adjustment

Pedal locked clicks:

Rear drum brake type: 3 to 5
Rear disc brake type:

4 to 6

Rear drum brake type: ’99-01 models

19-7

Parking Brake Check and Adjustment

B

A
Pressed with
294 N
(30 kgf, 66 lbf)

A

1. Press the parking brake pedal (A) with 294 N (30 kgf,

66 lbf) of force. The parking brake pedal should
travel within the specified number of clicks (B).

If the number of pedal clicks is excessive, adjust the
parking brake.

2. Check the rear brake shoe self adjuster, and make

sure the brake shoes are properly adjusted.

1. Raise the rear of the vehicle, and support it with

safety stands in the proper locations
(see page 1-15).

2. Tighten the adjusting nut (A) until the parking

brakes drag slightly when the rear wheels are
turned.

3. With the parking brake pedal properly adjusted, the

parking brake should be fully applied when the
parking brake pedal is pressed 3

5 clicks.

(cont’d)

03/07/29 09:53:49 61S0X050_190_0007

03

01

02

Minor Adjustment

Major Adjustment (to be done when
replacing parking brake shoe and after lining
surface break-in)

Rear disc brake type: ’02-04 models

Rear disc brake type: ’02-04 models

19-8

Conventional Brake Components

Parking Brake Check and Adjustment (cont’d)

A

A

B

C

A

1. Raise the rear of the vehicle, and support it with

safety stands in the proper locations
(see page 1-15).

2. Tighten the adjusting nut (A) until the parking

brakes drag slightly when the rear wheels are
turned.

3. Back off the adjusting nut in half-turn increments,

and check for proper adjustment (4

6 clicks) at a

pedal force of 294 N (30 kgf, 66 lbf).

1. Raise the rear of the vehicle, and support it with

safety stands in the proper locations
(see page 1-15). Remove the rear wheels.

2. Release the parking brake, and back off the

adjusting nut (A).

3. Remove the access plug (A).

4. Turn up the ratchet teeth (B) or the adjuster

assembly with a flat blade screwdriver (C) until the
shoes lock against the drum. Then back off ten
clicks, and install the access plug.

5. Do the minor adjustment procedure.

6. Install the rear wheels.

7. Do the parking brake shoe lining break-in

procedure (see page 19-34).

03/07/29 09:53:50 61S0X050_190_0008

03

04

*01

02

S0X4A00D14300000000LBAT00

Front:

Rear drum brake: ’99-01 models

Rear disc brake: ’02-04 models

19-9

Brake System Bleeding

9.8 N·m (1.0 kgf·m, 7.2 lbf·ft)

9.0 N·m (0.9 kgf·m, 7 lbf·ft)

Front Right

Front Left

Rear Left

Rear Right

BLEEDING SEQUENCE:

9.8 N·m (1.0 kgf·m, 7.2 lbf·ft)

NOTE:

• Do not reuse the drained fluid.
• Always use Honda DOT 3 Brake Fluid. Using a non-

Honda brake fluid can cause corrosion and shorten
the life of the system.

• Make sure no dirt or other foreign matter is allowed

to contaminate the brake fluid.

• Do not spill brake fluid on the vehicle, it may damage

the paint; if brake fluid does contact the paint, wash it
off immediately with water.

• The reservoir on the master cylinder must be at the

MAX (upper) level mark at the start of the bleeding
procedure and checked after bleeding each brake
caliper. Add fluid as required.

1. Make sure the brake fluid level in the reservoir is at

the MAX (upper) level line.

2. Attach a length of clear drain tube to the bleed

screw.

3. Have someone slowly pump the brake pedal

several times, then apply steady pressure.

4. Loosen the left-front brake bleed screw to allow air

to escape from the system. Then tighten the bleed
screw securely.

5. Repeat the procedure for each wheel in the

sequence shown below until air bubbles no longer
appear in the fluid.

6. Refill the master cylinder reservoir to the MAX

(upper) level line.

03/07/29 09:53:51 61S0X050_190_0009


Content   ..  298  299  300  301   ..