Honda Odyssey 2004. Manual - part 245
 

  Index      Honda     Honda Odyssey 2004 - service repair manual 2004 year


Search            


Content   ..  243  244  245  246   ..


Honda Odyssey 2004. Manual - part 245


18

19

20

21

14-374

Automatic Transmission

Transmission Removal (cont’d)

B

C

A

A

B

C

D

A

B

A

A

C

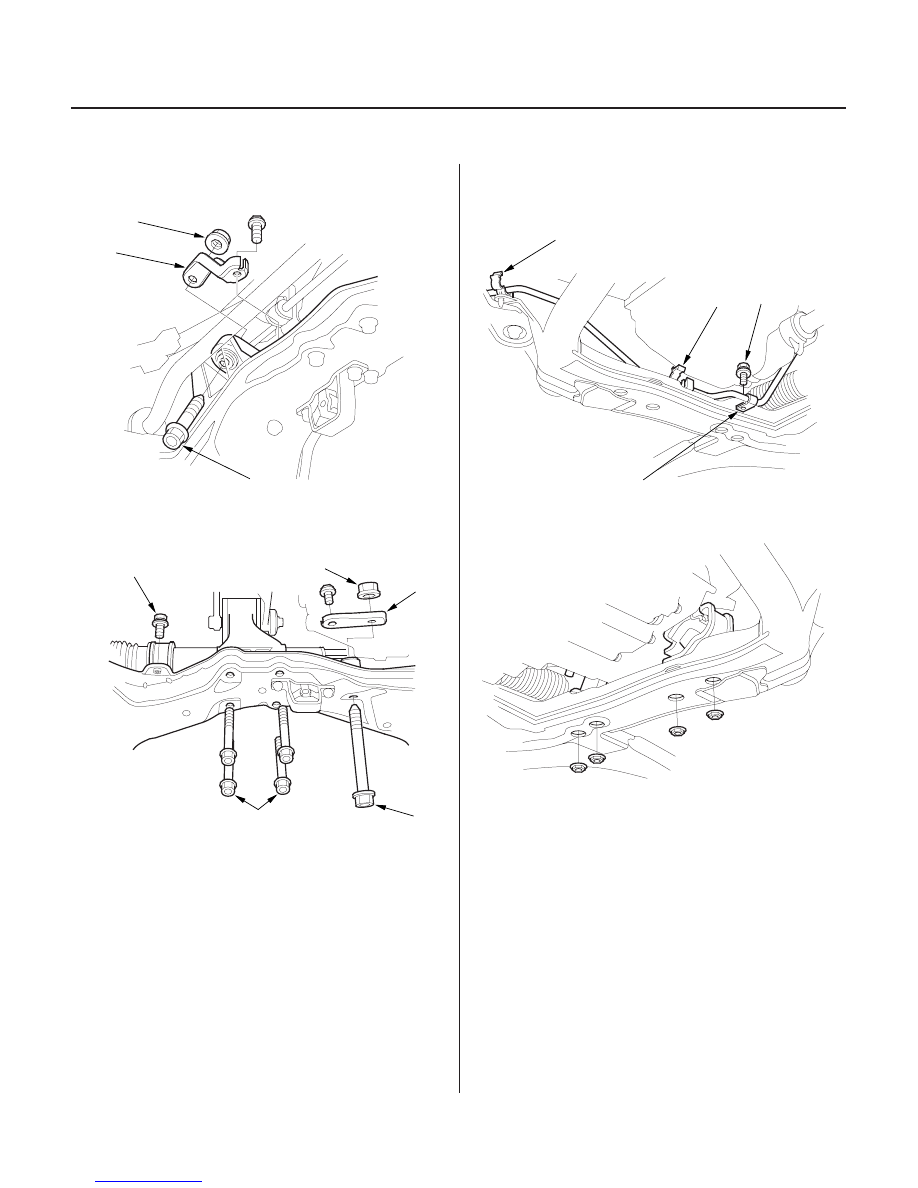
40. Remove the stiffener (A), the steering gearbox

mounting bolt (B) and nut (C).

41. Remove the steering gearbox mounting bolts (A)

and nut (B), and remove the stiffener (C).

42. Remove the rear mount mounting bolts (D).

43. Unclamp the power steering fluid line clamps (A),

and remove the bolt (B) securing the power
steering fluid line bracket (C).

44. Remove the transmission lower mount nuts.

03/07/29 09:40:26 61S0X050_140_0377

10

02

03

04

14-375

C

A

B

A

B

A

B

EQS07AODSY0

A

EQS07AODSY0

B

C
54 N·m
(5.5 kgf·m, 40 lbf·ft)

45. Make reference marks (A) on the body across the

marks (B) on the edge of the front subframe (C).

46. Loosen the four bolts (A) holding the adjustable

arms (B) of the front subframe adapter (T/N
EQS07AODSY0) to its center plate.

NOTE: The adapter is designed to be used with the
Honda transmission jack (model number LSL-
W93714) or powertrain lift (model number OTC-
1585), both available through the Honda Tool and
Equipment Program. It will also work with most
commercially available transmission jack.

47. Line up the slots in the arms with the bolt holes on

the corner of the jack base, then attach the adapter
to the jack base with the bolts (A) that came with
the jack. Tighten the bolts securely.

48. Raise the jack to vehicle height, then attach the

adapter to the front subframe by sliding the
adapter’s nut plates (B), between the subframe and
the body.

49. Insert the nut plate bolts through the holes in the

adapter and the subframe; then thread the bolts (C)
into the nut plates and tighten them to 54 N·m
(5.5 kgf·m, 40 lbf·ft).

(cont’d)

03/07/29 09:40:27 61S0X050_140_0378

05

*05

26

27

14-376

Automatic Transmission

Transmission Removal (cont’d)

D

A

B

C

B

B

A

C

B

50. Remove the 12 x 1.25 mm bolts (A), subframe

mounting bolts (4) (B), and the stiffeners (C), then
lower the front subframe (D).

51. Remove the transmission lower mounts.

52. Pry the left driveshaft out of the differential and the

right driveshaft from the intermediate shaft (see
page 16-3).

53. Move the left driveshaft to the front side. Coat all

precision finished surfaces with clean engine oil,
then tie the plastic bags over the driveshaft ends.

54. Remove the intermediate shaft.

55. Coat all precision finished surfaces with clean

engine oil, then tie plastic bags over both ends of
the intermediate shaft.

03/07/29 09:40:28 61S0X050_140_0379

*06

12

*07

*08

14-377

B

A

C

56. Remove the front mount bracket.

57. Remove the transmission housing mounting bolts.

58. Pull the transmission away from the engine until it

clears the dowel pins, then lower it on the
transmission jack.

NOTE: If the torque converter is stuck to the drive
plate, pull it toward the transmission housing
through the starter opening.

59. Remove the shift cable cover, then remove the

torque converter assembly from the torque
converter housing.

60. Inspect the drive plate, and replace it if it’s

damaged.

61. Remove the 6 x 1.0 x 14 mm bolt (A) and nut (B)

from the shift cable cover (C).

03/07/29 09:40:29 61S0X050_140_0380


Content   ..  243  244  245  246   ..